Making crafts yourself is very useful for children, because it helps develop imagination and fine motor skills. Besides, spending time like this is always exciting and fun.
And to make spending time creating a beautiful, unique product even more interesting, connect with your baby - this way you both will get a lot of pleasant emotions and it won’t be boring.
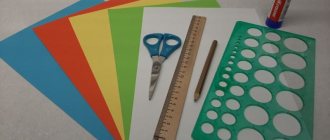
Materials for making fish applique
Before you start doing anything, it is important to find out what materials will be needed for the job.
Most crafts are made from paper, so it will become one of the main materials. You will also need cardboard, plasticine and other things that you want to use in your applications (for example: leaves, seeds or buttons).
In addition, to create interesting figures, you will need:
- Scissors;
- PVA glue;
- Pencils;
- Markers.
Undoubtedly, you should also stock up on patience, good imagination and a cheerful mood.
Fish applique using templates
It is possible to create amazing fish using templates that can act as a stencil, or as a basis for appliqué. Such blanks can be made by simply drawing a silhouette on a sheet of colored paper, or by printing a ready-made picture found on the Internet.
It's very easy and fun to use templates as a basis. The fish is cut out of a sheet, and then it can be decorated and decorated as you please.
Aquarium
The work on this craft is difficult and long. But the process is very exciting and creative. For the craft, you will need a box that will play the role of an aquarium. The size of the box for this volumetric application is chosen arbitrarily.
You will need: a cardboard box (can be a shoe box), multi-colored paper sheets, paints, a brush, scissors, glue, thread, decorative material.
The box needs to be made into an aquarium. To do this, you can paint the inside blue and the bottom yellow or cover it with paper of the appropriate color. When decorating an aquarium, it is worth showing the full flight of your and your children’s imagination.
You can take a photo from the Internet and use it to assemble a craft. For example, attach shells, pebbles or beads to the bottom, glue sequins or rhinestones (blue, silver) to the walls.
Cut algae and other aquarium vegetation from paper sheets, fabric, corrugation, or use ready-made plastic models. In addition to fish, you can add other sea creatures to the aquarium: seahorse, octopus, stingray, etc.
Templates for this must be prepared in advance and then painted on both sides or printed in color similar shapes twice and glued. Tie a string to the aquatic creatures and attach it to the top of the aquarium.
Create the impression of a real aquarium with sea inhabitants.
There are a lot of applications on the theme of the underwater world. As well as the material from which the craft can be made. These are paper, fabric, plasticine, leaves, etc. And there are a great variety of sea inhabitants.
If you show your imagination and prepare with the children, take care of the delivery of the material in advance, you can create real miracles. Thanks to such activities, children not only learn how to work, but also get acquainted with marine life.
Working together on a craft will give you fun creativity and a pleasant experience.
Geometric applique
This type of fish applique in an aquarium is perfect for kids, both younger and middle groups. During the creation process, they will not only have fun creating the product, but will also become familiar with a variety of shapes. Manufacturing consists of several steps:
- The first thing you need to do is find the right shades. The fish can be made in absolutely any color, and the background should be blue or blue.
- Four large circles are cut out of multi-colored paper for the bodies of the fish, four medium ones for the tails and a couple of small ones for the fins;
- Each circle is folded in half, and then any two semicircles of different colors are combined into one fish. After this, you can glue the remaining parts: tails and fins;
- Eyes and scales are drawn with a felt-tip pen.
You can add seaweed to the background by cutting strips of different lengths in green shades. It will be great to draw something using bright markers.
Summary of a lesson on application in the senior group on the topic “Fish in the Aquarium”
Summary of a lesson on application in the senior group on the topic “Fish in the Aquarium.”
Target:
Formation of the ability to convey in applique the image of fish, features of the shape of the body, tail (cutting out in parts).
Tasks:
— Summarize children’s knowledge about the underwater world and fish;
— Develop fine motor skills by using familiar cutting techniques (cutting circles from squares, ovals from rectangles, transforming some geometric shapes into others - a square into several triangles);
— To cultivate perseverance, independence, accuracy, to continue to build self-esteem in students;
Materials:
pictures of fish, a model of an aquarium, blanks of geometric shapes made of cardboard, scissors, glue, threads.
Equipment:
tape recorder, audio recording “The Sound of the Sea”, blackboard.
Progress of the lesson:
- Organizing time.
— Guys, listen to the sounds of nature. (Audio recording “The Sound of the Sea”)
-Where can you hear such sounds? What are these sounds? (These are the sounds of water, sea).
- Who lives in the sea? (Fish, shells, jellyfish, etc.)
- How can you call them in one word? (Marine life)
—What can you call the world in which sea creatures live? (Undersea world)
— Leopold the cat claims that we can admire the underwater world without leaving home, what do you think? (children's answers)
House made of glass, with water,
There is a small garden in It. And shells here and there, Fishes live in the house. What kind of house is this, children?
Who will answer the riddle... (Aquarium)
— Has Leopold the cat prepared a gift for us so that we can admire the underwater world without leaving the group? (There is a model of an aquarium on the table)
— You can go to the aquarium right now and admire the underwater world. (The aquarium is empty, there is no one there).
- What do we do? (Make paper fish yourself).
2. Main part
- Look at the pictures with fish, let's take a look? How are all fish alike? (They have a body, tail, fins)
- Right. What shape is the body? (Oval)
- What shape can the tail be? (Triangular)
- What kind of fins do the fish have? (Triangular, oval, round)
- How many fins do fish have? (Two)
- How are fish different? (Color and shape of tails and fins)
— Today we will make paper fish in order to place them in our aquarium.
— In front of you lie cut out geometric shapes (rectangles, large squares, small squares). What do we need to do with the rectangles to get an oval for the body of the future fish? (The rectangle has rounded corners)
- What will we do with the large square to get a triangle - the tail of the fish? (fold the square diagonally and cut along the fold line)
— How to make a circle of small squares to make an eye for a fish? (Let's cut off the corners of the square)
- Great! We glue the finished figures together and get a fish, thread a thread into each fish and attach it to the aquarium.
— Before we fill the aquarium with fish, let's stretch our fingers.
Finger gymnastics
The fish swims in the water . Two palms together depict swimming movements.
The fish have fun playing. Clap your hands
Fish, fish, mischief, clap their hands
We want to catch you. The palms are clenched into a fist one by one.
The fish arched its back, a smooth movement with each palm.
I took a bread crumb. Grasping movements with a “pinch”.
The fish wagged its tail, Smooth converging and diverging movements with both hands.
She quickly swam away.
—
Now our fingers are ready to work. I am sure that with your abilities you will be able to make very colorful and colorful fish, which we will place in our aquarium. Let's get to work.
Practical activities (
The audio recording
“The Sound of the Sea” plays)
(The children begin to cut out. I check whether all the parts are cut out, whether the structure and location of the parts are correctly conveyed. During independent activities, I give the children advice, if necessary, I provide assistance).
3. Summary of the lesson.
- Look what a wonderful sea corner we have created for you! All the fish turned out different, bright, interesting.
— Did you like the lesson?
— What was the most interesting?
— Was it difficult? What was the most difficult?
“I’m pleased with everyone’s work today; everyone did their work with great passion and interest!”
Application using origami technique
Older children (from older groups, for example) can try themselves by making an applique of a fish in an aquarium using the origami technique. There is a huge number of different schemes that are easy to find on the Internet.
They vary in degree of complexity, which means it is quite possible to choose something for yourself. Here is a simple option that your child can definitely repeat:
- Take a square of colored paper and make folds along both horizontal lines, as well as in half;
- Then unfold and fold so that the fold in the middle is inside a pair of triangles with a common vertex;
- Fold the corners from the sides of one of the triangles overlapping towards the middle. This will serve as a tail
All that remains is to turn the product over. You can decorate the fish however you like, the main thing is not to forget to draw an eye and a smiling mouth.
Aquarium fish
This task is for the older group of kids, but younger children can also cope with it with the help of adults.
You will need: a white piece of paper or cardboard, a set of multi-colored double-sided paper, glue, yellow and blue paints, a sponge (you can take it for dishes), scissors, ready-made self-adhesive eyes (sold in craft stores).
You can take cardboard or a white piece of paper and paint the background blue and yellow. This way you can differentiate between the sandy bottom and the water in the aquarium. Children can do this entire procedure with a sponge. They will like this kind of work. Next comes the work of preparing the blanks.
Fish can be cut out of colored paper according to a prepared template or sketches. Also do everything with algae, cutting them out of a green leaf, corals from brown or pink, and pebbles can be multi-colored.
To make the composition sparkle with bright colors, you need to distribute the details on the dried cardboard.
Such a fun craft can be placed in any room, and it will cheer up both children and adults.
Fabric applique
For such a composition you will need fabric of different colors and templates according to which the parts will be cut out. Each part is cut out very carefully with scissors, because you need to work with such material very carefully.
When all the elements are cut out, glue them as planned onto a cardboard sheet or fabric base.
To diversify the composition, it’s great to glue sequins, rhinestones, small beads and similar little things.
Volume applique
Despite the fact that the volumetric craft seems complicated, it is quite simple to make:
- Take a red or tan sheet of cardboard and draw a fish on it. Then cut it exactly along the contour. This is a blank for a future product;
- From double-sided paper in the colors you like, cut many narrow strips of the same size, and then glue the ends of each;
- All glued strips must be attached throughout the base, placing them evenly one after another. Only the head should remain free;
- Once the striping is complete, begin decorating the fish's head. Make a bunch of balls from scraps of napkins and paste them over the desired areas. The eyes and mouth are made in the same way.
This product looks quite unusual and unique.
Application from paper strips
This fish craft is no less beautiful and is perfect for kids. To construct one, you will need to cut out a blank that serves as a base from a sheet of multi-colored cardboard. One of them - a semicircle - is glued to the paper.
The remaining material must be cut into a bunch of thin strips. All of them are glued in half and then attached to the product blank. The second blank, which is a smaller semicircle, will become the fin. Eyes and other necessary details are drawn with a felt-tip pen.
After all the above steps have been completed, you can give free rein to your imagination and come up with something of your own, original. This way your fish will turn out to be even more interesting and will not be like any other.
Accordion-shaped applique
This fish applique from colored paper is also easy to make yourself, and besides, the result will definitely please you. And to achieve it, you need to do the following:
- Take a regular rectangular piece of paper and fold it in half. Then, along the fold line, carefully cut it into a pair of identical parts;
- Fold the resulting part like an accordion, but do not go all the way to the end. Carefully trim off any remaining excess edges;
- Now that the most basic things have been done, you can make the remaining necessary parts from paper of different colors. Therefore, cut out the mouth, eyes, tail, and fins.
All that remains is to glue all the parts together, and then decorate the craft by painting it with felt-tip pens.
MAGAZINE Preschooler.RF
Lesson summary on application on the topic: “Underwater Kingdom”Prepared by: teacher of the first qualification category S.N. Podymova Municipal budgetary preschool educational institution Child Development Center - kindergarten No. 14 “Jolly Bells” , Moscow region, Ozyory, 2020
Target:
- teach the ability to work with colored paper, decorate templates with various pieces of paper to convey the expressiveness of the image
- develop technical skills in working with paper, creativity, emotional perception, interest in the process and result of the application
- foster a sense of collectivism, co-creativity, and joy in the overall result.
Materials and equipment:
For each child: outline image of fish, colored paper, glue, brushes, hand napkins. Pictures "Fish" .
For parents: Whatman paper, various items, corrugated paper, candy wrappers, pebbles, plasticine for preparing the seabed for fish.
Progress of the lesson:
Emotional mood: On the left is a friend and on the right is a friend -
Let's hold hands tightly
And let's smile at each other.
Q: I have an envelope in my hands, there is a letter in it:
— We, the inhabitants of a magical underwater kingdom. We ask for help. We were bewitched by a sea octopus, and now we have become sad, ugly, pale, and cannot swim or frolic. Magic spells can be broken by completing 3 tasks.
Q: Guys, let’s help the inhabitants of the underwater kingdom?
D: Let's help.
Q: Task 1: name the sea creatures
D: Fish, jellyfish, turtles, starfish, octopuses, crabs, seahorses, plants...
Q: What is the sea like?
D: Quiet, calm, stormy, running, cold, warm, transparent.
Q: Task 2 help the fish become beautiful: decorate them. To do this, use colored paper. It can be torn off, crushed, twisted into flagella or balls. But first, let's see what the fish were like before the octopus enchanted them.
Q: And there is also a task for our guests: And you will prepare an underwater kingdom for our beautiful fish.
View illustrations.
Q: Task 3, launch them into the underwater kingdom (glue them onto whatman paper of the underwater kingdom).
All works are hung against a common background.
- Oh, guys, look how the fish sparkled, became cheerful, swim, frolic, play. Let's play too.
The fish splashed happily in the clean, light water. Either they will shrink, they will unclench, or they will bury themselves in the sand.
(Connect the fingers alternately from the index finger to the little finger and back.
Twist hands forward and backward.
They squat, twisting their torso.)
| Next > |
Plasticine fish
Probably everyone will like this method because of its simplicity and fun. And the end result will be a delicious goldfish. To create this underwater inhabitant you need:
- Make a base for a future application. To do this, use yellow and red plasticine;
- Next, you will need to roll out many small balls and flatten them into circles;
- The plasticine that you will have left after completing the previous steps will need to be rolled out into narrow strips;
- Next, you need to take a blue cardboard piece and mark the silhouette of a fish on it, after which you should surround its outline with circles of red shades;
- The inside of the body itself is surrounded by yellow circles. And the tail and fins are lined with thin stripes;
- An eye is also made from plasticine, which is then attached to the required location.
Once everything is ready, start decorating the background. Make seaweed, rocks, shells and other desired items from plasticine to complete the fish applique. Small pebbles or shells can be taken, even real ones, if such, of course, are available.
Use all your imagination, think through the whole composition. This way the product will look even more interesting and original. Once all the work is completed, you can place the craft in a prominent place so that it adds uniqueness to the overall atmosphere of the house and pleases the eye at any time.
Applications from other materials
If desired, you can use any available material. If you take something not quite ordinary, the product will turn out much more interesting. Here are some examples of simple crafts made from a variety of materials.
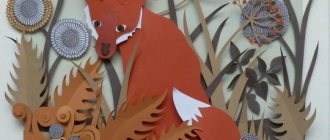
From leaves
Crafts made from autumn leaves are quite popular and loved. This is because the colorful leaves themselves are beautiful, and when they are folded into a certain composition, they become even more beautiful.
Such products add coziness when they serve as decoration in the home, and also bring a lot of positive emotions and give a good mood. In addition, anyone can handle this craft, as it is not at all difficult to create.
In order to make such an applique, you will need colorful autumn leaves. Before work, you will need to prepare them - rinse them under a weak stream of water, dry them and put them in a thick book so that they dry and straighten.
If you don’t have time to wait for the leaves to dry and straighten out in the book, you can dry them using an iron.
The basis is a piece of cardboard of any color you like, onto which a large orange leaf is attached. This will be the body of the fish. Other leaves, colored red, will become fins and a tail.
After completing the craft, decorate it with various twigs and other natural materials. You need to add algae and other seabed objects to the background.
From seeds, cereals, or pasta
Making fish from seeds is not at all difficult. You just need to follow these steps:
- Select a piece of cardboard of any shade and draw the outline of the future fish on it;
- Take glue and generously coat the entire area inside the outline;
- Now you can stick seeds, cereals, or pasta onto the glue, thereby building the fish itself. It is important to do this carefully so that the product turns out neat and tidy;
- After this, attach an eye made of paper or plasticine. Fins and tail can also be cut out of colored paper of any color.
This application is very interesting and will probably appeal to many children due to its unusual nature.
From buttons
You can make such a figurine yourself using ordinary buttons. You will need a template that is easy to find on the Internet, or you can draw it yourself.
It is painted in any color you like, and then buttons are selected to match it. Then, very evenly and carefully, each of them is glued to the base. This creates a voluminous and wonderful figure. And the remaining buttons are suitable for decoration.
Now that you have learned about so many ways to make your own fish, you can try each of them with your little one. Both he and you will enjoy spending time together doing such an exciting, useful and fun activity.
Conducting a lesson
When planning a lesson, you need to take into account the speed of the children’s work, as well as the time allotted for the lesson. In the preparatory group, the recommended duration of continuous educational activity (CED) is 30 minutes. The logical blocks of the lesson can be as follows:
- organizational stage (1 minute): children get into a working mood, greet the teacher;
- motivational stage (5–7 minutes): children are offered an interesting story, a plot that awakens interest in the topic of the lesson;
- explanation stage (5–7 minutes): the teacher explains to the children exactly how to perform the application;
- dynamic pause (1 minute): light warm-up;
- independent work (15 minutes): with the help of a teacher, children complete the application;
- summing up (3–5 minutes): organizing an exhibition of children's works, discussing the results.
Motivational start of the lesson
A significant part of the success of the lesson depends on the interest of the children. For motivation you can use:
- fairy tales and cartoons about fish, based on which children will make applications (“Finding Nemo”, “Goldfish”, “The Little Mermaid”, etc.);
- an aquarium in a living corner: for example, the teacher tells the children that their fish is sad because it doesn’t have enough friends. Pupils can help her if they make an applique with a lucky fish in a circle of relatives;
- short videos about wildlife, which tell about the amazing kingdom of fish;
- riddles about fish, for example: “Parents and children have all their clothes made of coins” (answer: fish).
Table: example of a lesson summary on the topic “Goldfish in an aquarium”
| Purpose of the lesson | Creating conditions for expanding children’s understanding of aquarium fish, for children to complete a plot application on the theme “Goldfish in an Aquarium” using existing skills and abilities in working with paints and scissors. |
| Tasks |
|
| Methods and techniques | A visual demonstration of working methods, a story, practical activities of children, questions for children. |
| Materials | White A4 cardboard, yellow and blue gouache, sippy cup, bristle brush No. 24, paper napkins for brush dipping, scissors, glue stick, strips of green colored paper, squares of yellow colored paper, illustration of a goldfish. |
| Preliminary work | Reading the fairy tale by A. S. Pushkin “About the Fisherman and the Fish”, designing a fish using the origami technique. |
| Motivational start | The teacher offers to guess the riddle: She always lives in the water, and she swims all day long. It wears fins on its back. They are beautiful and light. (answer: fish) Educator: that’s right, it’s a fish. Fish, guys, are animals whose bodies are covered with scales. Fins help to move in the water, and with the help of gills, fish breathe oxygen. The tail serves as a rudder and is the engine of the fish. Nowadays, people love to keep fish in their homes. Educator: Guys, where can a fish live in the house? (answer: in an aquarium) The teacher shows the children an empty aquarium. Educator: What shape is this aquarium? (children's answers). Guys, it’s boring to look at an empty aquarium, what needs to be done to get a fish to live in it? (children's answers). Yes, the fish needs water, algae, sand and pebbles. Goldfish are one of the most beautiful and popular aquarium fish. The teacher, raising his hand and bending it horizontally in front of his chest, shows wave-like movements with his palm, inviting the children to start working: swim fish, swim gold. |
| Explanation stage | The teacher suggests cutting out a round aquarium from a sheet of white cardboard along the drawn outline. And together with the children he discusses the possibility of filling the aquarium with water and sand at the bottom: the children come to the conclusion that the easiest way to do this is with paints (sand - yellow, water - blue). Make the fish using the origami technique, and cut the seaweed from green paper. |
| Independent work stage |
|
| Dynamic pause (performed in the middle of independent work) | “Fish” The fish swims in the water, the fish has fun playing. (with their palms folded together, children depict how a fish swims) Fish, fish, mischief! (they shake their finger) We want to catch you. (they slowly bring their palms together) The fish arched its back, (with palms folded together they depict how the fish swims) She took a bread crumb. (make a grasping movement with both hands) The fish waved its tail, the fish quickly swam away. ("floating" again) |
| Final part | At the end of the lesson, make an exhibition of works. Educator: guys, do you like our goldfish? (children's answers) What was the most interesting or difficult thing in your work? (children's answers). Well done to all of you, now you will have your own goldfish at home. |
| Source | Vladimirova L. https://www.maam.ru/detskijsad/konspekt-nod-po-aplikaci-v-podgotovitelnoi-grupe-na-temu-zolotaja-rybka-v-akvariume.html |
Depending on the speed of work, the child can make either one or several fish in his aquarium
Gallery: examples of finished works
Fish can also be made from painted pebbles, complemented by fins and tails made of feathers
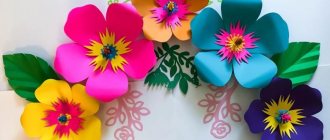
Colored paper is suitable for making fish using the origami technique
Small round fish can be made from plastic bottle caps
From individual children's works you can create a whole large aquarium for the entire group
Bright paper baskets will not only add volume to the fish, but are also suitable for simulating scales
A tail made of garlands will create the effect of a fish moving
Fish can be made from seashells, adding plastic or plasticine eyes and fins
To create bright and beautiful scales, you can use shiny paper or candy wrappers
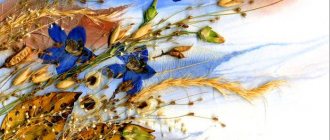
From natural materials such as dried leaves and herbs, you can create an entire underwater world
Pasta is suitable for simulating scales on the body of a fish
From plasticine you can make not only the fish itself, but also algae and pebbles
A stylish and at the same time laconic composition can be made from straw
Felt is an incredibly convenient material for cutting out appliqué pieces.
You can use old CDs as a basis for the body of the fish.
Video: three-dimensional application “Fish” in various techniques
Video: applique made of colored paper “Fish”
Video: origami fish
Gallery: templates for applications
Using this template, the fins are cut out in an arc and bent to add volume.
To add volume, we make cuts along the tail of fish and crabs, roll them into a cone and fix them with glue. A simple template, convenient for transferring to paper or fabric
In addition to fish, children can fill the aquarium with other sea creatures using a template.
There are various options for creating a fish using the origami technique, and the simplest of them are suitable for older preschoolers. In some cases, shells can be drawn using a template on a background for applique
You can put not only fish in the aquarium, but also other marine life
The result of a successfully conducted lesson on applique aquarium fish will be a beautifully designed stand with works, as well as satisfied children who have learned a lot about the world of underwater inhabitants and about techniques for working with different materials.