If you like to make things with your own hands, then you may bring back whole bags from your vacation to the coast with shellfish shells and small pebbles that you collected on the beach.
Souvenirs made from them will remind you of your vacation, and the process of working on them will give you creative satisfaction.
In this article you can get ideas if, for example, your child needs a sea craft for kindergarten, or if you just want to enjoy the creative process.
Even if you don’t have natural materials, it doesn’t matter. Crafts with a marine theme can be made from more affordable materials.
Materials for working on a marine theme
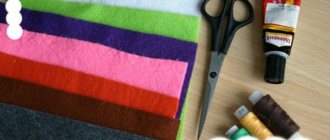
All the crafts proposed in this article are very easy to make; they do not require any very rare or expensive materials. Most of them can be bought at a stationery store, and shells and pebbles can be collected on the beach or, if this is not possible, purchased at a souvenir store.
Everything you need for each specific souvenir will be listed separately.
Sea of paper
You will need: a sheet of blue double-sided cardboard, a simple pencil, scissors, colored cardboard, glue.
Master Class
- Fold a sheet of cardboard in half.
- Draw waves with a pencil and make cuts as shown in the image.
- Straighten the cardboard so that the waves alternate one on each side.
- Cut out small fish, jellyfish and algae from colored paper.
- Glue sea creatures to the waves.
- Make a boat out of paper and glue it to the top wave.
The paper sea is ready!
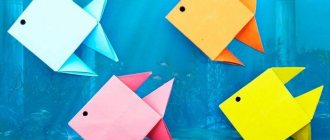
DIY Fish craft
And finally, another option for making paper fish. Girls will especially like this method, because with slight hand movements the finished fish can change color.
Cut out the silhouette of a fish from a sheet of colored paper (see photo).
Fold the workpiece in half and make horizontal cuts.
Cut thin strips from colored paper of other colors and start decorating the fish.
How to make a fish out of paper. Application made from colored paper using a fish template. Paper fish
Is your child already familiar with where and how fish live? What do they eat, what types are there? Not yet?! Then it's time to introduce your baby to the amazing underwater world. And to make the acquaintance not only educational, but also fascinating and unusual, we suggest you make these bright and fun themed children’s crafts on the theme of Pisces.
Application using the “Goldfish” template (Master class)
Applique is a very useful activity for children. They learn to use glue and scissors, practice accuracy, imagine by combining colors in a picture, develop hand motor skills and abstract thinking. Working with bright colors and creating images from small details is also good fun for children over 4 years old.
To create an application you will need:
Creating an application using a template includes several stages:
1. Take one of the simple fish stencils and outline the details, prepare cardboard templates for the child.
Fish pattern details
2. Find thick cardboard for the background and several sheets of colored paper. First, outline the body of the fish, cut it out and glue it to the cardboard. Make the tail and fins the same color, carefully glue them next to each other.
Glue the body and tail
3. Make the scales - this is the most interesting part of creating a goldfish. Trace the prepared template, and on it with a simple pencil, draw several scales, placing them evenly over the part.
Drawing scales for cutting
4. After cutting out the scales, bend them at a right angle. Apply glue to the part and glue it on top of the fish. The scale will add volume to the future craft and a touch of originality. Unusual crafts are a guarantee that your child will be interested in working with you.
Glue the fins and the part with the scales
5. Of course, a fish needs an eye. After cutting out a circle from white paper, place it proportionally on the heroine of the applique. Make a pupil out of black paper in the same way. Next is a matter of taste and flight of fancy.
Glue the eye
6. Decorate the background. You can also cut out seaweed or stones from colored paper.
Glue the details in the form of algae and stones
The goldfish is ready. This is how easy it is to make a little sea creature from colored paper. Your child will definitely enjoy working with bright sheets of paper, and the templates for the golden sea lady will simplify his work.
Light and beautiful origami paper fish - a simple pattern for children
Everything is very simple! It is very easy to repeat a similar design according to the instructions. You just need to stock up on squares of colored paper, a plastic eye and a felt-tip pen in advance.
Fold the square along two horizontal lines and in half.
Expand the square. And fold it again so that the fold in the middle of the sheet is inside two triangles with one vertex.
We bend the side corners of one triangle to the middle with an overlap. It turns out to be a fish tail.
We turn the structure over. Glue the eye and draw a smile.
As you can see, everything is very simple. You don't even need to cut anything.
Source
This option is more complicated, but more interesting:
A few more simple patterns for children:
Craft “goldfish” made of paper and thread
And with the help of this technique we can even make our own. Goldfish so that it fulfills all wishes. You just need to take “golden” threads: yellow, red, orange.
Cut out a fish-shaped piece from thick paper or cardboard. Don't forget to cut out the round eyes separately.
We make deep cuts on the tail.
We wrap the fish with yarn.
To get exactly the goldfish, choose threads of appropriate shades. It will look beautiful if we take threads in several shades.
Glue the eye and the fish comes to life!
Our golden and most magical fish turned out great! And most importantly, the work is very simple, kids can do it.
Author
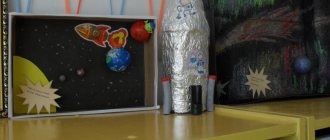
Underwater world in a bottle
You will need: plastic bottle, water, blue food coloring, sunflower oil, fish, shells, pebbles, stars, glitter, cocktail tube, funnel.
Master Class
- Fill a third of the bottle with water.
- Add a few drops of dye and mix it thoroughly with a straw.
- Throw shells, fish, glitter and pebbles into the bottle.
- Pour the oil into the bottle through a funnel.
- Close the lid tightly.
The underwater world in a bottle is ready! I recommend watching this video!
Volumetric applique “Fish in an aquarium”
Bright and nimble waterfowl attract all children, so they will definitely love the voluminous applique “Fish in the Aquarium”. But the fish themselves in this work are quite complex. Therefore, if children are small, it is better to make simple multi-colored fish in a flat form. You also don’t need to make a very small aquarium, since making small fish using this technique is quite problematic, especially for children.
How to make an aquarium out of paper?
Draw a round aquarium on a white piece of cardboard and cut it out. Don't make it very small, because small voluminous fish are very difficult to make.
Place the aquarium on the blue paper and circle it. And then draw a parallel inner line next to it, since the water should follow the contour of the aquarium, but be slightly smaller. Draw a wavy line at the top. Cut out the water.