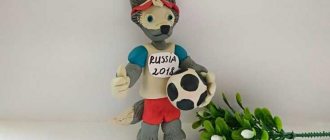
The national folk toy is the heritage of our ancestors, passed on to us through the craft skills of the masters of the past. This is a unique combination of folk, arts and crafts and artistic creativity.
Toys usually differ in their type, what materials they are made from and how they are made. It can be considered very important that the toy is directly connected with the household and labor details of a person, with religious customs and rituals.
Figures of people, animals and objects are part of the educational process and social adaptation to the lives of children.
Symbolism of Russian folk crafts
Our toy is not only colorful, and its images delight both children and adults, but also carries symbolism. The crafts of living beings or objects made from clay or wood contain meaning. Each figure carries its own information from the past:
- The rooster symbolizes sunlight. Apparently because this bird wakes up before everyone else and informs the world about the arrival of a new day.
- The goat is a symbol of fertility and unpretentiousness.
- The rocker is a symbol of balance in the family. And since it was mainly female representatives (girls, girls, women, grandmothers) who carried water with a rocker, the mistress of the house had to be responsible for the family balance or harmony.
- An ax is a symbol of protection from diseases and other troubles.
Preview:
“The importance and content of the art corner in groups.
Registration and storage of children's works"
(teacher, Eva Vrezhovna Yaralyan)
Slide No. 2: Creating a fine arts corner in a kindergarten group promotes an environment for children’s creative activity and promotes the emergence and development of independent artistic activity in preschool children.
Slide No. 3: Modern design of a fine arts corner in a kindergarten may consist of setting up an exhibition of children’s drawings in the locker room and a corner with materials, visual aids, colorful drawings and thematic attributes directly in the group.
Let's first consider the design of the corner in the group.
Slide No. 4: The most important thing is that the art activity corner, the developmental environment in the kindergarten, should be located in a visual, optimal, convenient, accessible place for children. It is important that children feel like owners of toys, have free access to artistic and creative materials. A prerequisite is a high level of design and aesthetics, as well as flexible and expanded use of the organized space of the corner.
Slide No. 5: Fine art corners in kindergarten help create optimal conditions in the group for the development of visual activity, independence and creative activity of children. Children get the opportunity to express themselves in various types of artistic and design activities, get acquainted with the world around them, learn the properties of objects, colors, correlate the concepts “object-color”, etc.
Slide No. 6-13: It is recommended that in the corner there should be a table with a lid or an easel, all kinds of paints, brushes, paper of different formats and textures, sponges, cloths for hands and hands, paint palettes, jars for water, aprons, materials for modeling, in general, everything that will contribute to the artistic development of the child. If possible, it is better to place materials in a closet or special bedside table.
Slide No. 14-15: For clarity, reproductions, paintings, portraits of artists, arts and crafts, folk art (haze, Gzhel, Khokhloma) should also be placed in the corner. There it is also necessary to place various didactic games to introduce children to various directions and genres - still life, portrait, landscape; with painting, graphics, decorative and applied arts, architecture; with flowers and their shades.
Slide No. 16: The teacher needs to introduce children to the corner of fine arts:
1. Tell about its structure and direct purpose,
2. Teach children to look at pictures, creative materials and other attributes only there;
3. Tell the children the rules to follow regarding the iso-corner:
Take albums, reproductions, portraits only with clean hands;
Flip carefully;
Do not tear, crush, or use for games;
After looking at it, always put the book or picture back in its place.
Slide 17: Before you start decorating, think about what you will place and where, what component you cannot do without. Achieve aesthetics and relevance in design.
Slide No. 18-19: To summarize: the main and important conditions for the design of iso-corners for all kindergarten groups are:
1. Optimal location of the visual arts area: accessibility, aesthetics, mobility, safety;
2. Using notes of a “child’s hand” in design;
3. Availability of works of art, compliance with age requirements;
4. Availability of visual material: variety, age requirements, accessibility;
5. Availability of equipment for drawing, modeling, appliqué;
6. Don’t neglect working with color and lines;
7. Use of various techniques of visual creativity, compositions;
8. Presence of folk arts and crafts;
9. Demonstration of various genres of painting, clay samples; artistic handicrafts;
10 Organization of work with children outside the area of artistic and aesthetic development - long-term plans.
Slide No. 20: The design of the corner may be different for each teacher. The main thing is an individual approach, clarity, and compliance with age norms. The rest depends on the creativity and imagination of the preschool teacher.
Let's consider the issue of design and storage of children's work.
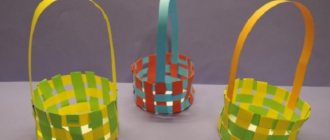
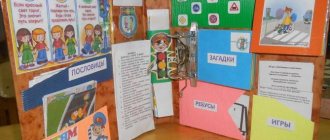
Slide No. 21-26: In order to introduce parents to the creativity of their children, exhibitions of children's works should be arranged in the locker room or in close proximity to the exit from the group room. Design options can be very diverse. For example, you can offer an option where crafts are displayed on a stand, perhaps with paths made of fishing line, on which drawings are hung using paper clips and other improvised materials.
Larisa Savchuk
Hello, dear colleagues! I bring to your attention an option for decorating a corner of fine arts
.
In the new school year, my
students and I moved to a new group, and since this only happened on September 10 and the school year had already begun, it was necessary to urgently
arrange
the play and learning areas.
There was no time to think for a long time, there was no time to make anything special, and I had to quickly design my art corner
in a matter of days. And here is the result.
I cut out pictures from colored self-adhesive wallpaper: rainbow, sun, palette, etc.
I made funny blots from thick transparent film and self-adhesive wallpaper. The idea of making blots was borrowed from
Wooden toys
Toys sawn, planed or assembled from various elements are best made from hard wood:
- Apple tree,
- pear,
- oak,
- birch,
- pine (any conifer).
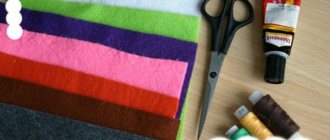
In addition to measuring tools and a pencil, you will need:
- hacksaw,
- plane,
- hammer,
- screwdrivers,
- glue gun
To connect the structural elements you will need:
- nails,
- screws,
- wood glue,
- silicone glue.
If crafts are made by cutting, then soft varieties of trees will be required. Basswood is a great wood to cut. For this work you will need wood carving tools:
- knife,
- straight and semicircular chisels,
- gravers (narrow semicircular chisel).
Where to arrange an exhibition corner and what needs to be taken into account?
Traditionally, the design of a corner in a kindergarten can consist of several components: the design of an exhibition of children's drawings in the locker room and a corner with materials and visual aids in the group room. However, experts consider it optimal to organize an art studio in a separate room, or to use temporarily free ones - a locker room, a hall, a corridor, and so on.
Our creativity
The developmental environment for visual arts is located in any place convenient for children. It is important that children feel like owners of toys and have free access to art materials and visuals. A prerequisite is a high level of design and aesthetics, as well as flexible use of preschool and preschool space. An exhibition of children's works is most often arranged in the locker room or near the exit from the group room in order to introduce parents to the creativity of their children. It is designed in the form of a stand, most often with tracks made of fishing line, on which drawings are hung using paper clips.
Clay toy
To work with this material, you need to understand what kind of clay there is, and there are two types: mountain and polymer.
Mountain or natural clay has several colors depending on the presence of iron, minerals and salts:
- Red. Holds temperature perfectly. In nature it is brown in color with a greenish tint.
- Blue. It contains many minerals and salts. A very good cosmetic product.
- White. The most affordable of natural clays. In nature it has a dirty dark gray color. It turns white after firing.
The artificial material for modeling is polymer. It has very important properties: heat resistance and ductility.
This type of technologically new material may require firing after modeling and may have the ability to harden on its own.
To work with this interesting product you may need the following accessories:
- Stable and level table.
- A cloth for wiping hands.
- Gloves if you suddenly have to mix the clay yourself.
- Apron.
- Small knife: stationery or pocket knife.
- Molds for applying patterns. They can not only be factory-made, but also be made from improvised materials.
- “Sandpaper” from zero to five.
- Rolling pin for rolling out clay. Any housewife can find it.
- Decorating products.
Creativity corner for children of senior preschool age article (senior group)
GBDOU kindergarten No. 7
Krasnoselsky district of St. Petersburg
Senior teacher
Tushevskaya Olga Valentinovna
"Creativity Corner"
The subject-development environment is organized so that every child has the opportunity to freely do what they love. Placing equipment by sectors (development centers) allows children to unite in subgroups based on common interests. A rich subject-developmental and educational environment becomes the basis for organizing an exciting, meaningful life and all-round development of each child. The developing subject environment is the main means of shaping the child’s personality and is the source of his knowledge and social experience.
When creating a “creativity corner” the following tasks are solved:
- Create an atmosphere of emotional comfort
- Create conditions for creative self-expression
- Create conditions for the manifestation of children’s cognitive activity
- Create favorable conditions for perception and contemplation, draw children’s attention to the beauty of nature, painting, arts and crafts, book illustrations, music
A “creativity corner” in the senior group can be created under the motto “Feel – Cognize – Create.” It presents:
Materials for artistic and aesthetic activities, their variety:
- Paints (watercolor, gouache), plasticine, pencils, wax crayons, colored paper of various formats and textures, cardboard, brushes (squirrel or kolinsky) thin, medium and thick; rags for hands and hands, paint palettes, aprons, sippy cups for water, modeling materials.
- Easel
- Literature on art, postcards and albums for viewing. Reproductions, paintings, portraits of artists, small sculptures, works of decorative and applied art (haze, Gzhel, Khokhloma and others).
- Various didactic games for familiarization with: genres - still life, portrait, landscape; with painting, graphics, decorative and applied arts, architecture; with flowers and their shades.
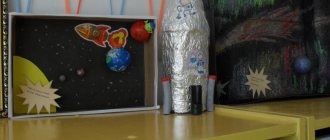
- Natural and waste material
- Musical instruments, toys, technical equipment
- Games and attributes for theatrical performance. These are not only materials characteristic of the theater (screens, dolls, costumes, and so on), but also some materials for familiarization with the environment, fiction. There are also “theatres” and characters made by the children themselves during art classes. Theatricalization includes: table theater, sets of dolls, costumes, books, materials for decorations.
Materials for educational activities
- Nature calendars, collections
- Sensory Education Materials
- Visual material, games, aids to familiarize yourself with the world around you
- Fiction and encyclopedic literature
- Didactic and educational games
- Educational games, technical devices and toys, models, items for experimental research work - magnets, magnifying glasses, springs, scales, beakers, etc.; a large selection of natural materials for studying, experimenting, and making collections
- Table for experimenting with water and sand
The “Creativity Corner” is located in a well-lit and accessible place, where students in their free time draw, sculpt, do appliqué work, explore, and transform themselves into fairy tale heroes. It is a place for children's self-development. The group in the “Creativity Corner” combines various types of activities: drawing, modeling, familiarization with musical instruments, theatrical performances, research and experimental activities, work with natural materials, and familiarization with literature.
The “Creativity Corner” is always an actively working area that helps preschoolers develop an interest in making their own crafts, inventing fairy tales and stories, and studying science.
The creativity corner in kindergarten allows you to create optimal conditions in the group for the development of visual activity, independence and creative activity of children. Children get the opportunity to express themselves in various types of artistic and design activities, get acquainted with the world around them, and learn the properties of objects.
Matryoshka
This Russian doll is no less popular than Barbie. And doing it yourself will not be difficult.
From cardboard
To make a matryoshka doll from cardboard you will need:
- Red cardboard.
- Set of multi-colored paper.
- Markers.
- Scissors.
- PVA glue or glue stick.
- A simple pencil.
Making the preparation:
- Draw a blank on the wrong side of the cardboard and cut it out.
- We make a scarf from yellow paper (or any other color you like). To do this, place the blank on a colored sheet and trace only the upper part.
- Cut out the scarf and paste it onto the top of the matryoshka doll.
- We cut out a circle from white paper and heat this circle onto the top of the future matryoshka doll. Next we draw the face.
Decorate the nesting doll with a flower:
- Cut out a square from colored paper.
- Fold it diagonally several times.
- Using scissors, round off the ends.
- We unfold the flower and heat it onto the matryoshka doll.
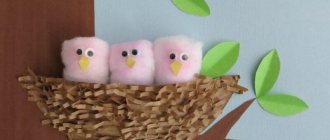
Beaded birch
To make this craft you will need:
- Green beads.
- Wire thickness from 0.3 mm to 1 mm.
- Threads.
- Alabaster.
- PVA glue.
- Acrylic paint and brush.
Getting the job done.
- We put beads on the wire and twist them into a loop. You need 15 such blanks.
- We connect the branches together.
- We form the trunk.
- We take any container.
- We dilute alabaster with glue and water in the following proportion: 2 tbsp. spoons of alabaster, 1 tbsp. spoon of glue, dilute with water, leave everything for 12 hours.
- We paint the branches of the trunk with this solution.
- Apply black paint to the dry white paint.
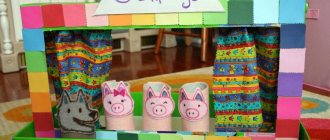
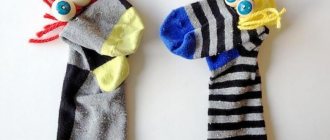
Folk themed rag dolls
To bring such a doll into the world we will need:
- Fabric size: forty by fifteen centimeters (white, variegated and plain).
- A small “rag” for an apron, ten by eight centimeters.
- We will use the yarn to make hair.
Stages of making a doll:
- We make the body. Place padding polyester on a piece of white fabric and fold the fabric in half.
- Head. We make a twist at the end and secure it with thread.
- Hands. Fold the fabric in half and tie the edges.
- We fasten the body and arms with thread. Using thread we make a cross-shaped pattern on the chest. This will connect the arms and body. We wrap her belt. We tighten the thread.
- Create an underskirt. Folds form on plain fabric. We fasten the skirt with threads. We put a skirt on the doll
- Attach an apron and belt. We tie the fabric for the apron with a thread to the front (front) part of the doll.
- Making hair. We wind the yarn onto thick cardboard in several layers, then cut the yarn from one edge. Align the bun and secure it to the head.
The above examples are not all that is in the tradition of making “Russian folk toys”. With this article I wanted to attract as many people as possible to the study of native traditions, rituals and the history of Russia in general.