The puppet theater is an amazing show for children. With him, the child enters the magical world of a fairy tale, where dolls come to life: they appear from behind the screen, take the stage, and tell stories.
Children love not only to watch, but also to participate in the performances themselves. And that's great! This game develops the child’s speech, his ability to empathize, and distinguish between good and bad deeds.
Trying on this or that role, the child learns courage, resourcefulness, empathy, and proper relationships with peers and adults.
We do it ourselves
There are probably a hundred types of theater. Wall-mounted, floor-mounted, mounted, table-top, you can’t count them all. Manufacturers of children's toys offer a huge selection of sets.
But how great it is to be craftsmen yourself, to create your favorite characters from different materials. Perhaps the heroes of a particular work are not yet on sale, but you can create them and enjoy the work you have done.
Universal cap for masks
It's easy to do:
- Cut strips of paper or cardboard,
- wrap one strip around the child’s head, connect the ends so that one overlaps the other slightly, glue or fasten with paper clips.
- On the main strip, two strips are glued crosswise to create a dome-shaped shape.
- Glue the second strip slightly above the main one in a circle. We put Velcro on the front of the cap, the bottom and top stripes.
A cap with Velcro, and masks of various animals, birds, insects, fairy tale characters, vegetables, fruits, berries, also with Velcro, depending on your desire and mood, you can easily change the pictures on such a cap.
It is convenient to store the masks in a box; you can take them out if necessary.
Felt figures
Felt is a great find for crafts.
Felt pictures will look good on a flannel board. Heroes of fairy tales, surrounding pictures of forests, rivers, fields, household items - everything can be depicted from felt.
Finger Theater
A double character pattern is made. Two blanks are sewn together, the place for the finger is left unsewn, details are added depending on the character being depicted. The theater is ready. It is soft and pleasant to the touch. Funny characters and recognizable fairy tale heroes will delight children.
Stuffed Toys
Felt toys are a job for craftsmen. But if you decide to make a doll or animal from this material, you will conquer your child forever:
- Make patterns of body parts and sew each one;
- carefully and evenly fill with cotton wool;
- make the doll's eyes, sew the mouth;
- sew the parts correctly;
- Then make an outfit for the doll.
This is painstaking work and requires patience. The child can provide all possible assistance.
Paper
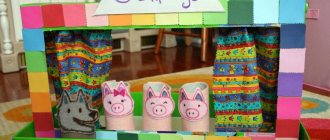
This is the easiest way to make a do-it-yourself puppet theater.
Option 1
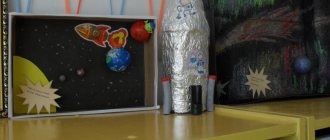
Draw fairy tale characters on a piece of thick paper. Cut them out and glue them on the wrong side onto cocktail tubes, ice cream sticks, and pencils. Cut out the front side of a children's lunch box to make a screen. Make a slot in the lower part where sticks with heroes will be inserted.
Attach a ribbon to the top of the box and the theater is ready. The child can hang the box around their neck or on a doorknob and perform the show.
A master class will help you create such a theater:
Option 2
Glue together a tube from paper - the torso of a theatrical character. The size depends on whether the doll will be worn on the hand or on the finger.
Glue the muzzle/face elements onto the tube.
Option 3
You can take ready-made toilet paper tubes and decorate them using colored paper.
Knitted theater
If you know how to knit, don’t be lazy and give your baby a nice gift. Knit small cute figures of a grandfather, a woman, and a pockmarked hen; bear, hare, and fox. Put it on your finger and act out the story with the main characters.
These figures are convenient to take on the road, for a walk, or in the garden. They are small in size, do not wrinkle, do not break, are easy to wash, and are quite durable, unlike paper ones.
Shadow theater
Here's what you need to try:
- We cut out one wall from the open box and glue a screen of white paper in its place.
- We cover the sides of the screen with white strips of paper.
- At the bottom of the screen on the inside, one strip is designed to hold decorations that can be changed by the puppeteer.
- We draw ourselves or download images of characters from a fairy tale from the Internet, for example, “At the Order of the Pike.” Emelya, princess, pike, king, stove.
- We make the figures strong, glue them onto cardboard, and cut them out.
- The color is not important, the main thing is that the material does not show through.
- We come up with scenery: the royal chambers, a well, Emelya’s house.
- At the bottom of each figure and decoration there is a rectangle, it is intended for attaching a stick with which the doll will be moved.
- While the story is going on and the figures are moving, the corresponding decorations are installed at the bottom of the screen.
- We place a lamp on the table between the screen and the narrator, so that the lamp shines on the screen from the inside.
Such performances are fascinating, there is a sense of mystery in them.
The same principle of the shadow theater from the designer. Place decorations from parts, use them to strengthen a white sheet of paper, turn on the lamp behind the screen, move the figures using a long part on which the toy is placed. For example, a dog ran out, barked, sniffed a tree, and ran away. The director voices the characters.
You can make separate arms, legs, and a head for the character, and attach them to wires so that the figures can move.
Non-traditional types of theater
In addition to the usual materials for puppet theaters, alternative types can be used.
These can include plastic and wooden spoons. Images of characters are drawn or attached to them. When painting on plastic, you should use acrylic paint. If you have to paint with gouache, it is mixed with a small amount of PVA glue.
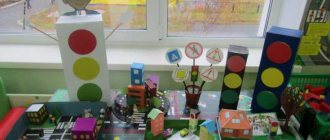
Interesting options are made from yogurt jars and plastic bottles. They are covered with colored paper, images of characters are attached and fragments of scenery are added. The results are voluminous mini-stories. Such figures do not require additional decorations and develop children's imagination.
Playing theater is a useful and interesting activity. It improves memory and develops oratory skills. The child learns to retell the text, highlight the main points, not be afraid of public speaking, and parents have the opportunity to discern the child’s talents.
Magnetic Theater
Such a theater will undoubtedly win the hearts of children and even adults. Therefore, you can try to make it yourself.
Magnetic pictures
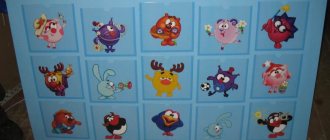
Any fairy tale can be drawn on cardboard, painted, and a flat magnet can be glued to the back of the figure. These fairy tales are shown on a magnetic board. In accordance with the narrative, the figures are superimposed, moved, and put aside.
Tabletop Magnet Theater
A magnetic theater made of cardboard is made differently: the prepared figures are held on a cardboard stand, to which iron clips are attached:
- The big box is a stage and needs to be decorated.
- On the narrator's side, the box should be open so that the magnet can be conveniently moved under the “stage” to move the figures on the stage.
- In accordance with the words, the figures move straight, to the side, and turn.
- For example, in the fairy tale “Who, the Rooster and the Fox,” the scenery of the cat’s house is displayed on one side, the scenery of the forest on the other, the cat gives instructions to the rooster, turns and goes into the forest to hunt, the fox waits at the house, the figures are double-sided, with a muzzle on one side cat, with a tail on the other side.
Such unusual actions arouse curiosity in children; they are interested in both the fairy tale and the properties of the magnet, and want to participate in the performance themselves.
Theater made of paper and cardboard
Figures made of paper and cardboard can be easily turned into a fairy tale: simple execution, accessible, varied, cheap material.
Well-known and popular Russian folk tales, tales of famous writers, can be brought to life with the help of paper, glue, and scissors.
Pictures on the wall
Let's start with theater on flannel. You need a board covered with flannel, character figures can be made from ordinary paper: white, colored, even wallpaper, draw the characters, stick them on cardboard, so they will last longer:
- You can use ready-made figures cut out from old books and printed on a computer.
- Stick adhesive tape, flannel, or velvet paper on the back of the picture so that the picture holds well.
- Don't forget about the scenery: house, grass, sun, clouds, trees, and so on.
- You can hang lace along the edges of the board - it will look like a curtain.
Adults can show such fairy tales with pictures, and children themselves willingly join in the game.
Finger Theater
Characters for the theater can be made from small paper cones, cylinders where the figures will be attached, or the figure can be glued to a cardboard ring that fits on your finger:
- You can also fasten a paper double image of a person or animal with paper clips, leaving a hole for your finger.
- The main thing is that the foundations stick well to your fingers. “Kolobok”, “Teremok”, the heroes of the poems “Toys” can be shown to very young children. Older brothers and sisters may be involved in the show.
- Children from the age of two can already try to use such a craft themselves, put it on one finger, and voice it.
For such a game, you can use a screen, houses, and trees in the shape of fingers where the toys will rest. For example, a bird flew in and sat on a tree.
Other crafts for fingers
Using an elastic band, attach any picture without the image of legs to the back of the fingers; they will be replaced by the middle and index fingers. Such crafts can run, dance, and jump.
Children can show each other a theatrical performance accompanied by songs, poems, and dance music. For example, “Happy Geese”, “Who Jumps Better”, “Little Bunny, Come Out”. Funny and entertaining.
Cardboard table theater
They make a stage out of cardboard boxes and folders, cutting out a window, a beautiful curtain made of non-bulk materials. Everything is put on the table:
- The figures are made of double cardboard, the front and back parts of the images are glued together, placed on a stand, which can serve as a continuation of the cardboard figure, at the bottom, in the form of a rectangle.
- When gluing the parts of the craft, the lower part is left free, bent at a right angle, and placed on the table.
- Plastic bottle caps can be used as shape holders, an incision is made on the back side, on both sides, and the craft is inserted; small plywood with slots.
Paper masks
- We take measurements of the child's head.
- Draw an image on paper. For example, a bear: round head, ears, eyes, muzzle, nose. Cut out holes where the eyes are.
- The muzzle can be made from a circle of a different color, glued, and a nose can be drawn on it. On the back of the mask at eye level, glue strings on both sides or an elastic band. We put on a mask and tie the strings at the back of our heads.
- The mask can not be applied to the entire face, but only from the nose to the forehead.
- You can make a whole set of such masks: hare, wolf, fox, bear, deer, wild boar; bee, butterfly, ladybug, grasshopper; strawberry, apple, orange, cucumber, tomato, carrot.
- Use them in free games, music classes, and holidays. For example, “Autumn Harvest”, “Berry Summer”.
- You can also make a set of characters based on fairy tales and role-play them.
- If you add costumes to masks, it will be great.
Master class “Do-it-yourself cone table theater”
Hello, dear parents!
I would like to present to you a master class on making a tabletop theater at home.
Goal: Making a tabletop theater with its subsequent use in theater and play, as well as in other types of activities with preschool children.
Tasks:
— To interest and encourage parents to make a theater and then use it in theatrical activities with preschool children;
— To provide practical knowledge and skills in making a simple theater;
— Contribute to the organization of independent activities of parents;
— Attract the attention of parents to theatrical activities.
Allow me to tell you a little about theatrical activities.
Theatrical activities are the most common type of children's creativity. It is close and understandable to the child. Theater activities help develop the child’s interests and abilities; contribute to general development, speech development, curiosity, and the desire to learn new things. In theatrical activities, the child liberates himself, conveys his creative ideas, and receives satisfaction from the activity. The child has the opportunity to express his feelings, experiences, emotions, and resolve his internal conflicts. Theatrical activities help keep children's attention at a high level and, through interest, increase mental activity, helping to achieve quick and high-quality results in the development of children's creative abilities.
In my classes, I use theatrical play as a gaming technique and a form of teaching children. Characters are introduced into the lesson to help children acquire certain knowledge, skills and abilities. The playful form of the lesson helps to emancipate the child and create an atmosphere of freedom and play. In the hands of adults, a fairy-tale character is an assistant in solving many pedagogical problems. With its help, you can create playful motivation for children’s productive activities and give an adequate assessment of the child’s activities on behalf of the doll without the risk of causing offense or resistance.
Indeed, creating a theater is such an interesting and multifaceted activity that you should not waste time and effort on it.
So, we are opening a “Theater Workshop”. Today we will make a tabletop theater based on the fairy tale “The Tsokotukha Fly”
Necessary materials:
• Printout of characters and scenery for a fairy tale.
• Scissors
• Transparent wide tape
• Double sided tape
1. Print out the fairy tale characters and scenery on plain A4 office paper.
2. So that the finished figures are functional and we “laminate” them more than once, i.e. Cover with transparent wide tape on both sides.
3. Carefully cut out all the details along the contour.
4. First we glue together the parts - cones, then we glue the heads of the characters on double-sided tape, and at the end we add small details - arms, wings and other attributes.
5. A thick A4 folder or 2 sheets of thick cardboard will be suitable for the background. You can decorate plain cardboard either by coloring it with colored pencils, felt-tip pens, paints, or by covering it with colored tape. We glue 2 document files onto transparent tape, having previously cut off the side part with perforations (for aesthetics). We insert the previously prepared background for the fairy tale into the resulting pockets.
The tabletop theater is ready! The show can begin!
Master class prepared by teacher
Slastnikova Marina Anatolyevna.
Crafts from waste material
Waste material is often used to create crafts. And this time there is no need to bypass his attention either. After all, you can create a very unusual theater.
Theater made of toilet rolls
This, as with paper cylinders, results in a tabletop theater, where the character’s body is a sleeve, and we glue the character’s head, only such sleeves are much stronger, which means the invention will last longer:
- You can design the craft in a different way: draw a picture on a sheet of paper, or make an applique of a character, wrap the sleeve with a sheet of paper with the image.
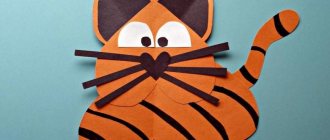
- From a soft sleeve, you can cut out animals, for example a cat: fold the sleeve into a quadrangle, draw an oval on top, and draw the legs below with three small semicircles.
- We cut along the lines, give the shape of the sleeve back, we have four legs, a tail, and a head.
- We bend the rectangle of the head downwards, cut off half, and glue the cat’s face onto this remainder. You can make different animals this way.
Plastic Cap Theater
Glue fairy tale characters onto plastic lids from jars, sour cream, and mayonnaise.
Children can draw them themselves, or they can easily download pictures from the Internet, stick them with glue or tape, or use adhesive colored paper with the picture on it.
Such tales can be shown behind a screen, or on a table.
Wine cork toys
You can make a lot of fun crafts from wine corks; they will be useful for the theater, for a regular game, or for a souvenir. You can take them with your child on the go, they don’t take up much space, and your child will be busy.
Dog
- Take two wine corks, one is the body, the second is divided into two parts, these are the head and paws. Divide the half into four parts. Glue the parts together with hot glue.
- We glue the paws to the whole cork, and place half of the cork on the top of the body.
- You can connect them with glue, wire, and a short toothpick.
- Ears, tail, nose and eyes can be made from felt, plasticine, and decorative parts.
Mouse
Cut two discs from the cork to create a body and two ears, glue the corks on the sides, pick out small details of the eyes and nose, preferably with beads. You can add wires, legs, stick them into the body, round off the sharp ends.
Hare
Divide the champagne cork into a wide part and a “leg”, this is the head and torso. We cut off a disk from the body, divide it in half, and glue it to the head. We decorate with bows, make eyes, a nose, you can draw details with a felt-tip pen.
Dolls
The upper part of the champagne cork is the head, the lower part is the torso and two feet separated by a knife:
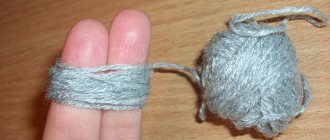
- We place hair on the head, use threads, thin rope, or yarn.
- We draw a face and decorate the doll with clothes.
- We draw a suit or dress on paper according to the size of the blank, wrap the figure in clothes smeared with glue. We design shoes.
- If there are a lot of traffic jams, then houses, trees, and furniture can be stacked here. And then put on a show with cork crafts.
Figures from cardboard boxes
This means small boxes for light bulbs, sweets, pharmaceutical herbs, tea; they must be stable on the surface.
If you look closely, you can make a good theater out of cardboard boxes, where you can show your imagination when decorating various characters for literary works:
- You can cut and paste parts from any materials.
- The craft can be moved around the table, or it can be put on the hand if the child’s hand fits.
- You can also make a cut in the place of the mouth, and then if you move your finger near the cut, you will get the feeling that the doll is talking.
Spoon dolls
There's a lot of materials used to make theater crafts, and plastic spoons haven't disappeared. This type of theater will bring great pleasure to the entire household.
Despite its one-time use, it is a fairly strong material.
Making puppets from spoons is a good leisure activity for children and parents, allowing them to experience the puppet theater at home every day.
Cheap and accessible material, easy to implement, will attract the attention of both children and adults.
Manufacturing Features:
- Faces can be painted with pink, beige gouache, or left white. Use felt-tip pens to draw parts of the face. For this purpose, you can use ready-made parts for the eyes, nose, mouth, and eyebrows.
- You can make facial details from colored paper or plasticine, but it doesn’t look particularly expressive. This is about depicting people.
- For animals, the color can be different, for example, a dog has a brown or gray muzzle, a fox has a red muzzle.
- The natural color of the spoon is also suitable, white, for example, it is quite suitable for a hare, and for all animals whose skin is white.
- You can depict fairy-tale characters from a fairy tale: a wizard, a sorcerer, a fairy, a koschey, a yaga, here everything depends on your imagination. Their faces may not be the usual color.
- You can choose disposable spoons of a different color; now there are blue, yellow, green, red, orange disposable spoons on sale. Then all that remains is to design the face.
- Or you can sculpt faces from plasticine, highlighting the details.
Dressing up the doll
It is better to sew clothes from dense fabrics: felt, drape, flannel:
- We sew the dress into a cone, leave a hole, insert a spoon into the cone (dress), glue or tie the clothes onto the handle of the spoon, for example, instead of a collar we will make a bow. We make hair from woolen threads.
- Such dolls can be placed on a special stand, in a glass, or attached to plasticine.
- If you make dolls from a strong material, such as cardboard, a conical dress that reaches the floor, then the dress will hold them.
And if you give them different outfits, turn them into kings, princesses and princes, then a fairy tale is just around the corner, and you can start a theatrical performance.
Sock dolls
Sock dolls. What people can't think of. So they came up with a theater made from socks.
But this is a wonderful idea, to turn ordinary socks into different characters, to see fun in ordinary things. And the attitude towards things will be better, children will treat clothes more carefully, try not to throw them around, not to get them dirty:
- We put a clean children's sock, white or colored, or better yet knee socks, on the hand, and where the fingers should be, we draw the eyes and mouth with marks.
- We take it off the hand and glue it along the eye marks, for example buttons. Decorative eyes are also suitable.
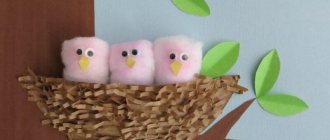
- We also make the nose from a button, bead, or pompom. It will be a cool toy.
- Just above the eyes we will make hair from a bunch of woolen threads, thin ribbons, or ropes. We glue everything with hot glue.
You can add an opening mouth to the doll; to do this, cut off exactly the place where the fingers should be:
- cut out a cardboard oval 9-10 cm,
- According to his office, we cut out two ovals from felt.
- It is better to take red or pink material, since this is the doll’s future mouth. We bend the cardboard oval in half and insert it into the sock, stretch the edges of the sock onto the cardboard and glue it to the top and bottom of the oval.
- Then we cover the mouth with red felt. The doll can talk. Besides, she is mobile.
Children play with pleasure and make up their own stories with famous characters in free games. For any production, do not forget to choose musical accompaniment that is unobtrusive, so that it serves as a pleasant background and helps you feel the essence of the work.
Theatrical activity is an activity where many tasks are solved: the development of memory, attention, imagination, speech.
Purposefulness and perseverance are fostered. Aesthetic taste is instilled. Design and other skills are being improved. There is an introduction to the professions of stage manager, costume designer, director, actor, screenwriter. Fun, funny, useful.
Puppet show
Puppet theater helps develop a child's speech, imagination, and fine motor skills. Every parent can make a home puppet theater with their own hands, especially if the kids take part in the exciting process.
A puppet theater is made from various available materials, such as:
- paper;
- disposable plastic tableware;
- felt;
- toilet paper rolls;
- socks;
- round cheese boxes.
Do-it-yourself dolls in a home theater can:
- put on a finger;
- put on the hand;
- be stationary.