Craft material
A lot of experience has been accumulated in such games. If you look at the photos of traffic crafts, you can see that making them is not difficult.
Parents will help children at home, and teachers will help children in child care institutions. Anything is suitable as a raw material: colored and white paper, cardboard, boxes, plastic bottles and their caps, old CDs, plasticine, toothpicks, tape. You will also need pencils, markers, paints, brushes, glue, and scissors.Mini city
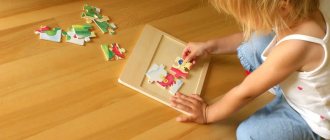
A mini model of the city can be made by parents with a child. Or it can be used as project work in the elementary grades of school or the senior group of kindergarten. Take the lid from the box. The larger and wider it is, the better.
Master class on creating a microdistrict
- On a piece of paper equal to the area of the box, we create a sketch diagram. Don't forget about houses, traffic lights and signs.
- We create houses. You can create the layout of the house yourself or take it from a design book.
- Two wide strips are cut out of black paper. This is our roadway. We glue it. From the gray we cut out four narrower stripes. This is the sidewalk. Carefully glue it too.
- A thin white dividing strip is cut out of the white one.
- Then the road marking “pedestrian crossing” is cut out. One by one, a dividing strip and a zebra stripe are glued onto the layout.
- A three-dimensional traffic light (so that it can be seen from all four sides) is made from a black scanner, onto which multi-colored circles are already glued in advance.
- The road signs we need are cut out mirror to each other.
- Now it's the turn of the houses. We glue them, creating a street and neighborhoods.
- If the boys in the class share small cars for the future city, it will be just wonderful.
Where to start
It is important to create a scenario that involves you in the creative process, and then working together will become useful and educational. Gradually, the child will remember the norms and realize that:
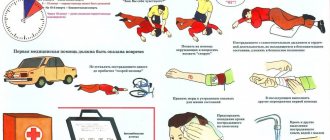
- At the “Pedestrian crossing” arrow, you must not let your guard down;
- First you need to make sure that all transport has stopped;
- when walking, look to the left, and when you reach the middle, look to the right;
- It is forbidden to play near the road, even if it is in the yard.
At what age to start
Even a small child can make DIY traffic crafts from paper or cardboard. This process not only develops hand motor skills and spatial imagination, but also brings new information.
For example, by drawing or gluing together a traffic light, a child will remember the colors of the lanterns, and with the help of an adult’s explanations, he will learn that red signals danger and one must stand, yellow means readiness, and one can go only when the light turns green.
How to make a traffic light
There are many options for manufacturing. It can be made in the form of a paper or plasticine applique on a landscape sheet or on a tube from a toilet paper roll, or on a box, for example, from a juice box.
Any available or junk means will do. A little imagination is enough to arouse the interest of a child. And then the vital rules will be remembered quickly.
How to make a traffic light with your own hands?
If you have a plumbing pipe lying around at home, and you also have shoulder straps, a cap, and a policeman’s baton, then you can make a character like this.
If you do not have such traffic police officer items, then make them from colored paper and cardboard. So, to implement your plan, take:
- plumbing pipe;
- wooden stick;
- acrylic lacquer;
- whistle;
- acrylic paints;
- cap;
- shoulder straps;
- a rod, and in the absence of this, colored paper and cardboard.
To work, you need tools such as a jigsaw and drill. Cut the pipe in half crosswise. Draw with a simple pencil where the traffic light will have facial features, red, yellow and green circles. Paint it all with paints of the appropriate colors. Make two holes with a drill at the level of the character’s shoulders, insert a wooden stick here, and glue the shoulder straps. Place a cap on top of the pipe.
Place a whistle on one hand of the character and a wand on the other.
Here's how to make a traffic light. If there are no ready-made attributes, then glue black strips onto white cardboard, roll this blank into a tube, and glue the sides from the large edge. You will have a wand. Shoulder straps are also easy to create; we cut them out of blue cardboard. If we talk about how to make a traffic light, the easiest way to do this is to cover a rectangular cardboard box with dark colored paper and glue a red, yellow and green circle on each side.
If you have a dairy box left over, this is just what you need. Cover it with black paper and attach circles of the corresponding colors to the sides. To make your child better understand that you should never cross the road at a red light, draw a sad smiley face on a circle of this color. The yellow one will have a straight mouth, while the green one will have a smiling mouth, which means an invitation to move. Hide the top of the box under a cap, which is cut out of colored paper, its parts are glued together.
If there is no such container, you can make a traffic light from a sheet of cardboard. The next photo shows how it should be cut and what dimensions it should be.
Straighten the cardboard box, cut it out, cut out the circles.
Glue black paper onto cardboard and cut out red, yellow and green squares. Glue them onto a dark base. Roll it up. Cut and glue a handle from cardboard, attach it to this roll. Insert this blank inside the glued traffic light. By turning the handle, you will change the color, thereby checking whether the children have correctly mastered the lesson about the rules of the road. The next traffic light is made of very interesting materials, for this one take:
- three laser discs;
- three juice caps;
- glue;
- lace;
- scissors;
- paints and brushes.
Let your child paint the juice caps the right colors.
If you have yellow or green ones, you don’t need to paint them. Glue these blanks to the center of the disks and connect the elements. Attach a cord of the required length to the back at the top, after which you can hang the craft. If you want to make a traffic light so that its elements are voluminous, then use the origami technique for this.
To do this, cut squares of green, yellow and red paper with sides of 5 cm, from them you need to twist the parts that are glued together.
The finished balls need to be attached to the stand, after which the work is finished. A traffic light made from plastic bags is very interesting. For this craft you will need:
- garbage bags in red, yellow and green colors;
- cardboard;
- scissors;
- colored paper.
How to make pompoms is shown in detail in the following master class.
- To do this, first cut off the handles from the bags.
- Then, starting from the outer corner, cut into a long strip, as shown in photo number 2.
- After this, you need to wrap this tape around your palm or around two identical cardboard circles, in the center of which there is a lace.
- Now the coils on the outside are cut through. If you wound the ribbon around your hand, then tie the resulting blank in the middle with a piece of plastic bag, tighten it, and tie it.
- To make a traffic light, you will tie these loose laces, thereby connecting the structure. You can glue pens and a staff from cardboard to the exhibit, eyes from colored paper, and make a cap from the same material.
If mothers know how to knit, they can make this traffic attribute from threads.
You need to knit a black rectangle with knitting needles, wrap it around a kefir or milk bag, sew it on the side, top and bottom. To fit the bottom and top, knit rectangles the same size as these sides and sew them to the main fabric.
Crochet the circles and attach them in place.
Cardboard and tinsel will also make a wonderful traffic light.
How to make a road with a barrier
To do this, you will need to cut a strip of black paper of the required width and glue it onto a piece of cardboard with PVA glue. Cut out barriers from the boxes, wrap them in white paper and paint them with red stripes.
We recommend reading:
- Craft bullfinch: detailed description of how to make a bird with your own hands (115 photos)
Crafts from vegetables: 100 photos of the best crafts for children and a review of recipes for adults
- Craft ship: 120 photos, templates, drawings and step-by-step instructions on how to make a boat
Attach to the sides. Make markings depending on the type of traffic: single-lane or two-lane. Draw and display signs. Toy cars will complement the picture.
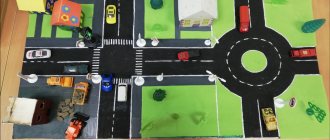
Visual aid to traffic rules for children
You will need: cardboard boxes, colored paper and cardboard, scissors, glue, markers, a pencil, a ruler, toy cars, a traffic cop.
Master Class
- Make houses and other buildings (shops, schools) by covering boxes with colored paper.
- Make windows by cutting colored paper into squares and rectangles.
- Glue windows to the facades of houses and buildings.
- Trace the windows with a felt-tip pen.
- Make building roofs by cutting a strip of cardboard and gluing it to the top of the box.
- Cut a sheet of white paper into strips 5 cm wide.
- Glue white stripes onto a black sheet of cardboard to create a zebra crossing.
- Make strips of white paper 1 cm wide - 2 central solid strips and 8 segments.
- Make a roadway out of gray or black cardboard and white stripes.
- Make trees and a traffic light from colored paper.
- Take a large sheet of cardboard on which the entire craft will be located.
- Glue the track onto a large piece of paper, then the zebra, buildings and trees.
- Place toy cars on the highway, you can put a traffic cop at the intersection.
I recommend watching the video master class!
Do-it-yourself parking for cardboard cars
as a traffic policeman
You will need: plumbing pipe, wooden stick, acrylic varnish and paints, whistle, cap, shoulder straps, traffic cop baton, jigsaw, drill, pencil, glue. If some materials are missing, don't despair! Make a staff, a cap, and shoulder straps out of cardboard by cutting the cardboard into the desired shape.
Master Class
- Cut the pipe in half crosswise.
- Draw the character's face and traffic light circles with a simple pencil.
- Paint with paints and let them dry.
- Drill two identical holes for the arms with a drill.
- Insert the stick and glue the shoulder straps.
- Place the cap on top of the pipe.
- Hang the whistle and the baton on opposite sides.
I recommend watching the video master class!
DIY traffic light. Crafts for school. Traffic light with your hands. Crafts for school.
Interest turns into knowledge
Crafts for little ones are easy to make. They are made in the form of a three-dimensional object or a flat figure.
Drawing road crossing strips together with children and placing special signs on “paper streets” will help to convey to children the law about moving across roads in strictly designated areas.
When drawing sidewalks, you should explain that they are for people only, and that you should walk on them keeping to the right. During the game, learning occurs naturally and naturally.
Miniature city
A small city can even be assembled in the lid of a cardboard box. This composition includes several roads and sidewalks, houses, a school or kindergarten, and shops. It is imperative to create intersections and pedestrian crossings.
Master class on creating one of the districts of the mini-city:
- A diagram of the neighborhood is drawn up on the lid of the box. The basis is 2 wide roads intersecting in the center of the composition.
- The roads are formed from wide strips of black paper in the shape of a cross. Narrow black stripes are fixed parallel to them - sidewalks.
- Three-dimensional houses are made from paper. Windows, doors, decor, and signs are glued to them. The most important facilities for the child are highlighted: kindergarten, school, store, playrooms, etc. The houses are fixed to the bottom of the box, forming neighborhoods.
- Trees are made from twigs, toothpicks and plasticine and installed along the street and in courtyards.
- It is advisable to allocate one of the areas for a park. Here you need to install trees, glue the surface of a small lake, and make attractions out of paper.
- The road is being marked. A dividing strip is made from a thin white strip in the center. Near the intersection, “pedestrian zebras” are marked with small white stripes.
- Crosswalks and intersections are equipped with traffic lights and the necessary road signs.
- Cars are made from plasticine or paper. You can use small toy cars.
You can make several such crafts. They are put together to create a town. The roads must be connected to ensure the “passage” of cars throughout the mini-city.
Road signs
For older children, road safety crafts are used to introduce road symbols. They are easy to prepare. After drawing on paper, cut out, glue on cardboard and make a base for them from tubes and circles.
We recommend reading:
- Crafts weapons - step-by-step instructions for making dummies of weapons with your own hands (105 photos + video)
- Crafts of the symbol of 2021: New Year's crafts and tips for choosing a holiday theme (90 photos)
Crafts: the second life of things: ideas for creating beautiful crafts from old things (95 photos)
Such material will help classify signs. The first ones carry information, the second ones make warnings, and the third ones issue a ban.
original ideas for children's crafts
In elementary school, during fine arts lessons, children often make various crafts on certain topics. A very interesting idea is the idea of crafts on the theme “The road through the eyes of children,” which is usually given as homework. And as a rule, children ask their parents for help with this work. At first glance, a simple job can turn into a complete nightmare, the reason for which is the lack of suitable ideas. However, not everything is so scary, since there are quite a lot of options for travel-themed crafts.
Studying traffic rules with the help of fine arts
It is necessary to teach a child to cross the street correctly and look around from early childhood, since on the way to school and on returning home he is a pedestrian, and therefore a participant in traffic. Therefore, it is very important that the child learns the most important road signs, and making themed crafts with his own hands can help him with this.
If your child has cars and loves to play with them, then you can make an imitation of a city from an ordinary cardboard box with buildings, roads, traffic lights and road signs, the meaning of which you should tell the child about. Just by playing with his favorite toys, the child will gradually remember their meaning.
Making the road
To create a city road, you will need a black marker, with which you need to draw two parallel lines on the bottom of the box and paint over the gap between them. Next, you need to cut out small white strips from white paper and stick them in the center of our road, resulting in road markings. To make the dummy of the city more attractive and more interesting to play with, the space on the sides of the road can be painted with green watercolors or an imitation of a lawn can be created using an ordinary dishcloth, and artificial trees can also be placed in random order.
Making a traffic light
To study traffic rules more effectively, you cannot do without a traffic light during the game. It will allow the child to remember the meaning of the signal of each color and use this knowledge in everyday life. You can make it from an ordinary shoe box, which should be covered with black paper. Next, on the front side we glue three identical circles of different colors - red, yellow and green. The final touch will be making a stand for the traffic light, for which you can use ordinary cardboard and a small piece of wood.
Don't be afraid to try something of your own and get creative. For example, if you don’t have an unnecessary box, you can make a traffic light from plasticine or bake delicious cookies and decorate them with multi-colored icing that imitates a traffic light. It will not only be interesting, but also tasty and educational. In a similar way, you can make a pedestrian traffic light, which has only two signals.
Learn road signs as you play
Any training goes better if you approach it correctly. This also applies to road signs, which are much better remembered in games. For example, if you want to teach traffic rules to a five-year-old child, then make a small album or keep a notebook in which you will paste the learned signs every day.
You can also make a board game with your own hands, during which you will tell your child about new signs and how to behave on the road. To do this, you will need a square-shaped piece of carpet, measuring 60x60 centimeters. Velcro is sewn onto the front side to imitate the road. Next, small squares are cut out of the carpet, Velcro is sewn on one side, and road signs, traffic lights, as well as pictures depicting vehicles and people are sewn on the other. Thus, just by playing a game with your child, you can instill in him the rules of the road as a child.
krasotochka.com
Behavior in transport
It is important to teach how to behave correctly in and out of transport. The behavior model is formed during the game with a layout made up of streets, cars, buses, and stops. The little people are molded from plasticine or salt dough.
The child will get a fun idea of how to get on and off the bus correctly, so that in practice the information will be consolidated and gradually become a habit.
The road through the eyes of children | Country of Masters
A competition with this name has been taking place in our Lipetsk region for as long as I can remember. There was so much to see at these exhibitions: models of roads, traffic lights, drawings, fairy tales, poems. I also did a lot, but when last year my poem and a traffic light made of pompoms did not take up anything even at the district level, I realized that something out of the ordinary was needed. So I came up with a composition called “At night near the crossing”
Pedestrian traffic lights rest under the traffic light :)
On a bench made of spatulas
Leather bound book
Side view of the entire composition
Well, once again in all its glory!
And finally - crafts from previous years. This mini-composition is made of some kind of plasticine, which dries very quickly and becomes so light and light.
View from above
“Unusual flower” made from ball plasticine - 1st place in the regional competition.
From kinder surprises