Any application that depicts animals, plants, birds is an excellent way to introduce a child to the world around him. Birds are a huge and very significant part of nature, and each of the tens of thousands of species has its own characteristics of plumage, lifestyle, and habits.
Collecting, for example, an applique of poultry in the younger group of a kindergarten is very exciting; it helps introduce children to various representatives of the feathered family.
However, such creativity will be interesting at all ages, so both parents and children will enthusiastically invent new ways of appliqué and come up with unusual, attractive plots.
Bird applications for different age groups of children
The most effective way to show how to work with appliqué is by using the example of poultry - children encounter them most often, if not in real life, then in pictures in books, in alphabet books, on blocks, etc. so it will be easy for even kids to imagine a duck or a cockerel.
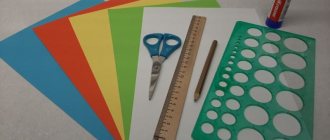
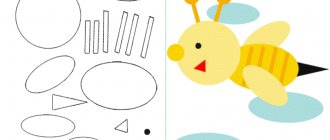
To work in the younger group, you should prepare cotton pads, sheets of colored cardboard, plasticine, paints and brushes, as well as glue and scissors with “blunt” tips.
The head or body of a bird is made from a whole disk; disks cut in half will serve for the wings or tail. These parts are glued to the cardboard in the appropriate order and painted. Paws, beak, comb and beard, and eyes are made from plasticine.
A little more complex work can be done in the middle group. To do this, you need to print out images of birds in advance, prepare cotton wool, PVA glue, felt-tip pens and paints.
First, the contours of the body, head, wings and tail are outlined with a felt-tip pen. Then small balls are rolled out of cotton wool and glued inside the outline with glue. When the entire image is filled, the cotton wool can be painted. Parts can also be made from plasticine.
An even more difficult application should be offered to children in the preparatory group. To do this, you will need rooster and hen templates, thick white sheets, paints and brushes, colored paper and napkins of different colors, scissors, a hole punch and glue.
The operating procedure is as follows:
- first you need to paint a white sheet with paints, depicting the sky, the sun, grass on it, and leave it to dry;
- a house, a roof, a fence is depicted on colored paper, after which the details are cut out and pasted onto the dried drawing;
- the cockerel and hen are carefully cut out along the contour on the template;
- napkins are torn into small pieces, from which lumps are rolled up - they can be used to glue the breasts of birds, the head;
- Confetti is prepared from colored paper using a hole punch - circles are glued like feathers on the wings and tail;
- the beard and comb of the cockerel are painted over with red paint;
- The birds are glued to the base.
The joint work of groups of different ages will look great - a large poultry yard made of appliqués made on a large sheet using different methods and materials.
Working on the image of an owl is also perfect for collective creativity. Adults should only draw the body of the bird along with the head on a large sheet of paper.
Each child should be given the task of making a feather for a bird. There is no need to dictate exactly how this should be done - let the children use their imagination. The finished feathers are collected into a tail and glued to the base.
Now you can start decorating the body and head - someone should roll balls of cotton wool or use a hole punch to make confetti from multi-colored paper, someone should stick on the decor, someone would paint the details, someone would sculpt a beak and paws from plasticine.
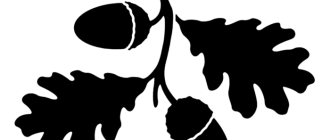
Crafts made from dry leaves
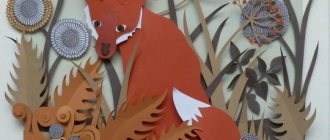
To create a firebird from dry leaves, prepare dry leaves, a glue gun, paint, and a sheet of cardboard.
- For the background, paint cardboard or use colored cardboard.
- Spread the paper and carefully arrange the leaves, and then color them.
- Now dry the leaves. Apply hot glue to the cardboard and glue colorful leaves.
- To do this, there must be an adhesive layer on the cardboard sheet, as well as spot-applied glue on the leaves.
- First, form the shape of a tail, then a larger leaf that stands out in shade - this will be the body of the firebird.
- Paws and eyes can be made from colored paper or cardboard.
- The magic bird is ready!
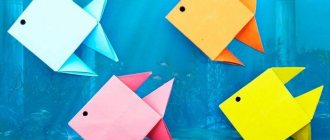
Paper bird applications
There are many options that depend on the child’s age, abilities and desire to follow a certain procedure. A little help from adults will, of course, be needed, but in general children can do a lot on their own.
You should also not limit their imagination if somewhere they want to deviate from the planned plan - after all, this is creativity, and it does not always fit into the framework.
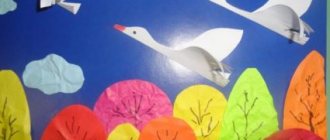
Arrival of birds
A very appropriate theme for spring, and the craft is as simple as possible:
- green (blue) cardboard for the base is prepared;
- white paper is cut into strips - these will be birch trunks; horizontal lines should be applied to them with a black marker along the entire height in different places;
- a birdhouse is cut out of brown paper, the window in it can be made of black paper, or painted with black paint;
- birch leaves are cut from green paper;
- the birds are cut out according to a template and painted (or decorated with cotton balls, confetti, beads, etc.);
- Now all the details are glued onto a cardboard base: first the birch tree trunks, then the birdhouse, followed by the leaves and, finally, the birds.
The missing parts can be painted on or made from plasticine.
Dining room for the birds
Once you start with appliqué, it may be difficult to stop, and you may end up making a real bird feeder. But first, it’s worth getting your child interested in a three-dimensional appliqué of birds on a paper feeder.
A sheet of white cardboard is prepared. Using the “wet” watercolor method, you can apply the blue sky and thawed patches in the snow to it. By the way, if you take initially blue cardboard, you can simply spray the snowball by dipping a hard brush or an old toothbrush into diluted white gouache. And paint on the snowdrifts.
While the paints are drying, cut out tree trunks from brown paper and add a few branches. It would be best to glue the feeder from corrugated cardboard.
You can cut out birds for applique from colored paper according to the template, outlining the contours of the wings, beaks and eyes. The figures are glued to the base - everything is ready!
Swallows on wires
For this work you will need gray woolen thread (twine will also work), white, yellow and black paper, blue cardboard, glue, white felt-tip pen (you can take a proofreader), scissors.
The blue cardboard is unfolded with the wide side down. From edge to edge horizontally, through the middle of the sheet, two threads are pulled and secured with glue on the back side of the base.
Strips 8-10 cm long and 3 cm thick are cut from white paper. Strips of the same thickness should be cut from black paper, but they should be 15-16 cm long, and the lower edge should be thicker. It is cut into a dovetail shape.
You also need to cut out wings from black paper (a curved strip with tapered tips, resembling the open wings of a swallow in shape), and from yellow paper - small squares that fold diagonally - these are the beaks of birds.
Now you should assemble the parts sequentially: the black strip is glued in the middle to the “wire”, tail down, its upper part is folded forward, and the edge is glued to the tape - you get a bird’s head. The wings are glued a little lower.
The white ribbon is folded into a ring, the edges are glued together, after which it is attached under the head of the bird - this is the breast of a swallow.
The beak is glued to the head, and eyes are drawn above it with a white felt-tip pen (corrector).
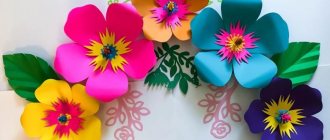
Paper palms
You can create an impressive craft even without a bird stencil for applique - you will only need multi-colored paper, white cardboard (A3), glue, scissors, pencil, felt-tip pens and decor.
In the middle of the white sheet, closer to the bottom edge, the body of the bird along with the head is drawn. You can only outline the wings and outline everything with a black felt-tip pen (or any bright, saturated color).
You need to trace the child’s palm on colored paper and repeat on several sheets of different shades. Cut out and glue the back of the bird like a fan - this will be the tail.
Now you can give free rein to your imagination: for example, outline the glued-on palms with a liner, glue the body of the bird with cotton balls and color them, draw the eyes and beak or cut them out of paper and stick them on.
You can use sequins, gold leaf, beads, confetti, threads and much more for decoration.
Class notes
| Author's full name | Title of the abstract |
| Gladkova L.I. | "Birds at the Feeder" Educational objectives: learn to depict a bird using the tearing method, consolidate knowledge about the structure of birds. Developmental tasks: enrich preschoolers’ knowledge about the life of birds in winter. Educational tasks: cultivate a caring attitude towards birds. Integration of educational areas: “Artistic creativity”, “Cognition”, “Communication”, “Socialization”, “Health”. Demo material: pictures of birds, audio recording “Bird Voices”. Handout: colored paper, glue, brushes, napkins, felt-tip pens. Progress of the lesson: At the beginning of the lesson, an audio recording of “Bird Voices” is played. Children determine who they belong to. The teacher invites the children to guess riddles about birds:
The teacher leads the children to the fact that all these birds are wintering birds. There is a discussion going on: why they are called that, what they eat in winter, how we can help birds, what food the titmouse, sparrow, and magpie especially like. The teacher reads the poem “Feed the birds in winter,” and then invites preschoolers to imagine themselves as birds and say words of gratitude to the people who feed them. Physical school is carried out:
The teacher invites the children to use appliqué to depict the birds that have flown to the feeder. Each child has a bird template that they must “color” using cut out appliqué. Finger gymnastics “How many birds” is carried out:
Independent activity of children. Analysis of works. |
| Balabina O.A. | "Fairytale Bird" The teacher shows preschoolers a model of a tree on which toy birds are sitting. The guys call them. The teacher draws the children's attention to the fact that one bird is not like the others - it is fabulous. What indicates this is being discussed (brighter plumage, unusually shaped crest, painted tail). Then the children tell what common features the fairy-tale and real birds have (head, body, wings, tail, beak, eyes). Then the teacher asks the children to remember in which fairy tales magic birds appear (“Ivan Tsarevich and the Gray Wolf”, “The Firebird and Vasilisa the Beautiful”, “The Little Humpbacked Horse”). The teacher shows the preschoolers slides depicting fairy-tale birds, and then asks the children to use their imagination and decorate the silhouettes to make a beautiful fairy bird. Relaxation is carried out to the musical accompaniment of “Transformation into a fairytale bird”: The teacher demonstrates how to cut out a symmetrical silhouette of a bird without a tail. Please note that only the body can be glued, and the head and neck will be slightly bowed - this will give the image life. The children design the shape and color of the feathers according to their wishes. The more unusual and colorful the bird is, the more joy it will bring. Finger gymnastics “Small Birds” is carried out:
Productive activities of children. Analysis of works. |
| Uzunyan A.N. | Christmas tree toy “New Year’s Cockerel” The teacher asks a riddle about a rooster:
The teacher informs the children that the Year of the Rooster is approaching and tells interesting educational information about this bird. This poultry is bold and cheerful, although it has a peculiar character. The rooster also has unique abilities: he can remember up to a hundred chickens or people, and his cry can be heard two kilometers away. Roosters and hens are capable of worrying about each other and feeling sad. In addition, preschoolers will be interested to know that roosters and chickens are descendants of dinosaurs. Next, the children are invited to decorate the Christmas tree that stands in the group with a cockerel, which they will cut out of colored paper and then decorate with applique details. Practical part of the lesson. |
| Adodina S.B. | "Penguins on an Ice Floe" (collective application) The teacher tells the children that today she had a wonderful dream - she found herself in a magical land. Everything there is white and very cold. And in this country she saw an amazing bird and asked a riddle:
It was Styopa the penguin who was in trouble. His family lived on a large ice floe, but the curious Stepa wanted to take a walk to find out what was happening on other ice floes. When he returned, he did not find his family - they sailed on an ice floe into the ocean. Styopa cried a lot. And the teacher asks the children to help the penguin - to portray his family. The body shape and coloration of the penguin are discussed. A physical education session is held:
Independent activity: Each child makes a penguin, glues it onto a paper ice floe, and then glues their craft onto the panel. |
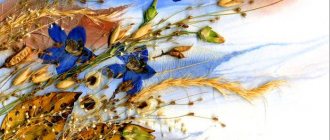
Bird leaf appliques
It is very convenient to use natural materials for applique - in the fall, leaves of different colors, ironed or stored in a book, are perfect for this. You will also need to prepare blue cardboard, white and yellow paper, glue, scissors and plasticine.
You can use any cardboard - simple, metallized, velvety, with a print.
A dense green leaf is glued in the center of the leaf; it should be oval in shape and without damage. To press and smooth the leaves, you can use a dry and clean cloth.
The beak is cut from a red or burgundy leaf; a bird's crest can be cut from a leaf of a brighter shade.
Now you need to cut a large maple leaf in half and glue the halves on both sides of the body, like wings. On top of them you need to stick the same halves of leaves, only smaller in size.
The tail can be made from several leaves of suitable color, shape and size, also arranged in a fan shape and in 2-3 layers.
Clouds are cut out of plain white paper, and a sun is cut out of yellow paper, after which these parts are glued onto the base.
Volumetric applications of birds
The simplest methods for making volumetric appliqué were discussed above. With an understanding of how you can make interesting pictures using glue, paper and cotton wool, comes the desire to experiment with other materials. However, paper can offer many options.
For example, tear-off appliqué perfectly develops motor skills, perseverance and imagination. You can draw a bird (or several birds) yourself, or you can trace it using a stencil, or cut out a template.
The plumage is created using small pieces of colored paper.
You can add trees to your work (the trunks are made not from simple strips, but from strips twisted into a tube and glued together, from plastic tubes, from thick threads and ropes, etc.), a colorful landscape as a background, to create a nest using the weaving technique, etc. d.
Plasticine is great for creating three-dimensional works. True, it will be difficult for very young children to cope with this material without adults, but the older group will cope with plasticine appliqué of birds on branches with pleasure. Here is an example of such work.
Take a sheet of black or dark blue cardboard - a round or oval shape will be original and attractive. Flagella are made from brown plasticine, several of which are attached together to a base - these are tree trunks. Branches are added from the same flagella.
Two large circles (the body of the birds) and two smaller circles (the heads) are cut out of velvety gray or light brown paper.
Yellow eyes, black pupils and a yellow beak are molded from plasticine. Feathers can be made using any technique - from cotton balls, scraps of paper, thread, etc. Wings can be cut out of paper, or they can be molded from plasticine and the feathers treated with a special stack.
A cotton pad is glued to the top of the composition - this is the moon. Reflections of moonlight can be shown by outlining all objects with a light outline (blue, soft white) - paint or a felt-tip pen can be used only in some places, it will be more reliable.
To create three-dimensional works, you can use plasticine flagella, buttons, beads and seed beads, nut shells, corks and caps, shells, cereals, and much more.
Videos on the topic
This video presents very interesting facts about birds. For example, we learn that the linguistic abilities of parrots are at the level of a six-year-old child. The small bird hummingbird is capable of flying backwards. The fastest of all birds is the Peregrine falcon, its record is 200 km/h. And the vulture bird flies the highest - once a plane met it at an altitude of 11 thousand km. The fastest bird is the ostrich (70 km/h). There is a bird that has no wings at all - it is a kiwi that lives in New Zealand. The golden eagle has the most excellent vision: it is able to spot a mouse at a distance of 1.5 km, and a rabbit even 3 km away.
This video gives you the opportunity to admire the most beautiful birds on the planet.
Video on the topic “Studying the voices of birds”
Application classes on the theme “Birds” in the senior group are always exciting. An applicative image is more conventional than a drawing, so children can fully unleash their creative imagination. Such activities are also educationally useful - they teach children to take care of birds and notice the beauty of living nature.
Bird applications using quilling technique
One of the most interesting techniques for creating three-dimensional paper appliqué. These are rolled paper strips that can be shaped into circles and droplets.
By varying the width of the ribbons, the thickness of the twist, the sizes of individual elements and, of course, colors, you can create paintings that are completely different from each other each time - even if you take a finished work you like as an example.
The name itself translates from English as bird feather, which is great for bird appliques. You can involve not only children, but also adults in the process by creating a Firebird - colorful, alluring, magical.
To work, you need double-sided colored paper - you need to cut thin long strips from it using a ruler and a stationery knife. However, many specialized stores sell ready-made kits.
For a fairytale bird you need red, orange, burgundy, and golden shades. For the background you need to stock up on cardboard and beautiful paper. You also cannot do without a pencil and eraser, scissors and white paper. To twist, you can use a regular toothpick (skewer).
The cardboard base is covered with beautiful paper. Although you can paint the cardboard yourself, or simply paint it. You should draw a sketch of the future work on a separate sheet so as not to get confused in the placement of parts.
Yellow and orange stripes are twisted; they will be used to decorate the head, beak and some places on the body. After this, you should try on the parts on the sketch and glue them together. The voids can be left as is for now, or you can twist a few more elements and fill the gaps.
Yellow and golden paper will become the basis for the feathers. It is easier to cope with this task if you have templates of different sizes. The edges of the feathers must be cut into fringes. The parts for the wings need to be folded in half; for the tail elements this is not necessary.
The top of the wings will be decorated with curved strips; for strength, three parts should be glued together.
Now the assembly of the Firebird applique begins on the basis. The body is glued, the base for the wings is attached to it - it should immediately be bent to shape. Now it’s the turn of the feathers, including the tail ones.
A fringe is cut out of golden paper and glued under the bird's neck. The crest on the head is made in the same way. Now the twisted elements are glued onto the feathers. When working, you should adhere to the greatest possible realism of the image.
Choosing the most suitable application technique for yourself is easy. This type of creativity is extremely attractive; once you have mastered the basics, you will be able to create entire canvases with a variety of subjects and characters.
In addition to the fact that children learn about the world with the help of applications, it also contributes to closer communication with parents, the development of motor skills, and the relief of emotional stress.