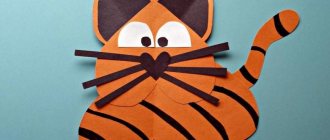
Types of applications
Before you start learning how to make beautiful appliqués with your own hands, you should understand what types of this technique exist.
- Mosaic applique - first the contours of the image are drawn, then parts of geometric shapes and different sizes are glued inside it.
- If you twist colored paper into a spiral, the technique is called quilling.
- For symmetrical applique, before cutting out the part, the paper blank is folded in half.
- A multi-layer applique is one that is created from parts of different sizes, small ones are glued onto large ones.
- If you trace the palm and use this figure as a base, you will get a palm applique.
Interesting ideas and application patterns on the topic “Birds” in the preparatory group
Children are very fond of fantasy works, for example, interpretations on the theme “Fairytale Bird” (photo 4, 8, 14, 18). They like to choose colors and shapes of feathers according to their wishes. In this regard, the work “Firebird” (photo 8) is interesting, where the feather on the tail is represented in the form of a cascade of droplets. The “Bird of Happiness” applique looks unusually effective (photo 18): the bird is all shiny and shimmers due to the bright candy wrappers from the endowment, the decor made of lace fabric looks elegant. Photo 14 - collective work, each child painted a feather to his or her taste, and together they made the tail of a magical bird. Fantasy works also include the composition “Festive outfit for an owl” (photo 17).
Three-dimensional compositions, which we see in photos 1, 5, 6, 7, 13, 15, 20, always look beautiful. A similar effect is achieved by partially gluing the silhouette of a bird, as well as using the technique of applique from strips, applique from lumps of napkins or pieces of torn colored paper.
A charming craft is a cockerel made from dry leaves (photo 2); this application is usually done in the fall. Another rooster is also made of non-traditional material - fabric (photo 16), the variety of patch patterns gives it a bright look.
Children will probably be happy to start making crafts “Sovunya” - a character from the cartoon “Smeshariki”; it is made of simple parts, but looks quite original.
Preschoolers also love group creativity. In this regard, the works in photos 1, 10, 11, 12, 13, 14, 19 are interesting (the children created the composition as a whole group or worked in a subgroup). Such activities, without a doubt, unite the guys, force them to be more attentive to each other, and jointly enjoy the results of their work. The basis of such compositions is usually prepared in advance by the teacher. This could be a tree with many branches on which the birds will be located, or a painted feeder where the birds will happily dine. Oh, where water is depicted in an unusual way - using blue and red strips of paper that convey reflections.
Photo: domestic and wild birds - rooster, cranes, firebird, swan, owl, duckling, etc.
Work in a subgroup
Application from dry leaves Application
Application
Application from strips of paper
Volume applique
Application
Application
Subject composition
Teamwork
Teamwork
Teamwork
Teamwork
Teamwork
Teamwork
Fabric applique Applique Applique using candy wrappers and lace
Work in a subgroup
Volume applique
Subject application
Templates
Part templates
Part templates
Silhouette cutting template
Part templates
Part templates
Owl creation technique
- Take cardboard - it will be the base.
- Glue a twig cut from colored paper.
- Now paint the background with paints, you can paint with your fingers.
- Glue clouds, moon and other background elements as you wish.
- Using the templates, trace the outline of the owl on the branch with a pencil.
- Tear off pieces of paper and glue them inside the outline.
- Make a second layer on top of the first.
- You can draw the eyes and beak with felt-tip pens or make them out of colored paper and glue them on.
Class notes
| Author's full name | Title of the abstract |
| Ramazanova Irina Nikolaevna | "Fairytale Bird" Educational objectives: learn to convey the image of a fairy-tale bird in appliqué, master the technique of silhouette and symmetrical cutting Developmental tasks: consolidate knowledge about warm and cold colors, develop visual memory, creative imagination. Educational tasks: cultivate a friendly attitude towards others, independence in choosing the nature of the decoration of the work. Integration of educational areas: “Artistic creativity”, “Cognition”, “Communication”, “Socialization”, “Health”. Demo material: pictures depicting real and fantastic birds, audio recording “Visiting a fairy tale.” Handout: colored cardboard, strips of colored paper, confetti, envelopes with multi-colored squares (warm and cool colors), glue, scissors, oilcloths, rags. Progress of the lesson:
The teacher demonstrates the presentation “Fairytale Birds” (to the tune of “Visiting a Fairy Tale”), and then invites the children to the fairytale forest. A surprise moment - a toy bird (for example, a magpie) appears, bringing a letter in its beak for the children. There, greetings are sent from all the forest birds, and they ask the children to make unusual fairy-tale birds to organize an exhibition in the forest. Preschoolers respond to this request with pleasure. The teacher asks the children to remember fairy tales in which the image of a fairy-tale bird appears (“Finist - the clear falcon”, “Firebird”, “The Tale of Tsar Saltan”). The teacher says that our ancestors loved to depict various birds and endow them with wonderful properties - they were embroidered on clothes, household items, and amulets. Discussion with children: how does a fairy-tale bird differ from an ordinary bird (unusual coloring, shape of wings, tail and crest) and how are they similar (identical body parts). Finger gymnastics is carried out. Children list the colors of the rainbow. An exercise to consolidate knowledge about warm and cool colors. Demonstration by the teacher of an applique of a finished fairy-tale bird, discussion of its features: a small oval body, an elongated neck with a small head, a long bushy tail, bright coloring. The teacher shows the children how to cut out a symmetrical silhouette of a bird without a tail from folded paper. The children are invited to design the tail as they wish (any shape of feathers). Independent activity of preschoolers. Summing up the lesson. |
| Loktionova D.N. | “Bullfinch” (collective applique) The task of the lesson is to cut out a bird according to a template (separate parts) with the characteristic color of the bullfinch conveyed. The teacher prepares in advance the base in the form of a tree with branches on which the birds will sit. The lesson begins with a conversation about winter and the birds we can see at this time of year. The teacher makes a riddle about a bullfinch, and then shows a picture. It is explained why the bird has such a name. The appearance and character of the bullfinch is discussed. Physical education “Bullfinches” is being held: |
| Bullfinches in red T-shirts. | Showing breasts |
| The feathers spread out, | Hands slightly to the sides |
| Basking in the sun. | Wiggle their fingers |
| They turn their heads, they turn them, | Turn your head right, left |
| They want to fly away. Shoo! Shoo! Let's fly away! | Running in a circle, waving their arms |
Examination of the sample, explanation of the sequence and techniques for creating the craft.
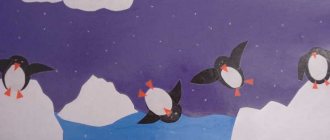
Perednya I."Little Penguin on an Ice Floe" The teacher invites the children to go to the North Pole, to do this they must create wind and cold - articulation gymnastics are carried out. Demonstration of a picture depicting a northern landscape - blue ocean, icebergs, snow. To prevent children from freezing, the teacher conducts physical education. Riddles about animals of the North Pole (polar bear, reindeer, arctic fox, polar wolf, walrus, and finally, penguin). Motivation for productive activity arises - to make a little penguin for a lonely penguin. Ishchenko N. "Migratory birds" The lesson consolidates preschoolers' knowledge about migratory and wintering birds. The teacher begins the lesson by reading E. Charushin’s story “The Sparrow”, and then invites the children to relax and turn into birds - the game “What kind of bird” is played (the children depict the habits and features of the movement of different birds). The teacher invites the children to perform a plot composition - flying swans. The work is interesting because the base is black cardboard (the night sky). Birds and clouds are cut out of white paper. The technique of symmetrical cutting of swans is used, and only one half of the bird is glued to the base - a volume effect is created. Children complete small details (beak, eyes and wing patterns) with a black felt-tip pen. Demina E. "Swan" (3-dimensional applique made from strips of paper) The lesson is preceded by reading a fairy tale by G.-H. Andersen's "The Ugly Duckling". Questions about content. The teacher talks about the features of the appearance, habits, and lifestyle of swans. Physical school is being held. The children are invited to applique the bird using a special technique - its feathers will be made from many paper strips, which creates a volume effect. At the end of the lesson, all the work is hung together on the board - it turns out to be a real “swan lake”.Firebird
The process of creating such a craft perfectly develops the imagination, because the character is magical and very bright.
- To make the head and body, cut out a ten-centimeter square piece from colored paper.
- Form a square into a triangle and bend along the larger side.
- Now expand the square - it is divided into four sectors.
- To get the body of the bird, glue both edges overlapping.
- The belly is the larger side, and the smaller side is the back.
- To create a chic ponytail, cut nine nine-centimeter strips - curl them or leave them straight.
- Glue three stripes to the back, six will serve as material for making wings also on the back.
- You can also make both the tail and wings using the palm technique.
- You can cut out eyes and other small details from colored paper or draw them.
- Attach the bird to the background on a branch of colored paper, decorate the background by painting it and gluing parts from colored paper.
Lesson on application on the theme “Birds”
When compiling notes, it is worth planning the main stages of the lesson:
- organizational stage: greeting children, getting them into a working mood (1 minute);
- motivational stage: interest children and lead them to determine the topic of the lesson (5 minutes);
- explanation: show children what and how they should do, distribute materials for the lesson (5–7 minutes);
- independent work: children are busy with appliqué (20 minutes);
- final part: summing up, demonstrating the resulting work to the whole group (3–5 minutes).
In the middle of the lesson, do not forget to take a dynamic break for the children to rest, but the warm-up can be compared with the topic of the lesson (for example, when studying the topic “Birds”, read a poem about birds and perform physical exercises for it: jumping, flapping their “wings”, etc. )
Table: lesson notes on application on the topic “Fairytale Birds”
| Purpose of the lesson | Strengthen the ability to cut out the image of a fairy-tale bird, notice its characteristic features in contrast to real birds, teach how to stick on figured decorations. |
| Materials and equipment | Landscape sheet, colored blanks of square, rectangular, triangular shape, colored strips, colored feathers, pencil, scissors, glue, brush, napkin. The materials are prepared in advance and laid out on the tables. |
| Game motivation | Educator: Guys, today we will take a trip to a fairyland where fabulous birds live. Let's remember which fairy tale tells about such a bird, and who caught it. Children: Ivan Tsarevich and the gray wolf. Educator: Let's look at the illustrations for this fairy tale. (the teacher shows pictures of exotic tropical birds, the children look at the color of their plumage and tell how they look like a fairy-tale bird). |
| Explanation | Educator: Now please describe to me the fairytale bird (firebird), what is it like? The children answer. The teacher tells how to make an applique: The head and body are cut out from round and rectangular blanks. The body of the bird can be drawn on the back of colored paper and cut out. We will make wings and a tail from triangles, making zigzag or wavy cuts along the edge. (the teacher places the main details on the sheet and sticks them on). To make decorations for the head, wings and tail, you need to take a colored strip and fold it in half several times or like an accordion. On the top part, draw a circle, or an oval, or a droplet-shaped figure, and cut it out. Decoration elements can be of different sizes, colors, shapes. They can be glued on top of each other. Glue shaped decorations on the wings, tail, head, you get a fairy-tale bird. |
| Physical education minute | Here on the branches, look, (children clap their hands on their sides) There are bullfinches in red T-shirts. (show the “aprons” on their chests) They spread their feathers, (move their arms slightly to the sides) Bask in the sun (lightly move their fingers, shake their hands) They turn their heads, turn them, (turn their heads to the right and left) They want to fly away. (run in a circle, waving their arms) Shoo! Shoo! They flew away. (children smoothly return to their seats) |
| Independent work | Children perform applications under the guidance of a teacher. |
| Didactic game “Who Flew Away” | The teacher shows pictures of birds for a few seconds and then closes them. Children must name the birds. Then the teacher removes one picture, and the children must name which bird is missing. |
| Summarizing | Discussion of works, organization of an exhibition, reflection on the questions “what was difficult”, “what did you like”. |
| Source | Shabrova Olga Alexandrovna. https://nsportal.ru/detskiy-sad/applikatsiya-lepka/2013/09/21/konspekt-nod-khudozhestvennoe-tvorchestvo-applikatsiya-v |
Crafts made from dry leaves
To create a firebird from dry leaves, prepare dry leaves, a glue gun, paint, and a sheet of cardboard.
- For the background, paint cardboard or use colored cardboard.
- Spread the paper and carefully arrange the leaves, and then color them.
- Now dry the leaves. Apply hot glue to the cardboard and glue colorful leaves.
- To do this, there must be an adhesive layer on the cardboard sheet, as well as spot-applied glue on the leaves.
- First, form the shape of a tail, then a larger leaf that stands out in shade - this will be the body of the firebird.
- Paws and eyes can be made from colored paper or cardboard.
- The magic bird is ready!
other methods
Tear-off - the picture is assembled from small multi-colored pieces. This technique trains perseverance because it takes much longer than the others. Additionally, fine motor skills are developed, since working with small elements is very painstaking.
Volumetric - the nest is often depicted on a paper plate or papier-mâché craft. The materials from which the product will be made can be very diverse: cotton wool, feathers, threads, dry grass, felt, paper, etc. It all depends on the child’s capabilities and imagination.
The combinations are countless. The miraculous embodiment is practiced not only in kindergartens, but also by art history professionals.
Migratory birds
Materials you will need:
- Sheet of cardboard,
- colored paper,
- And also scissors
- Paints and glue.
Operating procedure:
- A piece of cardboard is the sky.
- Color it or get a colored one.
- Cut out clouds from white cardboard and glue them to form a background.
- Draw and cut out the birds and then glue them to the cardboard.
- Draw the details - eyes, feathers, beak, and also add trees and other elements as desired.
Feather birds
Feathers also make great bird crafts! For example, a craft made from a pine cone, paper and feathers will be an excellent interior decoration.
In order to make such a craft, we will need:
- Cone;
- Multi-colored feathers;
- Thick paper for making the head and paws;
- Glue gun.
Before starting work, the pine cone must be dried in the oven for 20-30 minutes. This will get rid of excess moisture and insects inside.
The dried cone can be painted with paints, or you can leave the natural color and texture. We glue the cut out parts of the paws to the bottom of the cone, and also glue the head to the pointed end of the cone. You can glue toy eyes to your head, or you can draw them yourself. Now all that remains is to attach the feathers. We carefully place them on glue. The more feathers there are, the more magnificent the bird’s “hair” will be.
Related article: Beaded spider with diagram and description for beginners
There is also another way to make a bird from feathers.
We will need:
- 2 sheets of cardboard (white and any color);
- Glue;
- Scissors;
- Feathers.
Cut out the silhouette of a bird from white cardboard. In our case, this is the firebird. The silhouette, starting from the tail, must be covered with feathers. You can stick them on top of each other. Then we glue the cutout with feathers to colored cardboard. The painting can be framed and will be a great decoration for any room in your home!
Chickens
In order to make a craft with the image of funny chickens or other poultry, take a sheet of colored cardboard, cotton pads, a brush with paints, as well as glue and plasticine.
- The entire cotton pad will play the role of the head, as well as the body of the bird; if you separate half of the disc, you will get wings or a tail. Pre-paint them with paints and then glue them to the cardboard.
- All other elements (paws, eyes, beak) can be made from plasticine.
- To create a goose or chicken, you need to make a printout with a picture of a bird, and also stock up on a piece of cotton wool and PVA glue.
- Roll cotton balls to fill the image.
- You can also add colors to your work - paint some elements if necessary, add details.
- This way you will get a bird with plumage, the effect of which is created by cotton wool.
Cockerel and hen
- Take a white sheet of paper, a brush with paints, images with a pre-printed chicken and cockerel, colored paper, napkins of different colors, and you can’t do without a hole punch, glue and scissors.
- Prepare your future background: for this you need to paint a white sheet of paper and draw on it the background elements that you come up with.
- Illustrate the earth as well as the sky in your work.
- You can use colored paper to create images of a house, fence and other details.
Now cut out the birds.
- You can move on to decorating the characters of the craft - cut out feathers from colored paper, twist lumps from a napkin, a hole punch will be useful for making confetti.
- Glue the resulting plumage, now you can glue the birds to the background.
- If you wish, you can create a large work in a group, which will include an entire poultry yard.
There are many techniques for creating applications with images of birds. Using those presented in this article, you will create unique paintings that will decorate your child’s room, and the process of creating this masterpiece will give him a lot of positive emotions.
Also, all these techniques can be safely used for classes in kindergarten, all of them will develop the imagination of children and teach them to be neat, and will give them experience in running their own small project.
Abstract of GCD for application in the preparatory group of preschool educational institutions. Bullfinch
Summary of direct educational activities on the application “Bullfinch” in the preparatory group.
Author: Bogdanova Nadezhda Gennadievna, teacher at the Children's Preschool Educational Institution “DS No. 10”, Kopeysk.
Description of the material: I offer you a summary of direct educational activities for children of the preparatory group (6-7 years old) on an application on the topic: “Bullfinches.” This material will be useful for teachers of the preparatory group. Unconventional napkin appliqué techniques. Direction of activity: “Artistic and aesthetic development.” Goal: Creating a three-dimensional applique of a bullfinch. Objectives: - develop creative abilities; - develop fine motor skills and perseverance; - cultivate accuracy when performing work; - cultivate aesthetic taste, joy from creating your work; - cultivate love and respect for nature. Material: - sample; - blank mugs made of red paper napkins. - a simple pencil; - scissors; - PVA glue; — bullfinch templates. Preliminary work: Conversations about birds, drawing birds;
reading stories about birds. Progress of GCD
1. Organizational moment. Educator: Guys, listen to the poem “Bullfinches.” Paws are getting cold in the cold near the pine and spruce trees. What a miracle The apples are ripe on the birch tree. I’ll come closer to her and I can’t believe my eyes. A flock of scarlet bullfinches stuck around the tree. Author: T. Shorygina 2. A teacher’s story about bullfinches. Guys, do any of you know what a bullfinch looks like? What does it eat? Where does it winter? How does a person take care of him? Why did the bullfinch come to us for the winter? Now listen to the story about bullfinches. “Nature becomes even more beautiful in winter, when handsome bullfinches appear on snow-covered trees and bushes. They are called so because they appear in our area with the first snow. The bullfinch is found within the Chelyabinsk region as a sedentary and nomadic species. Lives in coniferous forests. Bullfinches have a bright pink chest (pinkish-brown in females), a gray back (brownish-gray in females), and a black “cap.” The bullfinch feeds on seeds of maple, lilac, rowan, plant buds, hawthorn fruits, etc. In winter, the number of bullfinches increases due to birds migrating from the North. - The bullfinch is considered the first herald of winter - the bullfinches have arrived, which means the real winter has begun. Educator: -Let's listen to how the bullfinch sings. (Recording of a bullfinch singing.) Educator: - Tell me, how does a bullfinch sing? What does his singing sound like? (Children's answers). Now you know what bullfinches are and where they live. 3. Explanation of the material. Educator : - Guys, I suggest you look at a sample of work. Educator . Look carefully at our bullfinch. Name the body parts of a bird. (The bullfinch has a beak, head, wings, tail, paws) Educator : What parts of the bullfinch’s body are black? (The bullfinch has black wings, a black head) Educator: What color is the bullfinch’s body? (red) But before we make our bullfinch. Let's rest a little 4. Physics lesson “A nimble tit is jumping” A nimble tit is jumping, (Jumping in place on two legs.) She can’t sit still, (Jumping in place on the left leg.) Jump-jump, jump-jump, (Jumping in place on the right leg.) Spun like a top. (Spinning in place.) So she sat down for a minute, (Squatted down.) Scratched her chest with her beak, (Standed up, tilted her head left and right.) And from the path to the fence, (Jumping in place on the left leg.) Tiri - tiri, (Jumping in place on the right leg.) Shadow-shadow-shadow! (Jumping in place on two legs.) 5. Finger gymnastics. -How many birds flew to our feeder? We'll tell you. Two tits, a sparrow, Six goldfinches and bullfinches, A woodpecker in motley feathers. There were enough grains for everyone. 6. Children begin making applique. While the application is being performed, the melody of the winter forest sounds 7. Result. Tell me, what did we do today? You did a good job today, well done, what beautiful bullfinches we got.
We recommend watching:
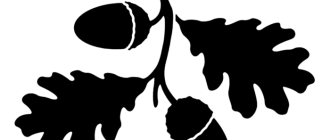
Paper bullfinches using quilling technique for children. Master class with photo Summary of a lesson on appliqué in the preparatory group. Oak Summary of GCD for application in the preparatory group of kindergarten on the topic: Animals of the North Lesson on application on the topic Autumn in kindergarten. Preparatory group
Similar articles:
Application. Bullfinches on a branch