Of the many varieties of children's creativity, paper cut applique is of particular interest for teaching the little ones.
To make crafts using this technique, very few devices are required and you do not need to work with scissors, which is the safest developmental activity for preschool children.
Multi-colored pieces of paper, napkins or cotton wool help to develop artistic imagination and lie on the base for the applique, like paint strokes from an artist. This technique is also close to mosaic and therefore looks especially decorative and original.
Features of cut-off appliqué
Creating a color picture using a template drawn on the main sheet or piece of cardboard, the workflow is close to assembling puzzles. This helps develop spatial and imaginative thinking in young children.
When working with cut-out applique, the image is formed using scraps of colored, colorful paper.
During an exciting creative activity, all the muscles of the child’s hands actively work, which has a positive effect on the good development of fine motor skills, which is reflected in the general intellectual level.
The painstaking work of assembling an image from small parts instills in little masters the perseverance and patience that are so necessary from the first years of school.
This unique type of applique is distinguished by some nuances, of which it should be mentioned that the work often turns out to be quite heavy and a thin sheet will bend unsightly under the weight of the pasted layers, of which there may be several.
Therefore, it is better to take a sheet of cardboard or other thick paper for the base, and use a pencil for children’s creativity as glue, which does not leave excess and untidy fragments.
When preparing pieces of torn paper for gluing, you need to make sure that they are approximately the same size. You can use pictures from used coloring books as templates or print them from the Internet.
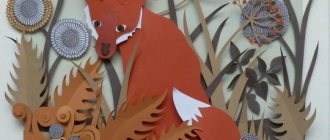
Bunny made of paper
To create such a craft, pre-prepared templates with images of animals are perfect. In the photo of the broken appliqué you can see a bunny; thanks to the use of this technique, an interesting texture is created, the character looks more voluminous.
To create beautiful crafts, you can take templates by cutting them out of magazines, old coloring books, or print them from the Internet. You can also draw the figure yourself on paper or cardboard.
Crafts technique:
- Tear off the paper strips and then finely tear them into pieces.
- Glue these elements like a mosaic onto a pre-printed or drawn image.
- Try to make small distances between the pieces so that they do not overlap each other.
- The nose and eyes can also be torn from dark-colored paper or drawn on.
- Makes a great craft!
Step-by-step creation of a broken applique
Creating applications using templates differs in types:
- decorative - includes decorating photo frames, holiday napkins, greeting cards;
- thematic - as a result of which a certain plot is created based on the themes of fairy tales, seasons, or dedicated to any event;
- objective - an image of a single image with simple and easily recognizable forms.
For any method of creative work, you should start with a base, which can be a sheet of thick base, a picture or photo frame, a paper napkin or a disposable cardboard plate.
Then you need to prepare torn pieces of paper, cotton wool or napkins. A marker is also useful for drawing patterns, the outline of which limits the gluing of pieces of the same color or neat filling of the form.
For the little ones, you need to make simple templates without small details of the drawing, and older children will be able to cope with smaller and more precise work. When all the elements, including the glue, are prepared, you can begin the creative process of gluing pieces of paper along the contours.
Paintings using the cutting technique
Preparatory group students can make simple drawings with their own hands. For work, it is important to choose the right drawing model. It should not be overloaded with small details and have complex outlines.
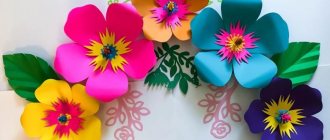
An image of a butterfly and the sun, a sunflower, a dolphin on a wave or a bear on the lawn in a mosaic version will look original. Templates for such images can be easily drawn yourself or copied from the Internet.
Simple cut-out appliques for kids
Experts in preschool education believe that the simplest tasks using the cut-out applique technique can be feasible for children starting from 2-3 years of age.
The very first tasks should include a simple acquaintance with the process itself and the order of actions, which consists of the sequence - tear it off, spread it with glue, turn it over and attach it to the main sheet.
The child becomes familiar with objects by touch and is fascinated by the action itself, which can gradually be complicated by using a simple template for associative images of familiar objects.
In this case, children place pieces of torn paper as randomly as at the initial stage, but the task is complicated by the fact that they cannot go beyond the contour line.
It is interesting for a child to watch how an adult first tears colored paper into strips of approximately the same width, and then tears off pieces from them. To begin with, you can use the simplest and most colorful pictures with simple templates.
Rainbow
It is a colorful image that will require pieces of seven colors from the applique paper kit. They are glued sequentially in a certain order according to a drawn template, for each color separately.
Creating a rainbow using the cut-out appliqué technique for preschoolers will introduce the child to the names of primary colors and help develop attentiveness.
Mushrooms
Mushrooms are the simplest applique options for little ones. For work you will need: glue, a thick base, a pencil or marker for outlining the template and torn colored paper of at least two colors - for the cap and stem of the mushroom.
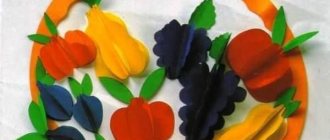
You can use green, brown, yellow or beige paper to depict mushrooms, which must be torn into medium-sized pieces. Then the elements must be glued as tightly as possible to each other, trying not to go beyond the marked lines of the mushroom shape.
The hat can be made from brown or beige paper, the leg from yellow, and the grass around it from green. You can also make a general background from sky blue paper, but often it is made from a large piece of colored sheet pasted on or a fragment painted on with paints.
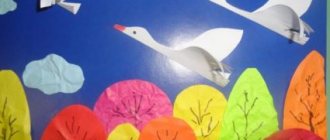
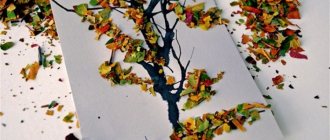
Autumn tree
This is a colorful and simple composition that a child can observe while walking, and then try to depict using the cut-out appliqué method. For the lesson, you need to prepare a basic thick sheet of A4 format, a glue stick, and multi-colored pieces of paper.
In one version, the tree trunk and prominent fragments of thick lower branches can be made of brown elements, and the top can be covered randomly and even without a template with green, yellow and red leaves, some of which can be depicted as having fallen to the ground.
In another case, adults can draw a tree trunk with colored pencils or felt-tip pens, and entrust the child with freely gluing a multi-colored crown of yellow, orange and red leaves.
Application ideas for preschoolers
To practice cut-out appliqué in the middle group, children are encouraged to fill out stylized figurines of the most famous and easily recognizable animals, birds or simple landscape compositions with paper elements.
Often, compact and simple templates are used for the first tasks, examples of which are present in any teaching material for classes with preschoolers in kindergarten or at home.
Bunny
The most common task for working with applications in the junior and middle groups of kindergarten. For work you will need: glue in the form of a pencil for children's creativity, white and blue paper for pieces.
The teacher can draw a bunny pattern on the basics, and at this time the children tear paper of two colors into pieces, trying to ensure that the elements are close to the same size.
Then you have to spread the base with glue along the inside of the contour and gluing the parts. The nose and eyes can be completed with felt-tip pens after the applique has dried.
Owl
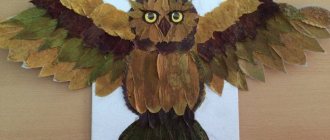
The owl is one of the easiest birds to draw and cut out for kindergarten. To depict it, you need to prepare pieces of dark brown, beige and yellow colors.
This bird is characterized by a large round head with circles of a lighter shade around the eyes and an oval body with the same spot in the chest area. The bird's eyes can be clarified with a pencil after gluing the elements of colored paper.
Snowman
Another simple example of a template for preschoolers. It consists of three circles of different diameters, the largest of which is at the bottom.
To depict a blue winter sky, you will need a background made of colored paper, and the snowman figure itself can be made from pieces of white torn paper or cotton balls.
The drawing is interestingly diversified by a bright carrot instead of a nose and a colored bucket on the snowman’s head.
Winter landscape
This is a more difficult job of creating a broken appliqué in the older group. In the process of completing the task, children develop logical methods of thinking, try to most accurately convey their impressions of seasonal changes on the street and show the inclinations of a creative attitude towards the life around them.
Children 5-6 years old enjoy making postcards dedicated to the New Year holidays with pictures of winter. A standard sheet of thick paper can be folded in half and an applique with a winter theme can be made on the inside.
To do this, you will need a lot of white and blue paper, from which snowdrifts, snowmen and other winter attributes will be made.
Snowman
Prepare a sheet of white paper and draw snowdrifts on it.
- Tear them off with your hands, following the drawn line.
- Now cut it into two parts.
- Blue or light blue cardboard will play the role of a background; stick snowdrifts on it.
- Attach different parts on top of each other to make the result look more realistic.
- Make templates with snowman parts from white paper.
- Carefully tear off the blanks along the pencil outline.
- You can glue the resulting circles to make a snowman; try to put the bottom border on the snowdrift to “put” the snowman on the snow.
- Cut out a headdress for a snowman from colored paper, buttons and parts of the face can be drawn with felt-tip pens.
- Decorate the craft further as you wish.
Applications for schoolchildren
In the lower grades, children continue to develop creatively, but the tasks become more and more complex. With each new type of application, the student receives new information about the world and learns to depict it.
Butterfly
The most elegant and beautiful insect that has its own characteristics. When preparing a template for work, it is necessary to maintain the symmetry of the image, which must then be maintained during the process of gluing pieces of paper.
In this work, children can try their hand at mosaic techniques, imagining that colored pieces of paper are pebbles or pieces of glass. In the same way, you can make a broken applique of an apple.
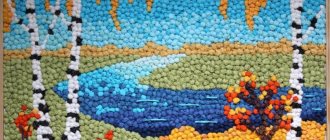
Seascape
The seascape develops the imagination of a child who learns about the beauty of the coastal strip with shells, pebbles and surf waves.
Also, a plot on the theme of a seascape may contain pictures of underwater life, in which fish and other ocean inhabitants are depicted against a background of blue colored paper.
Here the technique is complicated by the presence of many small and multi-colored elements.
Paintings using the technique of cut appliqué
These crafts are available to children of primary and secondary school age. The complexity of the plot and compositional solution depends on the individual abilities and imagination of the child.
Pieces of colored paper can be successfully combined with any other materials, including beads, glitter, ribbons, colored tape, as well as cereal or pasta inserts.
Autumn tree
One of the easiest to perform is the composition “Autumn Tree”.
You need to prepare for the lesson:
- glue.
- A4 cardboard sheet,
- colored paper,
Operating procedure:
- Using paint or a brown pencil, draw the trunk and branches of a tree. You can make an applique out of paper.
- Tear off equal sized pieces of colored paper in red, orange and yellow.
- Carefully attach the parts to the base, depicting the crown of a tree and fallen leaves.
Kids will definitely love this simple and fun mosaic. You can include a story about autumn changes in nature in your lesson plan.
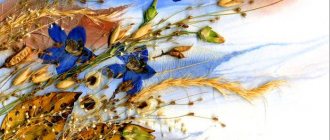
Tear-off napkin appliques
To create beautiful, airy works using the appliqué technique, multi-colored paper napkins are widely used.
They are torn into small pieces and glued with the middle part of the elements so that the edges remain slightly raised and create volume in the composition.
Applications made from pieces of colored napkins rolled into arbitrary soft balls look original.
Tear-off cotton wool applications
You can make independent appliques from cotton wool or cotton pads pre-painted with watercolors or complement compositions made from torn paper. Images of clouds, snowdrifts, furry animals such as sheep, dogs, lion cubs and teddy bears look very gentle and natural.
You can also add cotton fragments to appliqués on the theme of birds, flowers and natural landscapes. The gluing process occurs in the same way as with pieces of paper - the necessary fragments are applied to the base coated with glue.
Not only children, but also adults can become interested in this interesting type of creativity, creating complex panels using the cut-out appliqué technique.
Such paintings look original and are similar to mosaics that can be used to decorate the wall of a child’s room, kitchen or hallway, using waste wallpaper or other materials.