Photo of a painted tree
A tree can be drawn in completely different ways. It can be a bright colorful drawing, or, on the contrary, a black and white picture. It all depends on your mood, on the emotions you want to convey.
By depicting just one tree, you can convey the entire situation around it.
How to draw a tree for kindergarten step by step
From a very young age, children strive to draw. Yearlings will be happy to imitate you, waving a pencil over a sheet of paper. By the age of two, a child's hand coordination will allow him to draw the simplest things. At this age, many children begin to go to kindergarten.
In kindergarten, classes are held in which children learn to draw. They begin to hold a pencil correctly and draw lines and circles. Parents should practice with their child at home. To do this, you need to know how to correctly explain to a novice artist the technique of drawing a particular object.
Drawing a tree is also divided into several stages, which the child must remember well and master in practice. Do not try to complete the task instead of him, assigning the child the role of observer. In early childhood, all manipulations with hands and fingers help the child’s speech development.
Let's look at the simplest way you can teach a child.
The first stage is to draw a tree schematically. To do this, the child must understand that a tree grows from the ground, that it has a trunk and a crown with leaves. Do not forget that first we do all the sketches with a simple pencil. We don’t put too much pressure on it, so that later it will be easy for you to remove unnecessary elements.
We denote the ground with a horizontal line, and draw a tree trunk perpendicular to it. So that the tree has a crown, where the tree trunk ends, draw a circle or an oval.
The second step is to make our tree more real. Outline the trunk by adding a few root shoots and a couple of large branches.
In the third stage we outline the crown.
Fourth stage. Making the tree realistic. Add a few more lace turns of the crown in the center and remove all unnecessary details. The tree is ready.
Complicating the techniques of depicting trees in different age groups
Slide 1. Consultation for educators “Complicating the techniques of depicting trees in different age groups”
Slide 2.
The child shows an active interest in drawing already in the 2nd year of life.
At this age, toddlers
enthusiastically scribble various squiggles and scribbles on paper, and this is encouraged, because in the process of drawing squiggles, the child recognizes a pencil, felt-tip pen, brush and paints and gets used to them.
Slide 3.
These skills consist of very simple things that are the basis of drawing: the ability to draw vertical and horizontal straight lines with a pencil, felt-tip pen and gouache.
A child’s highest mastery in mastering basic drawing skills lies in the fact that he learns to draw closed lines: a circle, an oval, an abstract figure using the same tools - a pencil, a felt-tip pen, and then a brush with paints. The ability to draw vertical and horizontal lines, the ability to draw a circle and an oval allow children to draw whatever they want: animals, birds, trees, cars
, etc. Everything they like in life, they will be able to
depict
using closed and straight lines . And this is not a joke, but the basis of painting.
Slide 4.
Analysis of software tasks in
different age groups
.
We can highlight the following general tasks of teaching preschoolers to depict trees of different types:
breeds in object drawing:
— To form in children a generalized idea of a tree and how to depict it
.
— Introduce children to the characteristic features of trees of different species
.
— To form children’s ideas about the changing appearance of different trees
breeds at different times of the year.
— To promote mastery of various ways of depicting trees
.
— Learn to use different drawing techniques
.
— Learn to use different visual arts
materials for drawing
trees
.
For every age group
For preschoolers, setting tasks when teaching object drawing has its own specifics.
Slide 5.
The learning objectives in the first junior
group
are set taking into account the fact that with a child of the second year of life, special training in
image
, since he strives to reproduce the actions of the teacher, accompanied by explanations, but he has little experience, lacks knowledge and skills, and has insufficiently developed hand movements . Therefore, the main tasks are primarily related to the general educational impact on children (on the slide):
- arouse interest in the process of drawing as an activity that produces results, a desire to try one’s strengths;
- introduce drawing materials (pencils, paints)
and
methods for using them
.
Here, for example, is how to draw a tree
, mastering the basic principles of painting.
A tree grows on the ground
Therefore, the child must mark the place from which the
tree
with a straight horizontal line.
He must then use a pencil to mark the trunk of the tree
by drawing a straight vertical line perpendicular to the line marking the ground.
A tree has a crown
, therefore, the child must indicate the boundaries of this crown by tracing the top of the trunk
(or the tip of the straight vertical line that he just drew)
with a closed circle or oval line. It will turn out something like this.
Slide 6.
Drawing trees . 2nd junior group .
We draw on tinted paper, on the entire sheet or strip, with black paint and a wide brush.
Explanation:
Slide 7.
We indicate where
the tree grows - I draw an even
, straight line from left to right with black paint. Then I draw a straight, beautiful trunk - I draw a vertical line from top to bottom, start painting with the tip of the brush, and then with the whole brush.
Slide 8.
Now I'm drawing branches.
The tree
has a crown - I draw 2 small branches up.
The spruce branches grow downward, and the tree branches grow upward towards the sun
.
Raise your hands up, this is how we will draw twigs on a tree
, the brush will show where the twig grows - it grows from the trunk upward (I draw a line, now I draw a twig on the other side - it grows, grows.
Slide 9. Middle group
We draw on tinted paper, on the entire sheet or strip, with brown paint. We give 2 brushes: wide for the trunk, medium thickness for the branches.
Slide 10.
I take a wide brush and use brown paint to mark where
the tree
, draw an even, straight line from left to right.
The tree
has a straight, beautiful, even trunk - I draw a vertical line from top to bottom, start painting with the tip of the brush, and then with the whole brush.
I take a medium-thick brush, with which I will paint brown branches. With the tip of the brush I paint 2 small branches on the tops of the heads, which look up at the sun. tree has thick branches
, and they all grow upward - towards the sun, I paint them with the whole brush on one side and the other of the trunk. And on thick branches there are thin ones, they also reach out to the sun, I paint them with the tip of a brush on one and the other side of the branch.
Encourage children to watch their friend’s work and exchange opinions.
In the middle group you can draw a tree at different times of the year
: covered with snow in winter, in spring, summer, autumn - with leaves, we draw them by dipping them.
Slide 11. Senior group
Let's draw varieties of trees
.
Pay special attention to the fact that if children in the older group
, even after repeated observations, draw poorly, then transfer this work to the preparatory
group
, since this material is very difficult for children.
Slide 12.
Birch
We draw on two-stripe tinted paper with white and black paint. We give 2 brushes: wide and medium thickness.
Explanation:
The birch has a beautiful trunk - I paint the trunk with a wide brush of white paint, just like we painted the trunk of other trees
. The birch tree has black specks on its trunk, we will paint them later when the white paint has dried. Birch is called curly birch. Its branches are beautiful, elastic, and bent down. I take a medium brush and use black paint to paint thick branches from the trunk on one side and the other, starting from the top. And from the thick branches come thin ones, like garlands, descending down. The birch trunk has dried up, now let’s decorate it with black dots. Remember, when we looked at it, we noted that the trunk was very black at the bottom and there were fewer dots at the top.
The word of the teacher and the speech of the children themselves play a great role in conducting classes on drawing trees. The teacher's explanation must be thought out so that the child can think. When explaining, the teacher can use literary artistic images. This makes emotional memory work, which contributes to the creation of bright, expressive drawings. For example, while admiring a slender birch tree in a clearing, you can remind the children of a familiar song and stand around the birch tree and sing the song. They will start drawing a birch tree with special pleasure.
We draw a birch tree at different times of the year
: snowy in winter and green in spring
(we draw a raw outline of the crown and dotted leaves)
.
Slide 13. Preparatory group
We continue to draw varieties of trees
. Oak
We draw on tinted paper in two stripes, gouache, palette. We give 3 brushes: wide for the trunk, medium thickness and hard.
Slide 14.
Explanation:
The oak tree is called a giant, its trunk is very thick, I will paint it with a wide brush with brown paint like this - I will draw a central line and “build it up”
trunk on one side and on the other.
The trunk is thick, the oak is mighty, it stands firmly on the ground - the roots are visible. Using a medium brush, I paint the branches with brown paint. The branches have bent from time to time, they are old and thick. The oak does not have a crown like other trees
.
At the top the branches are curved and thick curved branches extend from the trunk. Small curved branches come off from the thick branches; I paint them with the tip of a brush. The greenery of the oak is transparent, carved, I will paint it with a hard glue brush “poke”
.
In this group
You can show a way to draw a crown without branches - with an outline.
Slide 15.
Also at this
age
, children enjoy drawing various fairy-tale
trees
.
For example, drawing “Autumn tree ”
.
The teacher has a drawing depicting a tree with autumn foliage
, the lower end of which ends approximately in the middle of a wide strip of land; Children have sheets of paper painted 1/3 with green paint.
The teacher shows the children a drawing of a tree
and offers to listen to the description, warning that there will be mistakes in the story.
Anyone who notices a mistake should say “no
.
“A summer tree
.
(No)
.
Which one? Why? Its trunk is thicker than its branches. The branches are longer at the top than at the bottom. (No)
.
Which branches are at the top and which ones are at the bottom? Thin branches extend from the branches. They are very long (no)
.
What are they like? The leaves on the tree are yellow
, orange, red."
Praise the children for knowing the structure of a tree
.
Suggest a diagram for drawing trees
.
Show children techniques for drawing tree crowns
.
Slide 16.
— Do you know by what signs you can distinguish one
tree from another (by trunk, leaves, branches)
.
-How can you recognize a tree
?
(by silhouette)
. Show silhouettes of birch, spruce, maple. Offer to draw the crown with crumpled paper or a poke. Accordingly, observing the shape of the crown.
Slide 17.
When
depicting trees,
you can use various
techniques
, for example: Arrange a walk in the park:
Consider the trunk, roots, branches, twigs, leaves, fruits, etc.
• Pay attention to the unusual shape of the trunks (curved, hollow, inclined)
• Play the game “I am a tree ”
- bring to the group
spruce or pine sprig for consideration;
- take a second walk into the forest to compare different deciduous trees
;
— Look at reproductions of paintings depicting trees
;
— Organize the lesson as a trip to different continents
where unusual
trees (palm trees, cypresses)
.
In teaching older children
you can use a partial display -
an image
of a detail or an individual element that preschoolers do not yet know how to
depict
.
For example, children 4-5 years old draw a tree
in the form of a triangle with a wide base.
This mistake is caused by the teacher’s explanation: “The tree trunk is narrow at the top and wide at the bottom
.
Therefore, along with verbal instructions, show an image of a tree trunk
.
One of the effective techniques
visual learning is the teacher's drawing. But the educational drawing should not be simplified to a diagram. The image must remain alive, corresponding to reality.
Slide 18
. For example, when showing how to draw a Christmas tree, the teacher must proceed from the requirements of the program - convey the main features: a vertical trunk, branches going to the sides, green color.
But these signs characterize other trees
.
To preserve the image of the Christmas tree, the teacher will draw the trunk with a line expanding towards the bottom, the branches (shorter at the top, longer at the bottom)
slightly inclined. It is important that the visual image does not diverge from the image of the real object, in this case it is a Christmas tree.
Slide 19.
If we want each child to fully demonstrate his or her individuality in art classes, create an atmosphere of joy, pleasure, goodwill and respect for the work, imagination, and creativity of each child.
How to draw a tree trunk
The trunk is the base of the tree. It doesn’t matter what kind of tree you draw, be it a lonely birch tree in a field or, on the contrary, a dense pine forest, you will start drawing from the trunk.
To make the tree look more natural, the trunk must be drawn correctly, regardless of whether you have a pencil in your hand or a brush. According to the rules, starting from the ground the trunk is wider and gradually narrows closer to the crown.
If you paint with paints, then paint the base with the wide part of the brush, and the top part with the narrower part. The line should be thin and flying.
Try to draw so that the trunk looks alive. It is difficult to find a tree with a perfectly straight trunk or symmetrical branches. Don't forget about shadows and highlights. They will add volume to the picture.
On the topic: methodological developments, presentations and notes
Summary of a lesson on applique in the middle group on the topic: “Autumn tree” Purpose: to introduce children to a new type of applique - floristry, to continue acquaintance with autumn.
Abstract of GCD drawing on the topic “Colors of Autumn” senior group.
An interesting activity, the children really enjoyed it, and so did I.
Abstract of the GCD for modeling in the senior group on the theme “Autumn Tree”.
Goal: development of children's creative abilities. Objectives: - instill the ability to see beauty in the surrounding reality; - create a desire to learn new things; - develop the ability to work with a brush and paint.
Source
How to draw a tree branch
The tree has large main branches and smaller branches growing from the main ones. Just like the trunk, large branches are thicker at the base. The type of tree determines the nature of the image of the branches. The branches of a birch stretch upward towards the sun, while those of a pine or spruce fan down to the ground.
First make a sketch, deciding where the branch will grow, how many branches it has, what its structure is.
Next we make the shape and give the volume.
First steps in the image
For children, the most difficult moment in drawing a tree is its crown, but if you correctly explain to the child what it consists of and show how to draw it, the child will quickly learn. So, explain that the branches are evenly spaced along the trunk and stretch towards the sun.
Larger branches have smaller branches and very small branches, which can be easily depicted in the drawing with light strokes. If the crown and trunk are made in the correct shape, then the design will look more beautiful.
How to draw tree leaves
Leaves are an integral part of any tree. Each tree has its own type of foliage. If you do not have a goal to depict the tree in detail and as accurately as possible, then you should not thoroughly draw each leaf.
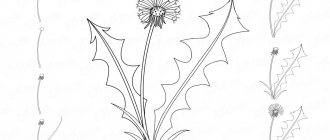
Let's look at how to draw leaves, for example maple leaves, more realistically.
First, we make sketches, draw the base and outline. Gradually outline the entire edge of the sheet and remove the excess with an eraser.
Add a leaf, a twig and veins. Fill the drawing with color. For the summer version we use several shades of green, for autumn warm red-orange tones.
How to draw a tree with a pencil step by step
Let's not draw any specific type of tree, let's draw an ordinary tree. Follow all the steps below and you will have a nice quality drawing.
First stage.
Remember that you don’t need to put too much pressure on the pencil, otherwise it will be difficult to erase the sketch later and the drawing will turn out a bit dirty. So, first we draw the trunk and the approximate outline of the tree crown.
Second phase.
We make the outline of the trunk clearer and add a few branches.
Third stage.
It's time to draw the foliage. Decide what the weather is like, windy or calm. If the wind is blowing in your drawing, the foliage should lean in one direction or another. Our example shows calm weather.
Fourth stage.
Now you need to remove the sketch and draw the elements of the tree in detail, starting from below. Draw the bark and branches.
Fifth stage.
To make the bark more natural, the lines should be like sketches; accuracy is not needed here. At this stage add a branch with leaves on the left side.
Sixth stage.
We continue to sketch out the foliage using rounded movements. Add earth to the drawing.
Seventh stage.
We highlight the tree trunk with a darker pencil, and on the contrary, paint over the foliage softly and lighter.
Eighth stage.
Don't forget about the play of shadows. Since the sun shines from above, the top of the crown should be lighter, and where the shadow is, in this case the lower left corner, should be a little darker.
Ninth stage.
Draw a few leaves in random order.
Tenth stage.
On the right side we also add a little shadow under the branches.
Eleventh stage.
The last step is to add highlights. For work done with paints, use white, and if you paint in black and white, just erase it a little with an eraser.
Step-by-step drawing of trees with pencils
When conducting a lesson or drawing class, children need to depict a park, forest and its vegetation.
But it's not as simple as it might seem. Therefore, drawing a tree with a pencil step by step is the very beginning task. If the child wishes, it can be further decorated with paints. If everything is explained correctly, describing each step in detail, then the baby will learn very soon. There is no need to despair if the first image turns out to be clumsy and sloppy.
Everything will work out very soon. Don't forget to constantly praise your child for his successes and gently point out possible mistakes. The best lesson option is a joint lesson with one of the parents.
From this article you will learn
How to draw a tree step by step for beginners
If you are a complete beginner artist, then this method will definitely suit you. Prepare a white sheet of paper, pencils, including a simple one, and an eraser.
Stage 1 and 2. First, let's draw a trunk and several thin branches.
We add volume to the branches, draw the same lines next to the existing branches, which smoothly turn into new branches. We remove unnecessary details with an eraser.
Let's draw foliage. To do this, using smooth lace lines, as if we were putting a cap on a tree, we draw a crown. After it we draw the next one, larger in size. Next is the third, largest crown.
Now all that remains is to paint the trunk brown, and each part of the crown with different shades of green.
step-by-step drawing of trees with children; methodological development for drawing (senior group) on the topic
Municipal budgetary preschool educational institution "Kindergarten of a combined type No. 67"
Engelssky municipal district of the Saratov region
“Step by step drawing of trees with children”
Art studio
2017
Before you start drawing trees step by step with your children, carefully examine these natural objects and find common features. What is characteristic of any (or almost any) tree? Of course, this is a powerful and straight barrel. The trunk is thick at the bottom, but the closer to the top, the thinner it becomes. Branches extend from the trunk in all directions. Usually the main branches are directed upwards. At the base the branches are long, closer to the top they are short. From large skeletal branches smaller branches extend in different directions, from them even smaller ones, etc. It is these small branches that form the crown of trees. The “skeleton” of the tree is ready. You can depict winter trees in this way - without foliage, just twigs.
Step-by-step drawing of trees with children - a generalized scheme for drawing a tree. We will dress the “skeleton” of the tree with leaves. You can draw them in dots, creating a mass of foliage from individual dots (tree A). When coloring foliage, it is better to choose several shades of green and even yellow for a summer tree. And for autumn - yellow, red, orange and green colors. But it is even easier for children to depict a certain plane of an irregular shape close to an oval (tree B). This method is interesting to use when drawing with young children, or depicting trees in a landscape. In this case, first draw only the trunk and thick skeletal branches, and add small branches after you have painted the green area.
Options for drawing foliage - step-by-step drawing of trees with children This is a tree “in general”. But of course, different types of trees will vary greatly. And, first of all, in our drawing there will be a difference in the trunks. A thick and powerful oak-hero, a slender weeping birch with drooping branches, a rowan or a pine - compare the trunks of these trees with children.
Trunks of various trees. The educational game “Trees, Leaves and Fruits” will help you introduce children to different types of trees.
A very simple tree - step-by-step drawing with children from 4 years old.
This is really a very simple way to draw a tree. Of course, it is unlikely to be able to determine its species. It is only clear that this tree is deciduous. Here we depict with the children only a trunk and a few large branches. Foliage is oval. You can color such a drawing not only with pencils and paints, but even with felt-tip pens.
A simple deciduous tree - a step-by-step drawing scheme for children from 4 years old. Although this tree drawing is very simple and generalized, it provides quite rich soil for creativity. See what trees you can draw based on our picture.
Tree crown design options.
Oak – step-by-step drawing of trees with children from 6 years old.
This oak tree is similar to the simple tree we drew above. But still, much more detail has been added here. This is a hollow, and the texture of the bark, and branches of complex shape. It's okay if your child leaves something out and simplifies the drawing. If his oak tree turns out to be powerful and stocky, then the artistic goal will be achieved!
Oak - a step-by-step diagram for drawing a tree with children from 6 years old.
Birch – step-by-step drawing of trees with children from 8 years old.
Drawing such a tree for children is quite a difficult task. This image is already close to a realistic image, replete with details and complex lines. Therefore, such work is not suitable for preschoolers. And younger schoolchildren will most likely simplify this drawing. Draw the children's attention to the position of the birch branches - they are leaning down.
Birch - a step-by-step diagram for drawing a tree with children from 8 years old.
Pine – step-by-step drawing of trees with children from 6 years old.
We move from deciduous trees to coniferous trees. Remind the children that pine is an evergreen tree. Therefore, it doesn’t matter whether you draw it in a winter or summer setting - the crown will always be the same. Pine is drawn according to the same principle as deciduous trees, but the green spots-needles need to be clearly “tied” to the branches. And the “bare” part of the trunk of this tree is much larger than that of deciduous trees.
Pine - a step-by-step diagram for drawing a tree with children from 6 years old.
Christmas tree - step-by-step drawing of trees with children from 4 years old.
There are many ways to draw the second well-known coniferous tree, the Christmas tree. Here we present only one - a realistic coniferous tree for fairly adult children.
Christmas tree - a step-by-step diagram for drawing a tree with children from 6 years old.
Palma – step-by-step drawing of trees with children from 7 years old.
Before this, we gave diagrams for drawing trees that grow everywhere in our country. Now let's look at the exotic palm tree. A fairly simple and decorative tree for drawing with children is a palm tree. The name “palm” comes from the Latin word “palma”, which means “palm”. Such associations were obviously born from palm leaves spread out like fingers. We present two options for drawing this tree. The first one is more “cartoonish”, the second one is more realistic. In terms of difficulty, both drawings are approximately the same. They can be recommended for working with children aged 7-8 years.
Palm tree No. 1 – diagram of step-by-step drawing of a tree with children from 7 years old.
Palm tree No. 2 – diagram of step-by-step drawing of a tree with children from 7 years old.
How to paint a tree with paints
Before you start painting, you need to choose quality paints. It is better to learn to paint with gouache, it does not spread like watercolor. This means the drawing will be more accurate.
Let's paint a winter spruce with paints.
First, draw the trunk and the branches emanating upward from it in brown. Then you need to mark the needles in green. In some places the paint should be lighter to make the drawing more vibrant. We paint the inside of the spruce with green paint with the addition of blue.
We wait until the paint is completely dry and start working on the snow. To depict snow on the branches, add a little blue to the white color.
How to draw an autumn tree
With the onset of autumn, nature is painted in all shades of red. In September you can see a mesmerizing landscape, when against the background of still green foliage, another, already red-orange, glows. Hands are reaching out to paint.
An autumn tree is drawn the same way as everyone else, starting from the trunk. Draw parallel, uneven lines at a wide distance from each other. From these lines we draw twisting branches.
To make the tree look more alive and voluminous, we draw small shoots in different ways, without repeating ourselves. We draw some of the branches clearly, and some as a sketch.
Next we draw the bark. To do this, we apply a lot of chaotic lines and a few tubercles to imitate real tree bark. To give the tree color, draw the bark lines in red-brown color.
Use a lighter brown to paint the remaining areas, watch the lines, they should be in the same direction. Adding shadows.
At the last stage we add foliage to the tree. On small branches we depict orange-red leaves.
Analysis of software drawing tasks according to age group
In the first junior group, drawing tasks are:
- arouse interest in the drawing process as a type of activity that produces results;
- familiarize children with drawing materials and how to use them;
- teach to understand an adult’s drawing as an image of an object;
- teach how to draw straight, rounded lines and closed shapes.
Drawing tasks in the second junior group:
- teach to depict a variety of simple objects, convey their main features - shape, color;
- develop a sense of color - learn to distinguish and name primary colors;
- develop compositional skills - placing the image in the middle of the album sheet;
- improve technical skills.
Drawing tasks in the middle group:
- teach how to depict round and rectangular objects, convey their structure, main parts and details;
- teach to use color as an artistic means of expression;
- develop compositional skills in arranging an object in the center of the sheet;
- improve the technical skills of painting a picture with pencils and paints.
Are you an expert in this subject area?
We offer to become the author of the Directory Working conditions Drawing tasks in the senior group:
- teach how to correctly convey the shape of an object, its characteristics, relative size and position of parts;
- teach how to convey simple movements in a drawing;
- develop and improve the sense of color;
- develop technical skills in working with pencil and paints;
- teach how to draw with crayons, charcoal, sanguine, and watercolors.
Objectives of object drawing in the preparatory group:
- teach to depict the structure, size, proportions, characteristic features of objects from nature and from imagination;
- teach the transfer of a wealth of forms and colors, the creation of expressive images;
- develop compositional skills;
- develop a sense of color;
- develop technical skills - the ability to mix paints to get different colors and shades;
- apply pencil strokes or brush strokes to the shape of an object.
How to draw a beautiful tree
Each tree is beautiful in its own way. But you must admit that the tree, large, with roots spread above the ground and a dense crown, is a little more impressive than an ordinary park maple. To draw such a tree, you will need a sheet of white paper, a simple pencil and an eraser.
We draw a trunk tapering upward. At the bottom of the trunk line we connect with an arc. Set the direction of the roots in four directions, and draw them like curved pipes that taper towards the bottom.
We produce two main branches from the tree trunk, and draw a fold between them. We remove all unnecessary auxiliary lines with an eraser.
Circles indicate crown locations. Build up the foliage by filling the main circles with smaller ones with an outline in the form of small scribbles. Add shadow.
winter tree
Summary of a lesson on drawing a snow-covered tree with children of the senior group.
Target
: learn to create expressive images of winter patterns on the window, and a tree in the snow outside the window.
Training tasks:
introduce graphic options for depicting a tree; consolidate the skills of its depiction using an artistic brush; improve the ability to achieve the required shade by mixing paints, make underpainting with rhythmic, smooth strokes in one direction, use additional devices of your choice (felt-tip pen caps, cotton swabs, rolled sheets of paper, stamps).
Developmental tasks:
develop a sense of color, shape, rhythm; attention, thinking, imagination, creativity; emotional response to the beauty of winter nature.
Educational tasks:
cultivate accuracy when drawing; encourage independence in decision making; the ability to rejoice in the successes of comrades.
Equipment:
projector, screen, computer, 2 easels.
Demo material:
slides depicting frosty patterns on glass, graphic versions of a tree.
Handout
: for each child, gouache in ten colors, sheets of A3 paper, palette, caps from felt-tip pens, rags, cotton swabs, sheets of white A6 paper, brushes No. 12 and No. 5.
Progress of the lesson
(The music of A. Vivaldi “Winter” sounds. The teacher throws up a handful of fluffy snow and catches snowflakes, the children gather around him.)
Educator:
Guess the riddle: The star spun in the air a little,
sat down and melted on my palm. What is this? (Children guess.)
The winter master Frost painted his picture. He wandered between houses, gardens, forests, parks and decorated them. What do you think he decorated with?
Children:
Icicles, snowdrifts, snow, ice, frost, frost, snowflakes.
Educator:
Frost has reached our kindergarten.
What did he manage to decorate? Let's go to the window and admire it. (The teacher turns off the lights in the group and approaches the window with the children.)
Children:
I decorated the windows and the fence. I covered the paths, trees, our mountain ash under the window, bushes.
Educator:
Look at the gorgeous pattern on the windows. Is it the same? What does it look like? Let's consider.
Children:
The pattern is completely different. It looks like curls. The same touches are there. Look, I looked at the sleigh!
Educator:
Moroz composed it himself, was not afraid to make mistakes, and wanted to please everyone. The snow-white pattern on the glass is beautiful against the dark sky, the silhouette of our mountain ash is clearly visible, the shape of the branches is clearly outlined.
Today we will try ourselves in the role of the same wizards. Let's depict the view from our window in only two colors. One color will be white, but you will choose the cool shade of the second “winter” color yourself. How can I do that? Let's go to the easels. The guys who have already created beautiful “winter” shades will help us. ( Two children tell and demonstrate how they mixed paints and achieved an interesting result. The teacher and other preschoolers watch.)
Children:
I mixed blue and white paint. It turned out light blue. And I got a beautiful color by mixing blue and a little red, and I also added white. And I took blue paint and added more water to create clouds.
Educator:
Master Frost composed his pattern and wrote so amazingly, and drew so wonderfully, look.
(The teacher demonstrates drawing a curl and a snowflake with a brush in the air and a damp brush on a board, and jerky lines on an easel. He shows techniques for drawing on paper with a felt-tip pen cap, a dry brush, paper rolled into a cylinder, a cotton swab.)
Let's take an imaginary magic brush in our hands and Let's repeat everything that Frost did.
(Children repeat all movements in the air after the teacher).
Educator:
Sit on the carpet.
Now you will see Frost's mastery on the windows of other houses. (The teacher turns off the light and shows a slide show of frosty patterns on the glass).
Now we will try ourselves in the role of Frost’s assistants and create our own original pattern.
Go to the tables. ( Children take their seats.
)
Educator:
Patterns on glass become poems.
Patterns on glass are winter fantasies.
The patterns on the glass live in the window frame,
They will tell us the story of winter. (I. Gilchenko)
Remember how the pattern is located on the glass. You can leave part of the sheet white and apply color to the rest. Or apply color to the entire sheet. (The teacher tints part of the sheet, leaving one corner white. Shows a previously prepared sheet, where several corners are white. Tints the entire sheet with light strokes. Then removes the samples.).
Take a wide brush and try to do the underpainting yourself.
(The music “Winter” by A. Vivaldi plays. Children complete the task.
) Now your underpaintings need to dry.
And today Frost has a performance,
We are invited with you by command
It's fun to walk like snowflakes fly,
Dance in the snow and draw patterns! (Tychkina S.M.)
(The music of G. Sviridov “Blizzard” sounds. Children stand up, raise and lower their hands, shake them, walk in place, spin around themselves, depicting the flight and dance of snowflakes, and draw in the air.)
Educator:
And now the most interesting part of our work.
Take your seats. ( Children sit down
). Now we will look at how to depict a tree.
(The teacher shows slides with different options for depicting a tree, including graphic ones, with a damp brush on the board, paint on a sheet.)
Your work has dried out, try to depict a tree outside the window. Our rowan will be a real decoration of the picture! We will paint it with a wide brush, and the branches with the tip of a thin brush. Rowan can be fabulous or real. You and I drew a curl, a snowflake, a stroke in the air. Let's transfer them to paper, and then you can decorate the drawing with small details.
(The music of G. Sviridov “Blizzard” sounds. Children depict a tree and a pattern, decorate the work with small details. The teacher helps the “wizards” in finding means of expression. The teacher offers the children who finished the work earlier than others to compose a winter story.)
Educator:
Let's look at the drawings you made.
(Children look at each other’s drawings, talk about their work, share their impressions.)
Svetlana Tychkina, teacher
GBOU School No. 1905, D/o No. 1, Moscow
How to draw a rowan tree
Rowan is very beautiful in winter, against the backdrop of white snow. Try to paint a winter rowan with paints.
Paint the background light gray and let the paint dry. First, make a pencil sketch. One rowan tree has several trunks growing out of the ground. They are thin and branched. Use small ovals to mark the location of future clusters. Now you can take on the paint.
We outline the trunks and branches with dark brown color. We take a rich red color and fill the ovals with small strokes. You will get bunches of rowan berries. Since we are drawing winter rowan, put a little white snow on each bunch. Using the same white, draw snowdrifts at the base.
How to draw a maple tree
The maple leaf has a characteristic acute-angled shape. The maple itself is a tall branched tree.
We make a sketch of a maple tree, draw a trunk and a crown cap. Next, we complicate it a little by adding several stripes inside. We divide the crown into parts, drawing the branches and partially the foliage. Next, we outline the crown in more detail with <<spiky>> lines.
We color the maple with shades of yellow, orange and brown. Don't forget to add light and shade.
Drawing construct “Trees in our park” for the older group (5-6 years old)
- Guys, did you know that even real artists did not immediately learn to paint pictures. And even when they became artists, for each painting they first wrote sketches - small sketches in pencil or charcoal in order to better understand what this or that tree, this or that object looks like.- So today you and I will prepare sketches - draw individual trees - birch, oak.
The teacher shows a pre-prepared sample and
shows step by step drawing of trees.
- Guys, first, let's remember how oak and birch are drawn. First let's talk about the oak tree, kids, what do you think needs to be done to draw a tree trunk?
Sample children's answer:
Dip the brush into water and pick up brown color.
- Okay, we will do this, but how do we draw a tree trunk?
That's right, well done! Then we draw it from the top of the head down. The top of our head is thin, and the bottom is a little thicker. Then we will draw the branches. We draw them from the bottom up from the trunk. Look how I can do it. Guys, what do you think is left to draw? That's right, leaves and acorns. What color are the leaves on the trees now? What wonderful answers you have. You said everything correctly. Watch how I will draw leaves. We take red, yellow or orange paint and draw leaves. Please note that we draw the leaves using dipping. Our tree is ready.
- Guys, what do you think the trunk of a birch tree is drawn?
Sample children's answer:
from bottom to top, pressing on the heel and moving to the tip of the brush.
- Why do you think so?
Sample children's answer:
The birch tree has a thin trunk.
— Guys, what do you think, are the branches of a birch tree being drawn?
Sample children's answer:
Thick branches go up, and then thinner ones go down.
- How did you guess about this?
Sample children's answer:
The birch branches are sad.
- Guys, how are we going to draw leaves, like oak leaves?
Sample children's answer:
Yes
- In what way?
Sample children's answer:
by dipping.
The teacher takes a paper prepared in advance and asks the children to show themselves how they understood.
- That's right, we will draw the leaves of the trees using the dipping method. Katya, show me how you will draw leaves.
Katya shows how she draws leaves.
- Well done, Katya! Sasha, show me how you will draw the trunk and branches of a birch?
Sasha shows how to draw the trunk and branches of a birch tree.
- Well done, Sasha! You just need to be careful when using brushes and gouache. We hold the brush vertically in relation to the sheet and make a sharp application with the brush. The paint should be thick enough; do not pour too much water into the gouache. Do not wet the brush with water either. Let the design dry a little before using another color.
“You and I remembered how trees are drawn, and now we just have to remember how sketches are drawn.”
— Guys, what do you think sketches are?
Sample children's answer:
This is when several trees are located on one leaf.
- That's right, well done! Guys, in order to draw trees near and far, we need to divide the sheet in half, carefully draw a horizon line with a pencil, without pressing.
-Guys, look what I draw first.
-First I draw the background of our landscape. The background may be different. Our sky is light blue, but the earth will be orange.
-Guys, remember that the further the tree is from us, the lower and smaller it is.
How to draw a sakura tree
It’s not at all difficult to draw a beautiful Japanese cherry tree. We use a simple pencil.
- Draw a large oval. Beneath it is a curved tree trunk. From it we draw crooked branches, they should intertwine a little and curl above the ground.
- Add more branches. This will make the tree look denser. Let's start with the flowers.
- Do not draw all the flowers clearly; turn some of them only into a hint.
- Draw the bark on the trunk.
- Remove all unnecessary lines with an eraser. Start working with paints.
- Paint the trunk dark brown. Bark lines are black. We paint the flowers with all shades of pink.