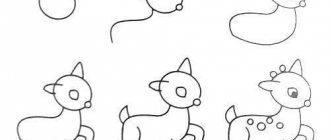
Master class 1. How to draw an autumn tree: draw a tree using the “poke” method
Even small children can draw a tree using the “poke” method.
The master class is conducted by Vera Parfentyeva, a reader of “Native Path”, a technology teacher, the head of an art circle for preschool children, a participant in our Internet Workshop of educational games “Through play - to success!”. To draw a tree using the poke method you will need:
- gouache paints,
- brushes No. 2, No. 4,
- white watercolor paper A 4.
We will paint this tree immediately with paints without first drawing the outline. The crown of the tree will consist of 3 tiers of different sizes. We will draw it as follows.
Step by step description of drawing a tree
Step 1:
In the center of the upper part of the sheet of paper, using a brush No. 4 with yellow paint, draw a dotted contour in the form of a cloud on the upper tier of the tree crown. The brush must be held vertically. You need to paint with the tip of the brush, making “pokes”. Then, inside the contour using the “poke” method, we will paint over this tier.
Step 2: Stepping back from the first tier down approximately 1 - 1.5 centimeters, as in the first point, we point-draw the second tier of the crown a little larger than the first. I say approximate because the size of each tier will be completely different for everyone. Therefore, every little artist will orient himself in size relative to the sheet. The contour should not be perfectly smooth and symmetrical along the edges relative to the center.
Step 3: Similar to the previous points, inside the contour using the “poke” method, paint over the second tier and draw the third tier. Let's fill it inside the contour. Make sure that the brush is always directed vertically.
Step 4: Apply dotted orange paint to all three tiers of the autumn tree. We apply orange paint mostly on the left side at the bottom of the crown, creating darker spots, because Let's conditionally choose the lighting on the right. Therefore, the right side should be lighter than the left.
Step 5: Using the “poke” method, we’ll paint the grass under the tree first with yellow paint, then with orange.
Step 6: Using a brush number 2 with brown paint, paint the trunk between the tiers. Moreover, it is better to draw it from the bottom up, since the tree grows, gradually narrowing the trunk towards the upper small tier. It is advisable to take paint in two shades: dark and lighter. Then the texture of the bark will stand out on the trunk. Let's draw the branches.
Step 7: Since we conventionally assumed that the light falls on the tree from the right, we will add thin lines along the trunk on the right side with yellow paint.
I would like to add that children of different ages completed the task. Some completed the drawing of an autumn tree entirely on their own. For others, I helped them first draw on the outline and trunk with a pencil.
Examples of children's drawings of autumn trees
Summary of a lesson on fine art activities (drawing) in the middle group “Autumn Tree”
Summary of a drawing lesson in the middle group
Topic: "Autumn tree."
Tasks:
Teach children to draw an autumn tree, correctly conveying its structure (the trunk is wide at the bottom, narrow at the top; the branches are thick at the bottom, thin at the top).
Practice the ability to draw thick lines with the whole brush, thin lines with the tip of the brush, leaves with the brush method.
Strengthen the ability to place the image in the center of the sheet.
Develop imagination and creativity.
Cultivate the desire to achieve good results.
Materials:
½ landscape sheet, gouache (brown, red, orange, yellow), brush No. 3, jar of water, cloth.
Progress of the lesson
The children stand in a semicircle.
The adult asks if the children know what time of year it is. Asks to name the signs of autumn. (throws the ball to the children).
Mystery
We saw him dressed in spring and summer.
And in the fall, all the poor girl’s shirts were torn off.
What say this? (Tree)
Children sit down on the floor.
Conversation about a tree.
There are many trees in our city. Why are trees needed? Trees provide oxygen. Clean the air.
(Appearance of the Taratun bird in the spaceship).
Dialogue with the bird Taratun
V. - Hello, who are you?
T. -I am the bird Taratun, who came to you from the planet Kaptun. Our planet is dying. I was sent to you for help, for a tree, because it releases oxygen and cleans the air. Give me a tree and I'll fly home?
V. - Taratun, do you know what a tree looks like?
T. - No.
V. – Our guys know, and we will definitely show them what a tree looks like. We will plant a whole alley of trees for you so that the air on your planet Kaptun becomes clean.
T. - Great. Thank you.
Children stand in a line, answer questions and show the structure of the tree with their movements.
How a tree grows (from bottom to top), what it holds on to (why the tree doesn’t fall). At the bottom of the tree the trunk is wide, at the top it is narrow.
The branches of the tree grow from the trunk. Small branches grow from a large branch.
There are leaves on the branches. What color are the leaves in autumn?
The wind blows in our faces
And the tree shakes.
The wind is getting quieter and quieter.
The tree is getting higher and higher.
What a beautiful alley it turned out to be.
T. -Thank you, friends. Load the trees into my spaceship and fly to the planet Kaptun.
V. - Why, Taratun, we won’t give you the guys. Guys? How can we help the planet Kaptun? We will draw trees with you. And we will send them to the planet Kaptun.
T. – Great, we have technology on the planet, and we will bring your drawings to life. We will have trees growing, a whole alley of trees. You friends will save our country Kaptun.
Children go to the tables.
How to draw a tree: creative tasks for children
— What two groups are tree species divided into? (deciduous and coniferous)
- Name the species of deciduous trees (Rowan, aspen, poplar, linden, elm, autumn, maple, birch and others).
-What tree did you depict? Think about whether it is possible to depict coniferous trees using this technique?
— Try to draw a pine tree using this technique? How can I do that? (For more information about drawing a pine tree, see the article “Drawing Summer”).
- Consider the shape of the tree. Are the crown and trunk dimensions the same at the top and bottom? What is the difference? How can you get this result when drawing a tree?
— Why is autumn called golden?
— Read to children or learn poems about autumn:
If the leaves on the trees have turned yellow, If the birds have flown to a distant land, If the sky is gloomy, if the rain is pouring, This time of year is called autumn. (M. Khodyakova “Autumn”)
Following summer, Autumn comes. The wind sings yellow songs to her, lays red leaves under her feet, flies like a white snowflake into the blue. (V. Stepanov “Autumn is Coming”)
An autumn tree can be drawn not only using the “poke” method, but also using other techniques. How to do this is in the step-by-step master classes below.
What you will need
To use step-by-step instructions for children or adults in drawing a tree, you need to select the appropriate tools and materials.
Any materials can be used; the choice will depend on the design and technique:
- Simple pencil;
- Eraser;
- Colored pencils or markers;
- Paints;
- Paper or cardboard on which the drawing will be created.
Birch
To know how to draw a birch beautifully, you need to follow the following instructions:
- The drawing should always start from the trunk, no matter what kind of tree is being drawn.
- The master class for beginners states that it is rare that a tree has a perfectly straight trunk. Birch is no exception.
- The barrel can be any length as desired. Its spreading nature also depends on the choice of the artist;
- You also need to think about what kind of landscape will be drawn against the background of the tree.
- If there are any elements that need to be added to the drawing, then you need to take this into account in advance;
- Let's imagine that there is a fairly standard landscape outside with calm, windless weather, so the trunk can be drawn slightly curved, rather than bowed by the wind;
- At the first stage, the trunk is depicted schematically, now you need to finish drawing its shoots for the branches;
- The next step in the master class on how to draw a tree with a pencil is drawing the branches. They need to be drawn from those processes that were drawn earlier.
- It must be remembered that the trunk becomes thinner towards the top, therefore the branches should decrease with height;
- Now you need to draw small thin branches to the thick branches; in birch they are usually directed downwards;
- You need to draw black strokes of bark on the tree trunk;
- If you mean a summer landscape, then you need to draw foliage. If it’s winter, then everything is much simpler. There is no need to draw foliage, the drawing is already completed.