Mom is the most dear and beloved person. She deserves love and attention. One way to please your mother is to surprise her. As such an unexpected gift, you can depict her portrait. Both a small child and older children can draw a beautiful drawing for mom. It all depends on the technique of execution, the time spent and imagination.
The basics of painting a portrait in brief
- The face is an oval
- Eyes, eyebrows, ears - symmetrically
- If the oval is divided equally horizontally, we get the eye line.
- The top of the ears also starts here.
- Eyebrows symmetrically above the eyes
- The distance between the eyes is equal to the length of the eye.
- The tip of the nose is located exactly in the middle of the lower part. The sinuses are symmetrical.
- In the middle of the nose-chin distance, there is a smile line, lips below and above this line.
Children at different ages have drawing skills to completely different degrees. A 5-year-old boy who is inclined to draw will portray his mother better than the same second-grader who wields a ball, like Ronaldo.
However, there is both a simple drawing technique suitable for kids, and a ready-made algorithm for older lovers of drawing.
Portrait by cells
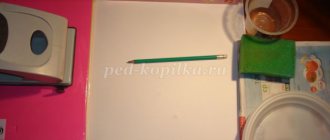
To work you will need:
- Checked leaf;
- Simple pencil;
- Eraser.
Stages of work:
- Draw half an oval - this is the head. We draw strands of hair on top, it is better to make the ends pointed. You can choose the hair length yourself.
- At the next stage we start drawing the face. Draw two black thin eyebrows. Then we draw the eyes, nose and mouth.
- The next thing we do is draw the neck. Its lines flow smoothly into the shoulders.
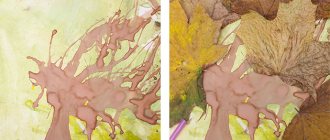
To make your mother’s drawing look beautiful, you can add flowers. Draw the buds and leaves. At the bottom of the bouquet we draw a line of hands. If desired, the drawing can be colored.
Drawing a portrait of a mother with babies
The attention and perseverance of children is minimal, so step-by-step instructions for children should be as simple as possible.
List of drawing materials.
- Album sheet. It should be thick enough to withstand the erasing of irregular lines by small hands and possibly excess water.
- Watercolor or gouache. Paint is not so important at this age, the main thing is to have enough time to dry the painting stages.
- Brushes (medium and small), simple pencil (marked TM)
- Felt pens, colored pencils.
Little lovers want to draw a portrait quickly, it is important to offer to draw the mother in stages, i.e. divide the entire process into small tasks.
Stages of drawing a portrait with small children
The first stage is creating a sketch; it is necessary to teach even small children how to construct a drawing and proportions. Plus the pencil can be erased and drawn again.
Step by step, use a pencil to make a blank for the future portrait, and then you can color it with paints or felt-tip pens.
- Using a pencil, draw an egg in the middle of the sheet, it is important not to press too hard on the pencil so that you can correct the sketch.
- Approximately in the middle draw two arcs.
- Under the arcs, outline identical even circles - the irises of the eyes, finish the eyes with another arc under the irises and another circle-pupil.
- A little lower we roughly outline the nose, with a small arch, slightly darken the nostrils on both sides
- Smile line in the center and beautiful lips
- Don't forget to add ears, they end approximately where the lower lip is.
- Remember what kind of hair your mother has, curly or straight, long or short, with bangs or pinned up.
- The final stage will be drawing the neck and clothes.
Portrait with colored pencils
Now let's try to draw a complicated portrait of my mother using multi-colored pencils. In addition, prepare a black felt-tip pen and a landscape sheet.
Let's move on to the instructions that will tell you how to draw a mother:
- Let's make a sketch with a black felt-tip pen. Let's draw an oval for the head.
Approximately in the center of the oval we begin to draw the eyes. They should resemble petals and be the same size. At the top of the eyes we add arches that will become eyelids. Add rounded pupils. - We continue to design the face. Add eyebrows above the eyes. The part of the face under the eyes should be visually divided in half. Mark the middle with a dot. Up to this point, draw a line for the nose. Add a wavy line to it below.
- Mark the location of the lips. Draw a wavy line for the upper lip. Draw the central part of the mouth and add the lower lip.
- Let's add a few details. Below under the head we will draw the neck and shoulders. Let's move on to the hair lines. In our sample, the hair is voluminous and short. The hairstyle may be different in your portrait.
- We start coloring the sketch from the skin. Try to choose colors that are as close to natural as possible. You can use light pink and paint over the desired areas with neat strokes.
- Let's add some blush to mom. Take a darker color and carefully apply strokes to the cheeks. Use black to highlight the eyebrows and eyelashes on the eyes.
- We paint over the pupils. We leave small highlights in the pupils. You can paint over your eyelids for beautiful makeup. Using a black pencil, draw long eyelashes from the outer corners of the eyes. Paint over the lips.
- Let's move on to the hair. Here it is better to use pastel pencils. We draw long lines from the roots and then rub the resulting result with a napkin or finger. You can use a simple pencil, but to get the desired effect, it is better to use a very soft lead.
- If you want to make the picture better after drawing mommy, you can add a dress below. It is enough to draw the lines of the sleeves and neckline. Color in the result. You can decorate your mother with earrings or beads, but this is optional.
It turned out to be a wonderful portrait. If you use your mom's facial features, it will turn out even better.
Creating a painting with paints
- Leather. If very young children are drawing, then the skin can be left white; older children take a very diluted brown, almost water, and cover the entire oval of the face.
- Background and clothes. Mom is on some kind of background, so we paint the background with any color, carefully going around the hair. It’s better to paint over your clothes now, while your complexion is drying.
- Eyes (shape, pupil) and lips. When the skin dries, use a thin brush to outline the eyes with brown paint, the pupil is black. We paint the lips with a delicate pink or light red color.
- Hairstyle. We color the hair taking into account the shade and sketch with one color. We draw our eyebrows.
- Final touches. Color the iris like your mother's and draw eyelashes with a thin brush or black felt-tip pen. Add darker shades to the strands on your hair, or a pattern to your clothes.
How to prepare your child to draw people
When starting to teach your child portrait drawing, you need to talk to him . You can also talk in the process of preparing for him to paint a portrait of his mother. The main thing he should take away from this conversation is:
- what shape is her face, ears, eyes;
- eye, lip and hair color;
- what length of hair and what hairstyle;
- symmetry of the location of the nose, eyes, and ears;
- the principle of drawing people is always the same
Knowing how to hold a pencil in his hands and use paints, the newly-minted artist will develop his abilities . His children's paintings will become a real hobby for him, and maybe more.
Creating a drawing with felt-tip pens
Coloring a portrait with a felt-tip pen comes down to outlining a pencil portrait; it is important to use different shades of the same color to make the portrait more voluminous.
Maybe for some, the question of how to draw a mother according to these instructions will become closed, it will seem easy, but someone will want more details and little things, we advise you to use your imagination, communicate with your mother, then your drawing will be even more “lively”.
For older children, it is important “What will other people say?”, whether my friend, teacher, and finally my mother will like my work. Therefore, teenagers think about how to draw beautifully, sometimes wasting time and resources.
The format is a master class, suitable not only for young beginners who love painting, but will also help an adult draw a beautiful portrait of a loved one in the shortest possible time.
List of drawing materials:
- Watercolor paper.
- Watercolor and palette.
- Brushes (No4) and a simple pencil (marked TM).
- Liner or gel pen.
Let's figure out how to draw a mother with a pencil, by the way, some artists stop at this stage, but the instructions given below are in pencil and color. It will be good if you draw your mother from a photograph, so her facial features will be more original.
Advice - make the same lines as in the sketch in your photograph, so you will see the nuances even better.
Final stage
It is best to paste the resulting work onto cardboard the same size as a sheet of paper. Using regular paper glue, glue the design to the cardboard.
On the reverse side, secure a rope with tape, with which the portrait can be hung on a nail on the wall.
The gift is ready! Mom will definitely like it. Your mother will treasure your drawn pictures for many years.
Sketch in pencil
- Mark the boundaries of the portrait with a pencil, about a centimeter on each side; try not to extend the drawing beyond these limits, so it will look harmonious and complete.
- Draw a circle in the middle of the sheet, then at the bottom turn it into an egg. At the same time, outline your cheeks, chin, and temples.
- Divide the oval into 4 parts. There will be eyes above the top line; draw 2 identical, symmetrical arcs.
- Next, look at the photo and decide on the shape, then make the lower arc of the eye, it is slightly smaller than the upper one.
- Draw 2 perfectly even circles of the iris, they may not be visible above and below, behind the eyelids, but the visible part should be perfectly round, like the pupil in the middle of the cornea - this is important.
- In the corner, mark the tear duct, and two more arches above the upper and lower parts of the eye - the eyelids.
- Let's draw parallels from the inner corners of the eyes, this will be the width of the nose, mark the wings a little wider than the stripes, with two semicircles, in the middle we'll outline the nostrils and a small semicircle - the tip.
- From the nose we set aside a segment equal to half, from the nose to the end of the oval of the face - this will be the line of the lips, we draw something like a wavy line, with one wave in the middle, we draw lips at the top and bottom.
- We draw the eyebrows in the form of a curved line, the same shape as in the portrait.
- Don't forget to add ears, they end approximately in the same place as the lower lip and represent a semi-oval.
- The upper inner part of the ear follows its outline, and the lower one is reduced in the form of a lobe. Let us darken the inside of the auricle a little; if there are decorations, then it’s time to depict them.
- Hair can be outlined with small strokes, how it grows, or how the strands descend.
- Neck and clothes. It is important that the neck is not too wide and not too narrow. Measure your nose and estimate the width of your neck based on that.
Half-turn portrait
You can depict your mother from different angles. The most difficult option for depicting a portrait in half-turn or in profile.
The drawing technique itself repeats the technique of drawing full face with some features:
- The oval will have an irregular shape. One of its sides is more convex than the other.
- Then you should divide the oval with a curved line where the back of the nose will be located.
- Draw a small horizontal line inside the oval.
- Draw arched eyebrows at the top of the face.
- At the intersection of the horizontal and vertical stripes, draw the tip of the nose.
- We depict the lips under the lower horizontal line.
- At the level of the upper horizontal stripe, draw the eyes so that the line goes in the middle.
- We erase all unnecessary elements.
- Draw the details of the face and add a hairstyle.
All that remains is to decorate the image and the portrait is ready. The drawing technique is based on the creation of horizontal and vertical stripes, which help maintain the proportionality of facial features.
Complexion
The skin has a beige-pink color, so mix the colors “ocher” and “red” on the palette, dilute it very much with water and completely cover the face, neck and ears.
In places where the light falls, it is better to leave it white, or dilute it even more with water; use darker paint to mark the shadow on the temples and neck.
Background and clothes
We fill the background and cover the clothes with the main tone.
Hairstyle
We cover the hair taking into account the color, making light and color shades.
- Line your eyebrows, not too brightly.
- It is advisable to paint the iris in several stages, adding depth of color around the edges.
- Line your upper and lower lashes with a thin brush or black liner.
- Use white paint to highlight the pupil.
Photos of mom's drawings
0