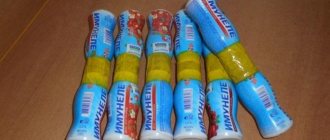
DIY sports equipment - how to make dumbbells for children
They can be made from the most unusual materials.
Take:
- imunele bottles;
- wooden sticks;
- scotch;
- peas.
Unscrew the bottle caps. Insert wooden sticks into each pair to connect these containers in pairs. Wrap with tape around the necks. But first, pour dry peas or beans into the bottles. You can also use buckwheat, rice.
Such sports equipment for kindergarten will help children fall in love with sports, they will be able to develop the strength of their hands.
You can also use unnecessary skittles to make dumbbells. You will make slits on the side of the neck, put loose weights in them and connect these parts in pairs with tape or tape.
If you want to make sports equipment for children, you can also take regular plastic bottles with a volume of 300 or 500 ml. And for adults, you will use larger bottles.
- See also how to make a climbing wall for children in the country
"breeze TO THE BOTTLE"
Material: A plastic bottle filled with confetti, foil, pieces of foam, etc., with holes punched in it. Cocktail tube.
Goal: To teach proper breathing (inhale through the nose, exhale through the mouth).
Usage: The child blows into a tube inserted into the lid. Breathing exercises in play activities.
We train the eye - do-it-yourself sports equipment
A ring throw will help with this. Take:
- plastic bottles with a volume of 1.5 to 2.5 liters;
- colored electrical tape;
- cardboard;
- scissors;
- glue.
Making master class:
- Cut out rings from cardboard. If you don't have very thick pressed paper, then connect the two rings in pairs.
- When the glue is dry, wrap them with colored electrical tape. Take plastic bottles, remove the labels from them, fill them with loose grain or sand so that these blanks are stable.
- Now invite the children to split into two teams and take turns throwing their rings at a certain bottle. Those who can string the most rings will win.
And here is another game called “Hit the Target.” It will also help train your eye. Also, the child will be able to develop coordination of movements, manual dexterity, speed of reaction, and attention. Take:
- thick fabric;
- scissors;
- threads;
- ball.
Making master class:
- Fold the fabric in half and stitch along the edges. Then place the ball here. See what size the holes need to be made so that this sports attribute fits into the grooves made.
- This game requires four people. Each of them will take a corner of the fabric at the base. The ball is placed in the center.
- Now the children need to throw it, but not high, so that the ball then falls into some hole. Here some of them will give up, others will take action in order to direct the projectile straight to the target.
Also, other sports equipment for kindergarten will help develop the children's eye. Cut out various shapes from cardboard. These can be rectangles, circles, triangles. Cover with self-adhesive film or cloth. Make a hole at the top to thread a thick rope through. Hang this attribute. Let your child throw objects, such as balls, inside. This way he will develop dexterity of movements.
Master class “Sports didactic games for physical education of preschool children”
MBDOU kindergarten No. 1 “Smile” of compensatory type
for teachers:
“Sports didactic games for physical education of preschool children”
Prepared by:
head of physical education
Aptrieva O.D.
All children are individual, each of them is unique and
you must find the key to everyone!
Play is not only a source of positive emotions, it is also an opportunity to develop qualities necessary for later life. While playing, a child, without even knowing it, can acquire new knowledge, skills, abilities, and develop abilities. Any game is, first of all, communication with peers or adults. And it is at this moment that the child learns to respect other people’s victories and endure his failures with dignity. From the wide variety of games, I would like to highlight didactic games, which in the hands of a teacher become an interesting, exciting, emotional and creative means of educating a child’s harmoniously developed personality. The didactic games for physical education presented below help to consolidate in children the knowledge acquired in thematic classes in physical education. Their main goal is to develop children’s sustainable interest in physical education and sports. All games are multifunctional. They not only develop interest in sports, but also contribute to the formation and development of mental processes:
- development of perception of color, shape, size, space, time; - development of visual and auditory attention; — formation and development of mental operations (comparison, juxtaposition, generalization, exclusion, classification), operations of analysis and synthesis; formation of logical thinking in children; - formation of general and fine motor skills of the hands.
I made all the games with my own hands. To make the games, photographs and symbols of sports, as well as pictures from board games and coloring books, were used.
Methodological recommendations for the use of didactic games in physical education
- Didactic games should be played during independent or joint activities of children and the teacher.
- To play board games, you should choose a table at which all participants in the game can sit comfortably.
- Participation in games by a teacher increases children’s interest in games and contributes to the development of friendships.
- To develop activity and independence, it is advisable to assign the role of leader to one of the children.
- The new game should be clearly and concisely explained, and individual points can be shown.
- The course of the game and its rules are explained before the start. If necessary, the teacher can show and use questions to find out how the children understood the game.
- All instructions during the game should be given in a calm tone, marking the correct completion of tasks and compliance with the rules.
- Children's activities in the game are assessed by all participants; At the same time, it is important to note compliance with the rules, quality of answers, independence in organizing and conducting games.
- After the game, it is necessary to give an objective analysis of the behavior of all the players, their compliance with all the rules, which contributes to the formation of friendly relations and the conscious attitude of each child to his behavior.
Description of educational games
"Sport equipment"
Goals and objectives:
to develop children’s interest in physical education and sports;
introduce children to sports equipment; teach children to recognize and name sports equipment, determine its purpose; develop thinking, attention, memory, logic. Age:
3 – 4 years.
Rules:
The set includes cards with black and white images of sports equipment and color parts of these pictures (from 3 to 12 parts).
The child selects a black and white picture and superimposes the colored parts of the picture onto it. After the child collects the picture, he must name the sports equipment that is depicted on it. Complication:
Collect a picture without relying on a black and white image. Explain how this equipment can be used.
"Fold the picture"
Pictures depicting sports and equipment are cut into various geometric shapes. Goals and objectives:
to develop children’s interest in physical education and sports;
introduce children to sports; teach children to recognize and name sports; develop imagination, thinking, logic. Age:
5 – 7 years.
Rules:
the player assembles a picture from parts. Having collected, the child tells what is shown in the picture.
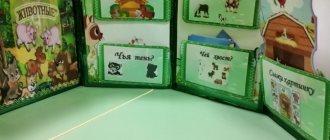
"Find a Pair"
Goals and objectives:
to develop children’s interest in physical education and sports;
introduce children to sports; teach children to recognize and name sports equipment and equipment, determine what sport it belongs to; develop the ability to analyze and generalize; develop creative thinking and imagination. Age:
3 - 5 years
Rules: Option 1:
play from 2 to 4 people.
The presenter sorts the cards into pairs and divides them equally between the players. On command, players must pick up paired cards and fold them. The winner is the one who first completed the task and correctly named the sports equipment. Option 2:
play from 2 to 4 people and a leader. The presenter sorts the cards: puts one card from a pair into one pile, and the second card into another. He distributes one pile to the players, and places the second on the table with the pictures facing down. The presenter takes one card and shows it to the players. The player who has a pair from this card names what is shown in the picture and what sport it is used in. If the answer is correct. Then the player takes the card for himself, if not, then the presenter keeps the card for himself. The one with the most collected pairs wins.
"Two halves"
Pictures depicting sports equipment and the main types of equipment movements are cut into two halves.
Goals and objectives:
teach children to recognize and name sports equipment and basic types of movement;
develop thinking and memory; develop interest in physical education. Age:
2 – 3 years.
Rules: 1 option.
The child puts the two halves together to make a picture.
Option 2.
The child looks for the desired half in a stack of pictures.
Having collected the picture, the child must name what is depicted on it. Option 3.
Having collected the picture, the child must name what is depicted on it. If this is a movement, then the child must show it. If this is equipment, then the child must find it in the group and show what exercises can be performed with it.
"Good and bad"
Goals and objectives:
teach children to have a healthy lifestyle;
teach children to compare good and bad, useful and harmful; instill in children the desire to lead a healthy lifestyle; develop thinking, logic, memory. Age:
3 – 6 years.
Rules:
children are given cards that depict situations harmful to health. Players must determine why it is harmful and find a pair of cards that depict a situation that is healthy.
“Relax actively”
(cubes)
Goals and objectives:
develop interest in physical activity;
teach children to recognize and name types of outdoor activities; develop memory, thinking, logic. Age:
3 – 6 years.
Rules:
assemble the cubes so that you get a whole image, based on the finished picture.
Complication 1:
after collecting the image, the child must name what is shown in the picture.
Complication 2:
assemble an image from memory without relying on a finished image.
"Sports Domino"
Goals and objectives:
teach children to recognize and name sports;
develop memory, logic, thinking. Age:
4 – 6 years.
Rules:
The dice feature symbols of sports. 2 – 4 people play. Before the start of the game, the dice are laid face down on the table and mixed. Each player chooses any seven dice. The remaining bones remain on the table - this is the “bazaar”. The player who has the double picture tile goes first. If several players have a tile with a double picture, then the first player is chosen by counting. Next, the players take turns placing dice to the right and left of the first, placing the same picture of the other to the picture of one dice. If the player (whose move) does not have a dice with the required picture, then he takes a dice at the “bazaar”. The one who has no dice left (or the fewest) wins.
"Sportloto"
Goals and objectives:
to develop children’s interest in physical education and sports;
teach children to recognize and name sports; develop attention and memory. Age:
5 – 7 years.
Rules:
I play with 2-6 people. Each player takes 2-3 game cards, on which symbols of sports are depicted instead of numbers. The driver takes out a chip with a symbol from the bag, names the sport and shows it to the players. The one who has such a symbol on the game card covers it with a token. The player who covers all the symbols with tokens the fastest wins.
"Sportmemorina"
Goals and objectives:
to develop children’s interest in physical education and sports;
teach children to recognize and name sports; develop memory. Age:
5 – 7 years.
Rules:
2 – 6 people play. Paired cards with sports symbols are laid out face down on the table in random order. Players alternately turn over two cards. If the symbols on the cards are the same, then the player takes them for himself and makes the next move. If the symbols are different, then the cards are turned over and the next player makes a move. The game ends when the players have all the cards. The one who collects the most pairs wins.
"Sports in winter and summer"
Goals and objectives:
to develop children’s interest in physical education and sports;
teach children to recognize and name sports; develop logic, memory, thinking, ability to classify and sort sports. Age:
5 – 7 years.
Rules:
The player is asked to select symbols (images) of only winter or only summer sports. Then he names these sports; explains why they are summer or winter; tells how the winner is determined.
"Sports Guessing Game"
Goals and objectives:
replenish and consolidate children’s knowledge about sports;
develop thinking and memory. Age:
4 – 7 years.
Rules:
the presenter (teacher) mixes the playing fields (each shows 6 different sports) and distributes them among the children.
Then the presenter shows a card with a picture of a sport and names it. The player whose field contains the same sport takes it and places it on top of his field and repeats the name. The player who covers their playing fields with cards the fastest wins. Complication:
play the same way, but the name of the sport is called by the player on whose field there is the same sport. In case of an incorrect answer, the presenter names the correct answer, gives the card to the player, and the player places a penalty token on top of the card that he placed on the playing field. The one with the fewest penalty tokens wins.
"The Fourth Wheel"
Goals and objectives:
develop interest in physical education and sports;
consolidate children's knowledge about sports, physical education, hygiene and health; develop logic, thinking, memory. Age:
4 – 7 years.
Rules:
The player takes one card with four pictures on it. The player names what is shown on the card, then covers the extra picture, explaining why it is extra.
“Get ready to exercise”
Goals and objectives:
to develop children’s interest in physical education and sports;
teach children to compose exercises for morning exercises; develop memory, thinking, logic. Age:
5 – 7 years.
Rules:
The player chooses a picture card for the starting position. Then he selects movements for the exercise itself (counting 1-2 or 1-4) so that the intermediate positions of the body and limbs are combined. After composing the exercise, the child must complete it. There can be several people playing. They take turns creating an exercise, and the rest must complete the task.
"What is what"
Goals and objectives:
to develop children’s interest in physical education and sports;
teach children to recognize and name sports; learn to identify and name the necessary inventory, equipment, equipment for a given sport; develop thinking, memory, logic. Age:
5 – 7 years.
Rules:
The player selects a card with a sport. Next, he selects the symbol of this sport, inventory and equipment for it. Several people can play at the same time: whoever collects the row faster.
"Collect a symbol"
Goals and objectives:
to develop children’s interest in physical education and sports;
introduce children to the symbols of sports; teach children to recognize and name the sport; develop thinking, attention, memory. Age:
5 – 7 years.
Rules:
From the cut pieces the player assembles a symbol of the sport. Then he names this sport and talks about it.
"Sports Four"
The game uses cards depicting the sport and its symbol. They are divided into groups of four cards, united by one symbol (standing in the upper corner), but having different images of this sport.
Goals and objectives:
to develop children’s interest in physical education and sports;
teach children to distinguish between sports (by season, by equipment, by location); develop memory, thinking, logic. Age:
4 – 7 years.
Rules:
4 – 6 people play. Players are dealt 4 cards. The task of each player is to collect a group of cards with one sport. To do this, players pass each other the unwanted card face down in a clockwise direction. The winner is the one who collects 4 cards with one sport faster.
"Me and my Shadow"
Goals and objectives:
to develop children’s interest in physical education and sports;
teach children to recognize starting points; develop attention and memory. Age:
5 – 7 years.
Rules:
I play with 2-6 people. Each player takes 2-3 game cards, which depict silhouettes of the starting positions and movements. The driver takes out a chip with a colored image from the bag and shows it to the players. The one who has the silhouette of this image on the game card takes a chip and covers the silhouette with it. The player who covers all the silhouettes with images the fastest wins.
"Make a guess - guess"
Goals and objectives:
to develop children’s interest in physical education and sports;
teach children to recognize sports by characteristics and definitions; teach children to guess a sport based on its characteristics and definitions; develop memory, thinking, logic. Age:
5 – 7 years.
Rules:
2 or more people can play. The driver (adult or child), using cards - “definitions and signs”, guesses the sport. Players try to guess the sport. The one who guessed correctly becomes the driver.
Cards of definitions and characteristics
Homemade exercise equipment for outdoor games with your own hands
You can make these in a matter of minutes. Take a rope and tie it in some places with colored electrical tape.
Now you can use it to come up with a variety of outdoor games. Tie a rope low and let the kids step over it first. Then position the rope higher so they crawl under it.
The following sports equipment for kindergarten, created with your own hands, will help children develop coordination of movements.
Take:
- thin foam;
- thick dark fabric;
- multi-colored rags.
First, take scraps of colorful fabric and cut out numbers from them.
It is better to take a canvas whose edges do not crumble. Fleece or drape is perfect.
Cut a rectangle out of foam rubber. Two of the same, but a little larger, will need to be made from fabric. But it is more advisable not to cut these two rectangles, but to make one large one. Fold it in half. Topstitch along the edges. Leave free edges on one side to insert foam rubber here. Straighten the workpiece and sew it here on your hands.
Now you can lay out this rug. Give your child different tasks, for example, step on the numbers in order or in reverse order. You can arrange real fun competitions if there are two participants.
"BAGS"
Material: Thick fabric or leatherette, sand or salt 150 and 200 grams.
Goal: Development of throwing skills from different distances and from different positions, development of arm strength. Fostering a positive competitive spirit.
Use: For outdoor switchgear classes and outdoor games. The game “Who will throw further?”, “Who will collect it faster?”, “Funny catch-up”. Children stand in a circle and pass 2 bags to each other. Purpose of the game: the bags should not meet, catch up with each other. In competitions, as a relay baton.
How to make sports equipment for kindergarten - interesting attributes
See also how you can make various sports equipment from improvised materials. These are called belboks. To make such sports equipment for children, take:
- laces or ropes;
- plastic bottles;
- plastic boxes from Kinder surprises;
- soft fabric;
- electrical tape;
- threads;
- markers.
Making master class:
- First, cut the plastic bottles. Now draw different flowers here with markers. To prevent children from getting hurt, cover the cut areas with fluffy cloth. You can use an old terry towel as it.
- Use a hot nail to make a hole in the middle of each lid, insert a cord here, and tie the end of it in a knot so that the laces are fixed.
- Attach them to the chocolate egg containers in the same way. Make a hole in this plastic with a hot nail, thread the lace and tie it with a knot on the back side. You can play with these devices in different ways, for example, throw the container up and catch it with the corresponding bottle.
Here is another DIY sports equipment for children.
These palm massagers are made from:
- plastic containers from Kinder surprises;
- Easter thermal stickers;
- pencils;
- thread
Take plastic chocolate egg containers and use a hot nail to make a hole in one side of each. The nail should be quite large so that you can then insert a pencil into these recesses.
To secure these wooden writing sticks, it is advisable to insert them immediately while the plastic is still hot. But if you didn’t have time to do this, then secure the blanks with hot glue.
Make small holes on the other side of the chocolate containers. You will thread threads here, from which you will create tassels. Secure them also with a hot gun.
If you want to decorate these containers, first heat them in hot water, then place iron-on stickers for regular eggs on top. Then you will make the holes.
Such homemade simulators will help children develop fine motor skills and tactile sensations.
It's interesting to twist the pencils between your palms and watch how the brushes develop in different directions.
If the kids are older and don't need plastic blocks, then show them how to transform these old toys. Let them and you draw figures of children doing various exercises. Such drawings should be on each side of the cubes.
Measure the sides that make up these toys, and use these measurements to cut out blanks from paper or cardboard. Now you will need to draw what you have planned, then glue each plate to a specific face of the cube.
To make these toys more durable, you can then additionally cover them with cellophane.
It is very interesting to play sports with such attributes at hand. You can have a competition and roll the dice lightly. Which side will be at the top, such exercises must be performed at the moment.
- Take a cube and write numbers on it. Which number will be at the top, this exercise must be repeated so many times. Therefore, it is advisable to start writing numbers from 10 and above.
- Here is another interesting sports craft made from scrap materials. First you need to fix the wooden pole on the plywood circle. If you do not have such a blank, then use an old wooden mop and attach an additional cross to it at the bottom. Paint these blanks, then the bottom can be decorated with fabric or a rug knitted from threads.
- Take large plastic bottles and cut off their tops. Then you will need to tie these cuts so as not to get hurt and get this beauty. After all, braids for funny characters are also created from these threads. And to tie the edges, you need to take a large needle, thread a thread of yarn into it and overcast the edges so that the turns are located closer to each other.
- All that remains is to use felt-tip pens to draw their facial features and attach them to wooden stands. You can make two holes in each bottle, thread a wire through it and attach these elements, or do it with tape.
If you have old tennis rackets that have broken strings, don't throw them away. See what you can make from such unnecessary attributes.
Six golden rules
After the improved Tic-Tac-Toe, Alena began to come up with the following games, and in the process she identified seven important rules for herself that will become the key to an interesting and useful game:
- The game is for kids, not adults. To keep children interested, don't make the game too hard or too easy.
- For children it is entertainment, for the teacher it is a tool. The game is not just for fun. And if this is entertainment for children, then the teacher must formulate the goal that he wants to achieve with this activity, for example, to consolidate educational material or develop the logical thinking of children.
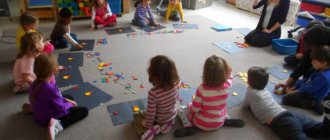
- "Squares" is a universal playing field. For an introduction to floor games, the universal playing field “Squares” is perfect: a rectangle made up of 24 squares. The recommended size is 1.4 by 2.8 meters to make it easier for children to move around. You can create the playing field yourself, for example, draw squares with electrical tape on the floor, or you can use ready-made material, for example, banner cloth.
- Game is movement. Think about what the child should do: remove pictures, spin a hoop, jump with a ball. Children love movement, and standing still will be boring for them.
- Rules are the basis of order. Think and clearly explain to children what can be done during the game and what cannot be done. This will make it easier to control the process and achieve didactic goals.
- Everything is good in moderation. To prevent children from getting bored with games, it is optimal to conduct them no more than two or three times a week. The exception is play activity during morning exercises: it is part of an exercise cycle and takes only a few minutes.
Alena came up with a whole series of outdoor games, which were included in her collection “Outdoor Games and Activities for Children,” and shared with us five activities that can easily be done with kids.
How to make sports equipment for home from tennis rackets?
Take these sports attributes, as well as a suitable translucent fabric and thread with a needle.
Take the fabric, cut out a cone-shaped blank from it, so that you can then sew such a net. Remove the fishing line from the racket, place the top part of this net here, wrap it around the racket and hem it here with a needle and thread.
Well, if children want, they can play badminton even with old attributes. But first, these rackets need to be updated. To do this, cut out blanks from cardboard to the size of the working parts of the rackets. Then you need to sew them to the base with threads. At the same time, you will sew on the petals of such a sunflower to create interesting sports attributes for children.
How to make sports equipment with your own hands - a velomobile for a child
This vehicle will also help children train their sports skills.
You can make it from an old bicycle, and you can take the wheels from an unnecessary baby stroller. You will also need round and square metal pipes, various fasteners, components and tools.
First, assemble the frame of the velomobile. To do this, you need to cut pipes of a certain length with a grinder, then fold them and connect them using a welding machine. Also provide wheel mounts to secure them. At this stage, weld a small round tube from the bicycle to the front part where the handlebar will be located.
Here's how to make a children's velomobile next, then the sports equipment will be replenished with such a useful thing. Attach a metal tube to the rear wheels on which the chain will be wound.
Then attach the part from the bicycle closer to the steering wheel, then fix the chain holder along with the pedals. You will also borrow these parts from an old bicycle.
Secure the steering column in front. Place the bike guard on so that it covers the chain. Now you can spray paint these metal parts.
Take a suitable chair so that your child can sit comfortably in it. To do this, you can purchase a regular plastic child seat and remove the legs from it. This is the kind of velomobile you will get.
The child will be able to develop his legs and hip joints while riding this sports device. And how much delight there will be!
And such a velomobile is stable, it is suitable even for those children who have not yet learned to ride a bicycle. The same applies to the next car. Such sports equipment for kindergarten and home will become a favorite toy for children.
For such equipment, we took parts that were already in use. Here's what you'll need:
- gear and pedals from a bicycle;
- stroller wheels;
- aluminum pipes;
- aluminum shanks;
- fastenings;
- plywood;
- tools;
- dye.
First you need to assemble the car drive. Various bodies can then be attached to such a chassis, since such a base is universal. This chassis consists of 4 sleepers, which are mounted on 2 rails. All these parts are made of wood. You can also attach a metal bicycle structure with pedals to a strong wooden board. But first you will need to cut this part with a grinder, then use tools and components to fix it here.
Secure the parts with secure bolts. Then fix the wooden planks and components made from these materials on the base, make holes with a drill and insert metal rods here on which the wheels will be attached.
Now secure the front axle beam with the bolt. Don't forget to lubricate it with machine oil so that the parts rotate better. Place this workpiece on the bearing and secure the chain.
To drive the drive wheels, you will need a so-called sprocket. Take pipes made of galvanized or chrome-plated steel. The rear sprocket must be clamped with nuts between two washers on the rod. Wind electrical tape between the tube and the rod.
Attach the instrument panel and steering wheel.
Then you need to decorate the car to make it look like a real one.
Do-it-yourself sports equipment can also be made for very young children who are learning to walk or have just learned to walk. Such children also need to train their arms, legs, and muscular frame. And this playpen will help with this. It will also free up the time of parents who will be doing things while looking after the child.
Non-standard sports equipment in preschool educational institutions
Non-standard sports equipment in preschool educational institutions pinned post
- Community Posts
- Search
Non-standard sports equipment in preschool educational institutions pinned post
The use of non-traditional aids in physical education classes
Municipal budgetary preschool educational institution "Kindergarten No. 205 "Novograd" of the city of Cheboksary, Chuvash Republic
Prepared by: physical education instructor Galina Vasilievna Larionova.
Non-standard sports equipment in preschool educational institutions pinned post
Unconventional DIY play equipment
The booklet presents play equipment for children, made together with parents, which we use to preserve and strengthen the health of children. All equipment is made from waste material.
MBDOU "Tambov kindergarten" in the village of Tambov, Romanovsky district, Altai Territory
Educator: Proskurina Evgenia Nikolaevna