Features of conducting appliqué classes in the middle group
Children in the middle group quickly gain more cognitive experience, and their imaginative ideas are enriched in the process of play. This naturally leads to the development of visual skills. At the age of four or five years, children already know how to properly hold scissors in their hands and cut a piece of paper in a straight line. Children are able to cut out round and oval shapes from a square and a rectangle, respectively.
At this age level, the skills of accurate gluing and composing a beautiful composition are improved - children learn to harmoniously place an image on a base, put together elementary patterns from geometric shapes and plant elements.
The task of the teacher in the middle group is to clarify ideas about the shape of objects (in this case, trees, flowers). In this case, such techniques as moving the hand along the contour, including special didactic games in the lesson (for example, make a flower from parts - petals, stem, leaves), observing environmental objects, looking at pictures and illustrations are used. The teacher shows the children various options for making parts of the same object.
Preschoolers learn to make flowers of various shapes from different geometric shapes
In addition, the teacher’s task is to develop a sense of color in students, to select contrasting shades that will look beautiful next to each other.
At the same time, in the middle group, children learn to perceive the teacher’s word: relying on the children’s experience, knowledge and skills, he can sometimes explain the task without using visual actions. For example, when creating an image of a magical garden, the children’s attention is drawn to the unusual shape and color of the parts from which trees and flowers can be made, while the teacher does not show the children individual elements.
Children are always inspired by collective activity, and joint appliqué is easier for them than drawing. The guys like to create an overall picture; in the course of work, they consult with each other and help their comrades.
During the process of children's creativity, the teacher gives children advice: which elements to choose, how best to arrange the details, but refrains from direct instructions.
The teacher must remember the individual approach: to stimulate the activity and independence of children. Since working with scissors at the age of four or five years is still quite difficult, children who experience difficulties should additionally be shown key cutting techniques on a separate sheet of paper.
Before starting to create the “Magic Garden” composition, the teacher invites each child to think about what object he wants to cut out and glue to the general background. Those guys who find it difficult to choose should submit an idea for creativity.
In the middle group, sufficient attention is paid to the analysis of the work received. The children are invited to admire the created picture, talk about it, and decorate the group room with it. The teacher highlights particularly expressive details, notes their interesting shape or color scheme. At the same time, you should not focus children’s attention on unsuccessful elements.
Preparing for the lesson, making parts
In the middle group, the main work on preparing details for the applicative lesson is carried out by the teacher. He should take care of a large size base (for example, a sheet of Whatman paper) painted in a suitable background. The teacher can offer the children ready-made shapes and silhouettes of trees, and they, in turn, will decorate them with various elements, which they will then cut out themselves.
The teacher offers the kids ready-made silhouettes of trees, and they decorate them with suitable elements
If the theme of the lesson sounds like “Wonderful Tree,” then the kids are offered a pre-drawn or glued trunk of an unusual color, with patterns (kids can stick them on as they work), which needs to be supplemented with the necessary details: leaves, fruits, birds, insects, etc. .
Children can stick unusual leaves, fruits, insects, birds, etc. onto a pre-prepared trunk.
To create leaves, fruits, etc., the teacher offers preschoolers paper squares, rectangles, and triangles. At the same time, the material on the table for collective creativity should be evenly distributed: each child should have free access to it (put several trays with parts).
Preschoolers work in subgroups: the material should be accessible to every child
You can offer the guys ready-made silhouettes of details for decoration, for example, original carved leaves. In this case, you need to focus on the beautiful arrangement of elements and a harmonious combination of colors.
The basis of the image of a fairy garden can be beautiful leaves of a bizarre shape.
What types of appliqué are appropriate to use to create the composition “Magic Garden”
When creating the image of a magical garden, students can be offered various applicative techniques. In addition to the traditional flat appliqué, you can include three-dimensional elements in the composition, which always look original. This could be leaves that are not completely glued, butterfly wings, grass in the form of a strip of paper with cuts that remain unglued, or bending of some parts of flat parts.
Application with volumetric elements
A mosaic appliqué, for example, made from lumps of multi-colored napkins, also gives a volume effect. For the development of fine motor skills, the cutting technique is perfect, as well as bulk application (using cereals or coarse salt).
Application using bulk and breaking techniques
Kids will be happy to create an applique collage - they will paste cut-out images from magazines and postcards onto the base. By the way, colorful store catalogs can also be useful for this purpose.
Collage
The most suitable material for the job, including the base
Such an unusual lesson topic as “The Magic Garden” involves the use of a variety of materials - both conventional and non-standard. So, in addition to traditional shades of paper, children should be offered gold and silver colors and velvet paper.
In addition, to make work more interesting and exciting for children, you can provide them with fabric parts, natural and waste materials. These can be satin ribbons, tree leaves, seeds, fluff, shiny candy wrappers, chocolate wrappers, cut-out elements from juice and milk cartons, etc. An interesting three-dimensional effect is achieved by using foam rubber or cotton wool.
Photo gallery: materials for the application “Magic Garden”
Application using waste material (chocolate wrappers, juice packaging, etc.)
Fabric applique
Foam applique
Application using natural material
Elements of drawing and modeling will help to complement the application and make it more original.
Application with drawing elements
Application “Bunch of Grapes” - extracurricular activities, events
Content
Topic: Application “Bunch of grapes” (practical lesson).
Goal: to expand skills in mastering the technique of artistic design of work.
Tasks:
Educational:
— continue to develop the skills and abilities of making appliqué based on the knowledge gained in the process of theoretical training;
— improve the ability to work with various materials (decorative stones and leaves), consolidate the sequence of making work.
Correctional and developmental:
- correct and develop children’s imagination, individual creative abilities, logical thinking, memory, attention, artistic taste, eye, fine motor skills, expand vocabulary, spatial image;
- develop a sense of composition in children;
Educational:
- develop the ability to work in a team;
— to cultivate neatness, hard work, independence, perseverance, aesthetic taste, love for the world around us.
Working methods:
— Preliminary conversation with the purpose of repeating and consolidating the acquired knowledge, instruction on TB.
— Visual – showing a sample of the product, analyzing the sample. Drawing up a work plan for making an application
-Practical part.
Equipment:
— Decorative pebbles and leaves, PVA glue, scissors, ruler, burlap, photo frame, glue gun, “Bunch of Grapes” template, finished product.
Progress of the lesson.
1. Organizational moment.
Children enter the classroom and sit down at their desks.
Educator: “We’re starting to study, we’re not wasting time.” We looked at each other, smiled... and on such a positive note, we will begin our lesson today.
2. Introductory part. — Today we guys have another practical lesson, where you and I learn how to make things. Try to guess what we will make after listening to the fairy tale.
"Amazing grape bushes"
The young man traveled for a long time. He collected a lot of different seeds and seedlings, but on the way back his ship was caught in a storm and crashed. The young man woke up on the shore at the foot of the hill. He looked around and gasped in amazement. Lianas covered with large beautiful leaves snaked along the slopes of the hill. From underneath them hung clusters of elongated berries with transparent green skin, and the breeze carried their sweet aroma.
"Miracle! - the young man thought joyfully. “So many berries on such crushed ground!” The young man picked a juicy berry. Her skin burst and sweet honey juice flowed down her fingers. Suddenly he heard someone's steps. An elderly man used large scissors to cut heavy bunches from the bushes, carefully placing them in a basket. “Hello,” the young man greeted timidly. Sorry for entering your garden without permission. I travel around the world in search of strange plants. All my seedlings died during the storm. However, your wonderful plants made me forget my troubles. “Welcome, young man, to my vineyard.” Don't they grow grapes in your country? — the owner of the vineyard asked, smiling. - No Unfortunately. Probably because it’s not as hot here as here. But if you give me the seeds, I will try to have it appreciated in my country,” the young man replied. — I must admit, climate has a huge influence on the sweetness of grapes. In hot climates it grows sweeter than honey, and in cool climates it grows sour. However, a good winegrower can ripen sweet berries even in the northern regions,” the winegrower explained good-naturedly and suggested: “When my brother, the captain, sails to your lands, he will take you to your homeland, but for now live with me.” During this time I will teach you the grape business. The days flew by unnoticed. From morning to evening, the young man learned the secrets of the grape business. What fascinated the young man most were the branches of the vine.
— Who guessed what kind of applique we would make? We have already said that handmade crafts are very relevant. Arts and crafts are highly valued in the modern world. Works created with your own hands serve as decoration for the interior, garden, yard, are exhibited at exhibitions and participate in various competitions. And it’s nice to receive a handmade gift that is original, into which effort and love have been put.
3.Warm up. Finger gymnastics.
4. Practical part.
— Today in class we will start making the “Bunch of Grapes” applique from decorative pebbles and leaves. So, let's get to work. You have the necessary materials and tools on your tables (decorative pebbles and leaves, PVA glue, scissors, ruler, burlap, photo frame, glue gun, template). Before starting work, let's repeat the safety precautions:
- pass the scissors rings forward;
- do not wave scissors;
- place scissors on the right with closed blades directed away from you;
- take the glue carefully so as not to get it in your eyes or spill it;
- use the glue gun carefully;
- ensure correct fit;
- keep the work area clean and tidy.
Well done guys, now let's get to work. Stage 1 “Preparation” Prepare the frame. We cut out a cardboard base, the size of which can be determined by the back side of the frame you choose for the applique. Using scissors, cut a piece of burlap to the size of the cardboard base. Glue the cut piece of fabric onto the cardboard, carefully applying glue to only the edges. Cover cardboard with fabric and let dry thoroughly. Next, we put carbon paper on the cardboard covered with fabric and a template on it - a bunch of grapes. We carefully circle it. We need this in order to beautifully shape and glue the grapes. Then we insert it tightly into the frame. You can secure it with small nails. The frame is ready.
Stage 2 “Applique” Let’s start gluing decorative pebbles and leaves. To do this, turn on the glue gun. While it is warming up, let us once again remember the safety precautions when working with hot glue. - Use the glue gun carefully. - Do not touch the glue, it is hot.
5.Dynamic pause.
When all the parts are ready, we begin assembling our application. Let's arrange all the prepared parts. Let's determine the location of each detail. First of all, make a bunch of grapes from the berries and glue each berry using a glue gun. Observing the shape of the drawn bunch in diameter. Having arranged the leaves the way you like, we begin to glue them sequentially. It all depends on your imagination and artistic taste. The final touch, the last detail is glued and our applique is ready. Don't forget to attach a loop to the back of the applique so you can hang it on the wall.
Cleaning the workplace.
6.Result.
- Guys, our lesson is coming to an end. Did you like today's work?
I am very pleased with your work. Look what a beautiful applique we made. You are all very talented, as can be seen from our wonderful decoration.
Well done guys, this is the end of our lesson. Until next time.
kopilkaurokov.ru
Specific options for the collective composition “Magic Garden” in the middle group
The collective application “Magic Garden” is offered to middle school students at the end of the school year (May). By this time, the guys already had skills in this kind of work - in the first half of the year (November) they created a joint composition “Basket of Mushrooms”.
During the lesson, preschoolers are given freedom of creativity; they independently determine the content of the image: they include strange trees, flowers in the picture, it can even be unusual animals, birds and insects (at the request of the children). The main goal of such a lesson is not only to consolidate visual skills, but, above all, to develop imagination and figurative perception.
You can make the topic of the lesson more specific and invite the children to create a wonderful apple orchard where apple trees with unusual fruits will grow. The teacher prepares a base in advance with drawn tree trunks and crowns, and each child cuts out an apple of the color and size he likes (they can be, for example, blue or silver) and sticks it on any place.
The theme can also be described as a wonderful tree: in this case, kids decorate one large blank (trunk and crown) with strange fruits and leaves.
Grapevines
- Applications with flowers 25
- Applications: Animals 14
- Applications on the theme of forest 13
- Applications: Birds 8
- crafts for the senior group of kindergarten 415
- crafts in the middle group of kindergarten 411
- in the younger group 384
- in the second junior group 384
- in the first junior group 383
- in the preparatory group 320
- 2nd class 411
- 3rd class 411
- 1 class 410
- for primary school 393
- 4th class 369
- 5th class 366
- 6th class 186
- 7th grade 181
- 8th grade 105
- 9th grade 72
- 11th grade 35
- 10th grade 34
- mom 350
- teacher/educator 346
- dad 236
- for kindergarten 411
- for school 405
- for kitchen 10
- made of paper 243
- from colored paper 195
- made of plasticine 91
- made of cardboard 31
- from bushings 22
- from boxes and packets of milk 18
- from cotton pads 10
- wooden 9
- from scrap materials 8
- from paper plates 8
- from natural material 6
- salt dough 6
- from bottles 6
- from clothespins 5
- from cups 5
- made from straw tubes 4
- from caps and stoppers 4
- made of chenille wire 4
- from twigs and sticks 3
- from thermomosaic 2
- from leaves 2
- from eggs from Kinder Surprise 2
- from cones 1
- from chestnuts 1
- from moss 1
- from napkins 1
- from matchboxes 1
- made of plastic caps 1
- made of balloons 1
- for children 3 years old 404
- for children 4 years old 119
- for children 5 years old 118
- for children 6 years old 118
- for children 7 years old 118
- for children 8 years old
&nb
creativebaby.ru
How to play up the beginning of a lesson in an interesting way
At the age of four or five years, children do not yet separate play from direct educational activities, therefore, in order to interest them in a creative activity as much as possible, the teacher must think through an exciting start to the lesson. For example, a group may receive a letter from a good wizard. He has a wonderful garden with unusual trees, on which fabulously beautiful flowers bloom and delicious fruits grow. But due to the tricks of the evil witch, the flowers did not bloom this year. The kids should help - decorate the trees with their strange flowers.
Another option is that a girl Masha comes from a fairyland to visit the children (a doll is on display). She tells an interesting story. One day she went for a walk in a wonderful forest to admire its beauty: all the trees there were bright and elegant. And so she walked and met one sad tree: it was worried that it did not have beautiful flowers and fruits. Masha felt very sorry for the tree, but she didn’t know how to help it—she couldn’t do it alone.
When telling preschoolers such stories, it is necessary to provide them with illustrations for them - pictures depicting magical nature. These can be gardens and clearings where apple trees with huge fruits grow, trees with soft lilac foliage, bizarrely shaped plants, among which fairy-tale characters (fairies, unicorns, anthropomorphic insects, etc.) walk.
Photo gallery: pictures depicting magical scenes of nature
A tree with huge roots and wonderful fruits
Apple tree with huge delicious apples
Fairies and unicorns are located between the delicate trees
Multi-colored trees, among which cute bugs and birds rest
Kids always love to transform into representatives of some profession, fairy-tale heroes. Therefore, they will enthusiastically accept the teacher’s offer to become wizards for a while and create the image of a magical garden, which they can populate at will with unusual trees, flowers, birds, beetles, and butterflies.
On the eve of the lesson, it is good to invite the children to complete puzzles on the theme “Garden”.
Before a creative activity, it is good to offer preschoolers puzzles on the relevant topic.
You can start a visual arts activity with a short fairy tale or an episode from a suitable work (after all, too long a story will tire the children). For example, in the fairy tale story “The Magic Garden” by Elena Zheryakova, the girl Lilya has a dream in which she goes to a wonderful castle and meets her cat there. It turns out that the animal can talk and invites its owner to take a walk in the garden. Lilya sees beautiful flowers: some her mother grew at the dacha, and others she has never seen before. There was a wonderful smell in the garden, and a bright rainbow shone in the sky. The girl's mood became simply wonderful. The cat told her about the names of flowers and various interesting facts from the life of plants (it was not for nothing that in the summer they took her with them to the dacha). She also told Lila that this garden is magical: if you look at the flowers and inhale their wonderful aroma, then all the bad things will be forgotten.
The following fairy tale with the same name, which was invented by schoolgirl Margarita Efimova, is also suitable for the lesson. One family had a large garden where various fruit trees grew: apple and pear trees, plums and apricots. And one day beautiful birds flew there. The son grabbed a stick and began to drive them away. The father scolded the boy. And the next day the garden became sad, and all the fruits became bitter. It turns out that the birds were magical and sang magical songs to the trees, but now they are offended and no longer come. Mom told her son that he should go into the forest, find the birds and apologize to them. The boy did so, and then the garden came to life again and the fruits became tasty.
The story of Elena Pishchulina-Volkova “A Tale of Love” also deserves attention. Magic Garden" (intended for children and adults). Here we are talking about a wonderful, kind garden that talked with the sun.
“Sunlight took Joy and Warmth by the hands (although a little warmth always remained to warm the conversation) and walked quietly and calmly through the Garden. The warmth caught up with them a little later, having already warmed the communication between the Garden and the Sun, it hurried after Joy and Sunlight. Oh, my God! How wonderful it was in this Garden - everyone loved each other in it: trees, flowers, cheerful bees and light-winged butterflies, carefree dragonflies, bugs, and spiders - after all, the Sunlight was nearby, and the Warmth entered the Soul of the Garden and warmed her, and the Joy that the guests brought filled the hearts of all its inhabitants.”
After reading such works, you can invite the children to create images of anthropomorphic trees inhabiting an unusual garden: glue on them, among other details, eyes and a smile (the teacher provides the details).
To convey imagery and expressiveness, it is good to include artistic words (riddles, poems, sayings) in the lesson.
Birds, bees, flowers, trees, They all live in our wonderful garden, We invented this garden ourselves In our little kindergarten. We all worked together and now, this garden on paper is blooming. Very bright, beautiful, wonderful, Made by our skillful hand.
Novruzova A.L.
https://mbdou6-krop.ru/?p=3043
Kids love outdoor games and dynamic physical education. They must be used in class, choosing the appropriate topic.
Physical school
| Trees have grown in the field. It's good to grow in freedom! | Stretching - arms to the sides |
| Everyone is trying, reaching for the sky, reaching for the sun. | Hands stretching up |
| A cheerful wind blew, the branches began to sway, | Children waving their hands |
| Even the thick trunks bent to the ground. | Forward bends |
| Right and left, back and forth - This is how the wind bends the trees. | Tilts left and right, forward and backward |
| He turns them, he turns them. When will there be a rest? | Torso rotation |
| The wind died down. The moon has risen. There was silence. | Children sit at tables |
| They raised their hands and shook them - These are trees in the forest. | smooth swaying of arms raised up |
| Arms bent, hands shaken - The wind knocks down the dew. | shaking hands in front of you |
| Let's wave our hands to the sides, smoothly - These are the birds flying towards us. | horizontal, simultaneous movements of the arms to the right - left |
| We’ll also show you how they sit down – the wings are folded back | Children sit down and fold their hands behind their backs |
Finger gymnastics “The hazel tree bent its branches...”
| The hazel tree bent its branches and gave nuts to all the animals. | stroke their hands |
| Here's a nut for the little squirrel, Here's a nut for the mouse, Here's a nut for the hamster, Here's a nut for the chipmunk, And here's a nut for me. | alternately massage fingers |
| He cooked it friends | rub your palms together |
Physical school
| The stems were straightened and the branches were stretched out. | Raise your hands up |
| They straightened out the leaves and rustled the leaves. | Wiggle your fingers |
| Gymnastics for the stem | Torso tilts left and right, forward and backward |
| Gymnastics for the roots | Stretched the right leg - rotation of the feet, extended the left leg - rotation of the feet |
| Washing leaves and stems in the rain | Raise your hands up, spread your fingers, expose your palms to the rain, spin around |
Outdoor game "Living Flowerbed". Children are divided into three teams: Golden Balls, Daisies, Marigolds and Marigolds. In the center of the flowerbed there are golden balls - they are the tallest. The guys raise their hands up and spin around themselves. The second circle is the marigolds; they form a dance around the golden balls. And the third circle is baby marigolds: they squat down because these flowers are the shortest.
The wind blew, the flowers came to life and moved: golden balls were spinning, marigolds were moving in a circle in one direction, and marigolds were moving in the other.
Volumetric applique with children “Grapes” | Preschooler
All children love grapes - ripe, appetizing and healthy. And in this lesson we suggest you make a realistic fruit from soft corrugated paper. Why plausible? Yes, because we will get a voluminous applique as a result. To make such a postcard, you need to be patient, because you will have to do a lot of details, but there is nothing complicated in such work. The craft will be interesting for children in the preparatory group and first graders.
If you teach the colors, shapes or names of fruits with preschoolers, then this master class will be useful for you. It is always better to present new material in a playful way so that the lessons yield good results. At home, you can make such a craft for some kind of celebration, and write a beautiful congratulation with wishes on the back side. A beautiful card with congratulations can be safely included in the bride’s bouquet of roses.
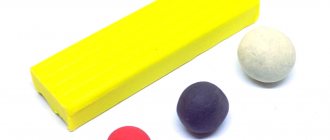
To make a three-dimensional applique, prepare:
- corrugated paper for green, purple or blue grapes;
- cardboard the size of a standard postcard for the base;
- green paper for leaves, brown or black for tassel antennae;
- scissors;
- glue liquid or solid pencil;
- black felt-tip pen.
How to make paper grapes
1. First, take care of the grape leaves. Take green paper, draw carved parts with a felt-tip pen - 2 pieces or more. Also be sure to draw the veins on the leaves. Cut them out with scissors. You may have to help the kids wield sharp scissors and do this stage of the work for them.
2. Prepare a sheet of cardboard - the basis of the picture. Glue the leaves on it at the very top. Also, cut out oblong curls from black or brown paper - antennae and a stem for an appetizing brush. Glue all the parts to the same place where the leaves will be. The upper part for the future brush is ready.
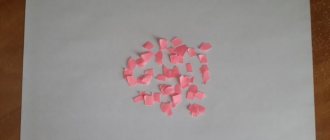
3. Proceed with the procedure for creating green (purple or blue) grapes. Use soft corrugated paper. Its texture will allow you to create small pellets. If you don’t have corrugated paper, you can replace it with colored napkins; they will also allow you to create details of the desired texture. Cut the prepared paper into squares. Roll each square into a ball. Simply squeeze the pieces between your palms and rub in a circular motion. Children can easily cope with this work on their own.
4. Make enough balls to create a grape tassel. Apply glue to the base of the picture. At this stage, you can use liquid PVA or a pencil. Start gluing the balls from the top, pressing them onto the paper. If the glue is liquid, you will have to wait a bit until it dries. The pencil instantly grabs the paper.
5. Fill the intended brush completely with soft paper balls.
The grapes in the form of a three-dimensional applique are ready. This is an easy way to practice with preschool children. Taking these tips into account, be sure to make other fruits or vegetables with the guys: carrots, apples, pears, plums. It's so fun to experiment and create something unique. Buy a set of corrugated paper, select shades, draw a template on cardboard and fill the drawing with soft balls.
Class notes
| Author's full name | Title of the abstract |
| Selishcheva T. | “Magic Garden” (collective application) Educational objectives : learn to create a collective picture, independently choosing the content of your image (tree, flower), consolidate the ability to cut with scissors in a straight line, round the corners of a square and rectangle. Developmental tasks : develop figurative representation, imagination, compositional skills, color perception, continue to practice the ability to carefully glue parts to the base. Educational objectives : to cultivate interest in the natural world and art. Integration of educational areas : “Artistic creativity”, “Cognition”, “Communication”, “Socialization”, “Health”. Handouts: brown rectangles (for the trunk), green and yellow squares of different sizes (crown and fruits), glue, glue brushes, scissors, oilcloth. Progress of the lesson: The teacher invites the children to close their eyes and mentally find themselves in a magical garden, where fabulous apple trees with golden apples grow, and wonderful birds fly next to them. The teacher recalls with the children the structure of the tree (trunk, crown, leaves, fruits), the color of each part. Techniques for cutting a triangle from a rectangle to obtain a crown are demonstrated (fold the rectangle in half and cut off the corners from the middle to the edges). The part is decorated with cloves. Apples are cut from a square by rounding the corners. Finger gymnastics “The hazel tree bent its branches...” is carried out. Before children work independently, the teacher reminds them how to hold scissors correctly in their hands. Productive activity of preschoolers. Examination of the finished composition: analyzes what the trees have in common, and how certain details were cut out. The teacher invites the children to come up with a story for their application. |
| Shornikova E. | "Magic Garden" (collective application) The teacher invites the preschoolers to remember what they saw during a walk in the kindergarten. The children are invited to look at a branch of a plant with blossoming flowers. The teacher asks a riddle about the garden:
Conversation with children on the topic: how they imagine a magical garden. A picture with a suitable image is shown and questions about it. The teacher explains techniques for cutting out and arranging flowers (they need to be glued to the crowns of trees). Independent work of preschoolers. Kids who quickly complete the task are additionally invited to cut out butterflies, bugs and flowers for the grass). |
Paper grapes: three-dimensional craft
A voluminous craft - grapes made from paper glued into thin tubes - is an excellent job for developing children’s fine motor skills, perseverance and attention.
What will you need for the craft?
- Purple colored paper. You can use several shades that imitate different degrees of ripeness of berries;
- Green colored paper and corrugated;
- Glue pencil and PVA;
- A simple pencil, scissors, ruler.
How to make grapes out of paper?
Cut the purple paper into strips, the length of which is equal to the wide side of the A4 paper, and the width of the strips is 2.5 cm.
Then cut these strips into small rectangles, about 5 cm long, taking into account the area for gluing. My bunch needed 34 rectangles.
Glue each one into a tube using a glue stick. This is best done using a felt-tip pen or pencil without sharp edges. But you will need a fairly wide felt-tip pen; standard ones are a bit narrow. It is much easier for children to work; they can easily use their fingers to fasten the sides of the paper together, placing them inside.
The berries are ready, it’s time to form them into a bunch of grapes of a classic shape, that is, the wide upper part gradually narrows towards the bottom. Here it is better to glue with PVA glue, since it is difficult to apply a glue stick to thin tubes and then fasten them together. When gluing, you don’t need even rows; you can make them not very symmetrical and clear.
Glue all the tubes, if there are not enough, add a few more to complete the bunch.
Print any grape leaf from the Internet or provided. Cut it out.
From the corrugated paper, cut two strips that will be the vine.
Twist each corrugated strip into flagella, spread a little glue stick on your fingers and twist the flagella again and wrap them around the pencil. The glue will set and the flagella will become wavy.
Glue them to the leaves.
Glue the leaves themselves to the bunch. It can be from behind or from above. That's it, the paper grapes are ready. You can add it to a basket with autumn gifts for the autumn holiday, or decorate the room.
tratatuk.ru