Ursa Major's bucket in winter drawing 1st grade, step by step with explanation
- On a piece of paper, draw 3 dots to represent the angles of an equilateral triangle. Connect them so that the appearance is not a triangle, but the letter “L”.
- Place another point opposite the vertex of the triangle (it should be located clearly along one line). Now you need to connect all these points to form a kind of trapezoid.
- Now draw a segment from the last point set and mark it with a bold dot.
- You need to draw another segment from it, moving it up a little.
- From the last point we draw another segment and mark it with the same bold dot.
How to draw a winter town
Winter is always associated with a small cozy town, with low houses and a wide road.
Stage 1
We outline the composition with thin lines without pressing with pencils. Don’t forget about linear perspective and reduce the width of the road closer to the horizon line
Stage 2
We clarify the details and lay out the first shadow places. All elements that look at us will be in shadow due to the position of the sun.
Stage 3
Draw with sweeping, wide strokes
Don't forget about the fine work, pay attention to the trees and elements in the foreground
Stage 4
Remove all unnecessary shadows. We check all the details for finishing.
DIY winter landscape - paintings made from salt
This kitchen seasoning makes wonderful landscapes.
Take:
- blue cardboard sheet;
- PVA glue;
- brush;
- salt;
- a cloth;
- simple pencil.
First, draw a winter landscape on a sheet of cardboard. It could be a snow-covered tree, a snowman, snowflakes.
Now take salt and generously sprinkle the painting with it. Wait a little, then you will need to pour out the remaining salt. Salt, like snow, will sparkle in the light, creating an interesting effect.
You can paint various winter landscapes with salt. If you wish, then houses, trees, a river, snowflakes will be located here. Since salt is white, paintings where this kitchen seasoning is used will turn out to be winter-like.
We depict nature from the earth to the sky
You can draw winter nature in different ways.
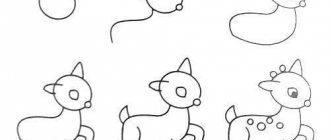
Animals
Who else, if not a bunny, stays awake all winter? What is not a symbol of this time of year:
The steps are extremely simple: draw an oval, not far from it there is a slightly elongated circle. Add the contours of the tail and paws. We connect the head with the body, attach long ears to the head. Add touches to create a wool effect.
Drawing animals with paints is not as difficult as it seems. Penguins live in the ice all year round. They deserve to be in your winter drawing:
How to draw animals: in the upper half we paint the excellent beautiful northern lights. Most of the leaf is occupied by snowdrifts and ice floes. Three little penguins walk happily on them. We make a black oval, slightly tapering at the very beginning. Next to him on the sides are flippers. Dip the brush into orange paint and carefully apply it downwards. These are webbed feet. We paint the eyes and abdomen white.
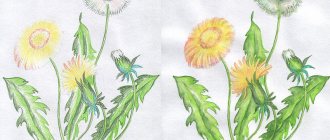
Forest
Forest - trees and animals collected in one place. How to depict a winter forest in the picture:
How to draw a winter picture with rowan: draw a trunk of medium thickness, short branches extend from it. At their ends we place small red circles in two rows. The first row is longer. Next to the rowan we draw a red semicircle, with two sticks extending from it. There are three more from these sticks: two diagonally, one in the center. Add a black head, beak, wings. Place a couple of Christmas trees and other animals of your choice in the picture. Don't forget to use white and blue pencils to create a snow effect.
Another variant:
First you need to draw the fir trees. Dip the brush into green paint, then press it onto the sheet evenly on both sides. The result is symmetrical needles. We use brown paint to mark the base of the trunk. The rest of it was covered by branches. After that, paint the bottom and top white, leaving space for the moon. We wait for the white paint to dry, then apply pink next to the yellow circle and blue around the edges.
Night
Fairytale night forest:
Even if you work in a minimalist style, there is a chance to achieve the desired recognition. Print the tree in green as in the step above. On top of this layer, apply almost the same, but white, leaving space for the previous one. It turns out to be a Christmas tree that is covered with snow. Add blue paint to the sky and paint stars and snowflakes on it with a thin brush.
River
Drawn picture with a river:
This drawing is also done using shading. Christmas trees are made with blue strokes obliquely and tilted to the right. The sky is in violet-blue tones. Let's add yellow-purple clouds. The river is blue-yellow with a horizontal streak.
How to draw a winter picture with paints, step by step
- First, sketch it on a piece of paper with a pencil so your child can see what needs to be colored. Only the pencil should be barely noticeable.
- Mix blue, pink and yellow watercolor paints and cover the sky with it:
- Use yellow paint, well diluted with water, to paint the mountains in the picture as shown in the example:
- Those parts of the hills and mountains that were not painted yellow, paint with translucent blue paint:
- Paint the bases of the fir trees with a bright blue color:
- Draw some fir branches with the same color:
- Draw those branches that remain unpainted with green watercolors:
- You will get a drawing like this:
Winter landscape - fabric painting
This material will also make excellent painting work.
To make one, take:
- scraps of fabric;
- glue;
- photo frame;
- scissors;
- rectangle of cardboard.
Take pieces of canvas and lay them out on the fabric. There is a dark blue flap on top. It will be heaven. Below it, place a blue one, then a lighter one, so that the sky seems to merge with the snowy plain.
If you have a beautiful openwork braid with wavy edges, then take it and attach it to the bottom. Then you get snowdrifts.
The edges of these fabrics can be folded back and attached here using a stapler. You can also carefully glue it using invisible glue.
Take a dark fabric and start cutting straight and rounded sections from it. Soon they will turn into trees, branches and bushes. Glue them in place to get these items.
To further make a winter landscape out of fabric, you can glue shiny sequins here to make it look like it’s snowing. All that remains is to frame your work and admire the final result.
We also offer a master class on how to draw spring
How to draw a winter forest landscape
Every season the forest is transformed.
In the spring it begins to come to life, covering the trees with young foliage and melting snow. In summer, the forest is fragrant not only with flowers, but with ripe berries. Autumn colors the trees of the forest in various warm colors, and the sun palely warms with its last rays. Winter exposes the branches of trees and covers them with a white blanket of snow, freezing the rivers. It's hard not to convey this beauty in illustrations. Therefore, today we will choose the last season of the year and learn how to draw a winter forest landscape using colored pencils. Tools and materials:
- Simple pencil;
- White sheet of paper;
- Eraser;
- Black helium pen;
- Black marker;
- Colored pencils (blue, orange, blue, gray, green, light green, brown, dark brown).
- Step 1
Divide the sheet into four parts. First, draw a horizontal line in the middle of the sheet. Draw a vertical segment in the middle of the horizontal line. - Step 2
Draw the background part of the picture. On a horizontal line we draw two mountains (the left one will be larger than the right one.) And in front of them we will make silhouettes of trees. - Step 3
We retreat a small section downwards from the horizontal line (the river will be located here). Using a curved line we will draw the ground, or rather, a cliff. - Step 4
Step back further and draw the pine trees. Their feature is a long trunk and thin branches. At the base of the trunk we will add small snowdrifts. The trees on the left have some foliage. - Step 5
Draw a deer in the foreground. The animal should not be too detailed, because the main task of the drawing is to show the winter landscape. Let's add more snowdrifts in the foreground. - Step 6
Outline the outline of the drawing in the foreground with a black pen. There will be snow on the tree branches. - Step 7
We begin to paint with color from the background part (top). Let's determine that there will be a sunset, so between the mountains we apply orange, then add blue and blue. We make transitions between colors smooth, applying from bottom to top. The mountains will be gray, but adjust the contrast using pressure. We make the trees in front of the mountains uniformly green. - Step 8
For the river we use the usual blue and blue colors. Closer to the mountains, we add green and gray tints to the water to make it look more picturesque. - Step 9
The trunk must be drawn using orange, brown and dark brown. The trees on the left have some leaves, which we'll make green. - Step 10
Add shadows from the trees using a gray pencil. Let's add a little coldness to the drawing by drawing the foreground in blue. - Step 11
The deer's body is covered with brown fur. And between the snowdrifts we will add blue color. So we learned how to draw a winter forest landscape.
Lesson author: HelenaArch
Preview:
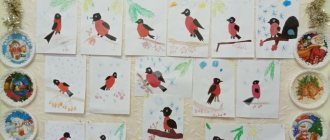
Summary of GCD in the senior group “Winter-Winter” using non-traditional drawing techniques
Bozhechkova Tatyana Gennadievna
Integration of educational areas: artistic and aesthetic development, speech development, cognitive development, physical development.
3. Educational: To cultivate in children a sense of beauty, a love of nature through fine art, poetry; cultivate interest in reflecting one’s impressions in visual arts; cultivate accuracy in work.
Planned results: have a developed imagination, which is realized in visual activities, show curiosity, see the beauty of the created image.
Preliminary work: learning poems about winter, looking at illustrations, reproductions of paintings about winter; observation of winter phenomena in nature, changes in the color of the snow cover at different times of the day, the color of the sky, falling snow, snow-covered trees, bushes, houses.
Vocabulary work: fierce, landscape, landscape painter
Individual work: activate Lisa Yagina, Artem Ustyantsev, Alexey Mineev.
Methods and techniques: visual, verbal, gaming, practical.
Materials and equipment: text of the poem: A. S. Pushkin “Winter Morning”; painting by I. Shishkin “Winter”; candle, salt, album sheets, paints, brushes, napkins, brush stands, plates, album sheet for each child.
Hands stretched out to the sun,
Educator: Guys, I want to tell you A. S. Pushkin’s poem “Winter Morning”:
Under blue skies
Shining, the snow lies in the sun,
The transparent forest alone turns black
And the spruce turns green through the frost,
And the river glitters under the ice.
Educator: Guys, please tell me what time of year is described in
Educator: Indeed, it is winter. Let's remember what winter is like? What words can you use to describe it?
Children's answers. (Winter can be: white, snowy, snow-white, cold, beautiful, frosty, fluffy, shiny, etc.)
How can you call winter affectionately? (winter)
-The earth was covered with white, fluffy (snow)