Beautiful Russian capital letters for design: letter templates, print and cut out
If you need to make an inscription in capital letters, then look for a suitable option in this section.
Beautiful Russian capital letters for design: option No. 1
Beautiful Russian capital letters for design: option No. 2
Beautiful Russian capital letters for design: option 3
Beautiful Russian New Year's letters for decoration: letter templates, print and cut out
In this section you will find a selection of beautiful Russian letters for decorating a New Year's event.
Beautiful Russian New Year letters for decoration
Beautiful Russian New Year letters for decoration
Beautiful New Year's inscription for decoration
Beautiful Russian New Year letters for decoration
Beautiful Russian winter letters for decoration
Beautiful Russian winter letters for decoration
Beautiful Russian winter letters for decoration: letter templates, print and cut out
To ensure that the inscription itself does not commemorate the frosty, clear days of winter, it is worth looking for appropriate letter templates to decorate the holiday. To make your search easier, we have collected them in this section.
Beautiful Russian winter letters for decoration
Beautiful Russian winter letters for decoration
Options for making craft letters with detailed diagrams
Modular letter made from paper napkins
Let's prepare the following materials for work:
The layout is necessary to carefully position our napkin modules strictly along the contour.
Let's get started:
Foam letter: light and comfortable
Step-by-step instructions for the master:
Salt dough letter: training children's palms
This method is ideal for a joint project between parents and children. Working with dough strengthens the muscles of the hands and fingers, developing fine motor skills of the child's hands. We definitely recommend you try it.
Beautiful Russian capital letters for design: letter templates, print and cut out
- For years, art schools and other specialized educational institutions have been teaching how to create inscriptions and correctly place texts on a poster. Therefore, all the nuances of writing letters cannot be revealed in one article. We won't even try. After all, now there are a lot of ways to bypass the process of writing text: letters and entire inscriptions can be printed on a printer, redrawn from a finished poster or cover onto tracing paper, and then transferred to a poster or other surface.
- If necessary, you can simply paste the text printed on a black and white or color printer. But if you have time, you can experiment with colors, textures and apply paint in some unusual way.
What tools do you need to write beautiful text?
Beautiful Russian capital letters for design
Beautiful Russian capital letters for design
Decorating a corner in the junior group of a kindergarten with your own hands: Russian folk art
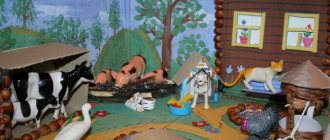
Decorating a corner in the junior group of the kindergarten “Russian Folk Art”
Author: Beloglazova Elena Aleksandrovna, teacher of the kindergarten “Alyonushka”, Novokuibyshevsk, Samara region. Description: this publication will be of interest to kindergarten teachers. Goal: Decorating a corner in the junior group of the kindergarten “Russian folk art” Objectives: - to introduce younger preschoolers to the origins of Russian folk art; — to involve parents of pupils in the design of the corner - “Russian folk art” My work as a kindergarten teacher began in the junior group, we got the group after kindergarten graduates, so the important point was the design of the group, the creation of a subject-spatial environment that would be comfortable and met the age requirements of children. Dear colleagues, I propose to your attention the design of the “Russian Folk Art” corner in the group. We all understand the importance of introducing children to the origins of national culture from an early age. Having explained to the parents of the pupils the importance of this area in the development and upbringing of their children, having received their approval and support, we began to design the corner. We allocated a place in the group so that it was open and accessible to children, and started decorating. Since the birch tree is a symbol of our Motherland, people wrote songs, proverbs and sayings about it, I chose it to decorate the wall. The birch trunk is made of whatman paper, which I bent and decorated, the leaves on the trees are made from ready-made decorative decorations, artificial leaves that I inserted on top.
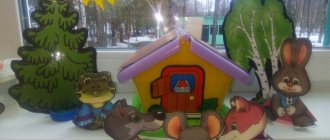
As you can see, the first Russian antiquities appeared on the shelf: this is a samovar, which was given to us by the grandmother of one of the pupils, on which we hung a bunch of drying sacks. Next to the samovar we placed a loaf of salt dough made by our parents, (the loaf in the photo below) appeared jars, wooden spoons, and a matryoshka doll. And of course, the main decoration of the corner is our Russian beauty, in a red sundress, who is rightfully considered the owner of the corner, she was also given to us by our parents.
Our corner continued to take shape, and soon a Russian beauty appeared on the wall, leading a round dance around our birch tree. We designed the inscription for the corner “Russian folk art”, the letters were cut out of colored paper and glued to tape.
Soon, Russian folk instruments appeared in our corner: balalaika, accordion, bells, pipe, etc.
So gradually our corner was transformed. Due to new fire safety requirements, we slightly changed the design on the wall, we left the birch symbol, but now we painted two birch trees with paints, the inscription on the corner was also made with paint. Now our corner looks like this:
Together with parents, we continue to replenish and enrich our corner. For children, a folder was created with drawings for Russian folk tales, which were made by parents and children at home. Children love to look through the folder with drawings while in the corner and share their impressions of which fairy tale they like painted with my parents.
Here are some works: Fairy tale “Snow Maiden”
Fairy tale "Bubble, straw and bast shoe"
Fairy tale "Kolobok"
Together with my parents, poems and nursery rhymes about the nesting doll were decorated in the corner, in the form of a collection of “Matryoshka’s poems and nursery rhymes,” which I read to children during special moments.
This is not the end of the design of the “Russian Folk Art” corner in our group; we continue to replenish it and expand the material. I would be very grateful to hear your wishes and recommendations. Thank you all for your attention!
We recommend watching:
Physical education and health corner in kindergarten Do-it-yourself group and reception room decoration Welcome corner in kindergarten Do-it-yourself nature calendar in kindergarten
Similar articles:
DIY Autumn panel
Beautiful Russian letters with monograms for decoration: letter templates, print and cut out
- Get started by creating a sketch. You will reduce the time spent on creating a poster or inscription for an event if you write the text in a small format, displaying the maximum amount of detail.
- While preparing the sketch, you should have a clear idea of what your inscription should look like in the end. Finish execution can begin only after preliminary sketches. The decision about the location of the text also needs to be made at the sketching stage.
- When starting to write text, you should adhere to a simple and simple rule: all characters must have the same width. Also, the inscription should consist of the same combination of thin and wide lines. Do not write overlapping graphic elements, or have characters of different heights, lengths, or widths. Between letters, no matter what format you create them in, the same distance should be maintained.
- If the above requirements seem too complicated for you, then write the letters without complicating them with various additional elements. Take your time, because this activity is only for the patient.
- If you are not sure that you will be able to write a beautiful inscription on a large-format canvas, then use a stencil for the work. Now there are many sites where you can find stencils for printing, made in various styles.
- But if you find it difficult to draw using a stencil, then choose a suitable font and print the letters on your computer. Next, you will need to carefully cut out the letters and place them on the poster, gluing the bottom part. such an inscription will also look good.
Beautiful Russian letters with monograms for decoration
Beautiful Russian letters with monograms
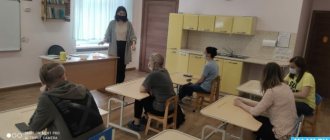
Do-it-yourself art corner.
Larisa Savchuk
Do-it-yourself art corner.
Corner of fine arts “Country of Creativity”
with your own hands for children of the fourth year of life .
One of the main tasks of the educational field “Artistic and aesthetic development”
are: development of
artistic and creative abilities of preschool children, interest in independent creative activities ( visual , constructive-model, musical, etc.); satisfying children's need for self-expression.
The most important condition for the implementation of tasks is the creation of a developmental, subject-rich, emotionally comfortable, aesthetically attractive, accessible, safe and other educational environment in accordance with the needs, interests, age and individual characteristics of children.
In our group, we try to create all the necessary conditions for the development of creative expressions by all available means that encourage self-expression.
such a cozy, bright and attractive art corner for children. A large poster was placed on the wall: “The Land of Creativity .”
We placed a desk on the right and placed pencil cups on it, also made by us.
Cups of different colors correspond to the colors of the rainbow. Each glass also has its own place - a flower.
Also on the table is a box with stencils made of thin, colored plastic.
Pencil holder made from 6 identical cream boxes, glued together and covered with self-adhesive paper
Covered boxes for coloring books, papers for free drawing
Next to the table, on the wall there is a small stand for children's work. To make it, we used a mosquito net for plastic windows, stretching colored ribbons over it.
On the left side they placed a small cabinet with shelves and decorated it.
On the top shelf were placed pencils made of thick cardboard and covered with colored self-adhesive wallpaper.
We pasted over different boxes containing a variety of materials for visual arts with children.
On the wall are our irreplaceable voluminous pencils, which are restored year after year.
Caterpillar placed on the wall of the cabinet
we have such a bright and attractive
And for parents in the reception area we have a large stand “Our Creativity ” made of ceiling slabs
Beautiful Russian letters for decoration: letter templates, print and cut out
If you need to design a poster in a humorous way, with cheerful notes, then look at the letter templates presented in this section.
Beautiful Russian letters for decoration
Beautiful Russian letters for decoration
Beautiful Russian fairy letters for design: letter templates, print and cut out
To decorate a children's party in a fairy tale theme, special templates are suitable. All you need to do is find the ones that suit you from this section and print them.
Beautiful Russian fairy tale letters for decoration
Beautiful Russian fairy tale letters for decoration
Beautiful Russian fairy tale letters for decoration
Where and for what purpose can templates be used?
When preparing theme evenings, matinees, children's parties, it is often necessary to prepare a wall newspaper, an advertisement, arrange an exhibition of children's works and make captions for them, etc. All this organization requires quick and clear design using the letters of the Russian alphabet. Thanks to paper cutting templates, this problem is solved in a short time. All you have to do is attach the template to the paper of the desired color, trace and cut it out, and then stick it in the required place. As a result, a beautiful and even inscription is ready.
Where can I get alphabet letter templates?
They can be bought at any office supply store, but if you have the Internet at home, you can easily download them completely free from our website, print them and use them in your work. Thus, letter templates for cutting out paper will be useful for teachers, kindergarten teachers and development centers.
Beautiful children's cartoon Russian letters for decoration: letter templates, print and cut out
A children's event can be decorated with original cartoon letters. Where can I find them? In this section!
Beautiful children's cartoon Russian letters for decoration
Beautiful children's cartoon Russian letters for decoration
Beautiful children's cartoon Russian letters for decoration
Beautiful large Russian letters for design: letter templates, print and cut out
- Whatever font you choose for the design of your stand or poster, the letters should remain readable. Otherwise, the beauty you create will turn the text into a puzzle. When creating an inscription, you can, of course, be guided by your taste or idea of the design of the future text, but frills will only complicate the text, and not make it more beautiful.
Letters written with fountain pens turn out beautifully
- When using a computer program or ready-made templates, you should not count on the special “beauty” of the inscription or its uniqueness. This is explained simply: the creators of such templates do not bother searching for information about a well-created font.
- For example, you can click on one of the template links and see the letters in the presented font of different widths. Letters can be created in violation of all requirements. One font may contain rounded, wide letters and elongated ones, some may have protruding ends. If you think this type of font is beautiful, then use it to design a poster. However, you should not expect that everyone will like the result.
Beautiful large Russian letters for design.
Here is an example of a readable simple font:
Beautiful large Russian letters for decoration
Downloads
You can download free letter templates for cutting here.
You can also download the blue alphabet with punctuation marks and numbers in a single archive here.
Click on the pictures below, download and print the letter you need:
So, templates of letters of the Russian alphabet can be very useful not only for teachers, educators, but also for parents who are engaged in the development of their children on their own. Templates are used to prepare holiday inscriptions, both for public events and for home use. It is useful to use cut-out letters in labor lessons as applications, for classes with preschoolers, for learning the letters of the Russian alphabet and developing reading skills. Templates can be downloaded completely free of charge on our website, printed and used in your work at your discretion. They will certainly help you successfully prepare your children for school and develop an interest in knowledge.
Source
Decorated letters in various styles are gaining popularity among the population. This is a great gift or decoration for an important holiday. Such products in stationery stores cost quite a lot, which sometimes limits the buyer’s options. We will tell you how you can make amazing crafts in the shape of letters yourself, what fonts and layouts you can use, what colors and openwork exist today.
Beautiful Russian letters with flowers for decoration: letter templates, print and cut out
Beautiful Russian letters with flowers for decoration
Beautiful Russian letters with flowers for decoration
Beautiful Russian letters with flowers for decoration
How to beautifully write letters for the design of a poster, stand, holiday: samples of letters for writing
When creating text, follow the following sequence:
What you will need to create beautiful letters on a large format poster or sheet of whatman paper: a fountain pen for ink and ink
- set of nibs for fountain pens (nibs of different thicknesses)
- wide markers (special, for glossy surfaces)
- paint for these markers (specialized stores sell paint with various tints, for example, metallic)
- If you don’t have a fountain pen, you can use felt-tip pens, colored pencils, gouache or watercolor
If you don’t have a fountain pen, you can use felt-tip pens, colored pencils, gouache or watercolor.
To write vertical dashes and lines, you can use a narrow tip; for the side parts of letters, use a wide tip. With this method of writing, letters acquire volume.
- If you decide to use markers or colored pencils, start by outlining the letters. This is done with a simple pencil. The outline is then outlined with a felt-tip pen, and only then the letter is painted over with paints or pencils.
- To prevent the inscription from looking boring, you can add shadows behind the letters. This will create the illusion of a wall behind the 3D letters, which will cast a shadow. Letters drawn in 3D also gain additional volume.
- So you've chosen a font. Today it won't be difficult. you just need to be able to correctly search the Internet.
How to write letters beautifully to design a poster, stand, or holiday
How to beautifully write letters for the design of a poster, stand, holiday
Technical part: recommendations
- we decide where the inscription will be located
- Without pressing hard on a simple pencil, we make a horizontal line on the sheet (there should be no traces left after using the eraser): we apply alternating stripes according to the height of the font and the line spacing
- if you decide to make an inclined inscription, then immediately prepare an inclined line like a school copybook, but place the lines less frequently
- after drawing the auxiliary lines, we begin to write the letters with a simple pencil, maintaining maximum accuracy in reproducing the configuration and adhering to the width of the letters of the selected font
- mistakes made when writing letters are corrected immediately with an eraser
- We outline the finished inscription with a pen, felt-tip pen or marker
- do not erase draft and auxiliary lines (they can be removed only after the main inscription has completely dried)
How to apply text using carbon paper?
- Print out your favorite template
- Place carbon paper on a sheet of Whatman paper
- Place the original text on top and trace it with a pen or pencil
- After this, remove the copy paper and template, trace the resulting contours again with a pen or felt-tip pen
Don't be afraid to draw lines with a pen and pencil. The ink will cover the contours drawn earlier in pencil and the letters will be drawn evenly and equally. But if you skip the step of drawing pencil lines, the inscription will come out sloppy.
You can choose from the letter outlines proposed in our article and use them as cheat sheets when creating your text.
How and from what can we make letters?
We choose the material to create our product:
In cases where you are going to decorate a holiday for guests or congratulate the birthday person in an original way, the presented methods may not be suitable. Why? We didn't take the font into account. The letter is ready, decorated, but there is no expected effect. To prevent such a situation, let's look at what fonts are used to create natural three-dimensional letters: