applique on the theme of dishes in the middle group pictures
March 16, 2013. Expand your vocabulary on the topic “Dishes”; enrich and clarify. sizes in modeling, drawing, decorating the silhouettes of dishes (spoons) with appliqué,... Pictures depicting dishes lie upside down on the table. books on drawing and fine arts. 10 slides (not a presentation) based on the series. Long-term plan for visual arts in the 2nd junior group of kindergarten. Topic: “In the clearing” - collective application. November 3, 2013. Lesson outline (speech development, middle group) on the topic:. classes in the middle group on speech development on the topic: “Dishes.” from small parts the whole picture according to presentation; to develop skills... in the middle group on speech development and applications on the theme “spring has come.” Summary of educational activities in the secondary speech therapy group on the topic “Utensils.” Summary of GCD for FEMP and applications in the middle group on the topic “Counting to 5... two ribbons - light, dark; magnetic board; pictures of dwellings. Lesson outline (appliqué, modeling, middle group) on the topic: Lesson c. on applique, modeling (junior group) on the topic: Dishes for insects. choose any image size you want :) I hope. Long-term planning of tasks in all areas of the program for the first quarter of the 2013-14 academic year. Lesson outline (appliqué, modeling, middle group) on the topic: Lesson c. on applique, modeling (junior group) on the topic: Dishes for insects. choose any image size you want :) I hope.
: 2021
- applique,
- topic,
- dishes,
- average,
- group,
- Pictures
- 30 November 2014, 19:22
- igope
Smart thoughts (0)
Collapse / Expand
The author of the topic forbade adding thoughts
We also recommend reading interesting things from user igope
- come up with five sentences about late autumn in the forest January 23, 2014. Write a sentence that answers the question: what unites people all……
- Oksana Karpyuk 7th grade answers 6 days. back. GDZ 4th grade - English language goes up O. Karp'yuk... GDZ English language 7th grade....
- workbook for English challenges Questions and Answers for an interview in English.. I like to explore alternative solutions to problems…
- prepare a presentation my family The presentation “My family” can serve as an excellent example for. In preparation for family...
- come up with 5 6 sentences with a participial phrase on the topic of spring, a sentence with a participial phrase on the topic. offers with turnover. involved. 6. Do...
- schoolchildren's report on Pushkin File: Reports on Pushkin for schoolchildren... and throughout school life, while studying...
- Terraria cheats · Add cheat. category:. Terraria: Save/Savegame (All things from the game + beautiful...
- crafts on the theme of winter video Aug 30, 2014.. class crafts on the theme of winter. symbols of the 2014 Olympics, DIY crafts from….
Complex panel of coffee beans
And a panel of coffee beans in the shape of a cup will definitely amaze everyone. This is a complex craft, so children will need adult help. Prepare:
- Thick cardboard 2 mm (pressed)
- Superglue, PVA
- Plastic bottle 1.5 l
- Masking tape and regular tape
- Ground coffee
- Coffee beans
Cut this shape out of the bottle.
Cut off the neck and get half a cup.
Glue it to the plastic “bottom” and cover it with masking tape.
Apply PVA glue and sprinkle with ground coffee.
Cut out a saucer from thick cardboard and bend it slightly.
We also cover it with glue and sprinkle it with ground coffee.
Then we glue the grains onto superglue or hot glue.
Let's start assembling the panel. Again, take thick cardboard or a thin sheet of drywall. Come up with a frame. Cover the background with crumpled paper (suitable for baking). Decorate the edges with broken cinnamon sticks, siding or coffee beans. Glue the cup and saucer. Glue a handle from the grains.
They are also made from natural materials. You can make a panel of tea leaves using a herbarium of currants, cherries, and dried berries.
Paper applications are not always suitable for children's games. They are not durable and get dirty quickly. But they will become a worthy interior decoration or a craft for school. With the help of dishes, kids learn the names of dishes and their purpose. A master class with coffee beans is suitable for children in grades 4-5.
In the decoupage technique in the middle group “Introduction to the decoupage technique.” Painted dishes."
1. Introduce children to an unconventional artistic technique - decoupage. With the help of a teacher, decorate interior items using the decoupage technique.
2. Develop design skills: place objects in accordance with the characteristics of their shape; develop creative abilities.
3. Foster love and respect for antique household items.
4. Foster friendliness and maintain interest in joint creativity.
Preliminary work.
1. View a presentation about the technique “Decoupage.
2. Reviewing magazines containing designer works (furniture, accessories, dishes).
Materials and equipment: wooden spoons, forks, boards, napkins for decoupage, PVA glue, large brushes, water-based varnish, scissors.
Progress of the lesson:
Guys, today we will go to the exhibition. But this exhibition is unusual. Craftswomen from all over Russia came to see it. Previously in Rus', craftswomen were called ! Why do you think they were called that?
Children's assumptions and answers.
Right! Because they did it with their hands! We sewed, crafted, decorated! And simple objects turned into extraordinary beauty!
Slide show.
But this was a long time ago in Rus'. And now the craftsmen who decorate and transform simple things into extraordinary ones are called designers. A designer can use simple objects, for example, take a glass jar and a decorative napkin and create with his own hands a very beautiful vase that everyone will admire.
Slide show.
Do you want to look at the needlewomen and the goods that they decorated themselves and brought to the exhibition?
But we guys won’t go to the exhibition. Let's ride the horse like before. After all, a long time ago, all of them were masters: and these are our ancestors: our grandparents rode horses.
Game exercise “Horses”.
Children come to the hall where there is a small exhibition of dishes. A girl in a Russian dress sits nearby and cries.
Q: Guys, who is this crying? Let's go and have a look.
Q: Beautiful girl, why are you crying? What's happened? And who are you?
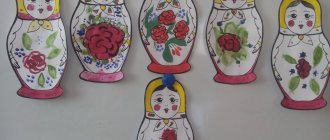
D: I am Marya, a needlewoman! And I’m crying because my mother and father sent me to an exhibition, they collected painted dishes so that I would surprise people with the beauty of painted dishes! Father made the dishes with his own hands, and my mother and I painted them. But I just lost my bundle, and all the dishes were in it. What should I do now? How to return home?
Q: Don’t cry, Marya is a needlewoman. I think the guys and I can help you! Guys, how can we help Marya?
Children's answers.
How are we going to paint the dishes?
Children's answers.
Would you like us to make you not just painted dishes, but dishes made using the decoupage technique? This is a work technique when you glue beautiful patterns, pictures, ornaments onto a wooden product, and then cover them with varnish. And such a product looks almost like it was painted by master artists. Well, shall we get started?
The teacher shows and explains the procedure: first cut out the required patterns from napkins, layer them (you must leave the last, third layer, then put a sufficient amount of glue on the brush and, pressing from the middle, glue the pattern. Possible patterns are shown. Children listen to Russian folk songs.
Educator: now our work must dry. While the glue dries, we will play a Russian folk game.
Educator: guys, let's finish our work. In order for our dishes to shine and not be scratched, we will cover them with a special varnish.
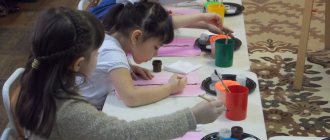
Children use water-based varnish to coat the items.
Marya the needlewoman:
Thank you guys! What beautiful dishes you made for me, I can’t take my eyes off them! Mother and father will be happy. They had never seen such beauty before. I just forgot what the name of the technique you used to make the dishes is called?
Children's answers.
Marya – needlewoman: Oh, yes, “decoupage”! Now I will remember this word and tell my family and show them how they can decorate objects using a simple napkin. I'll hurry right now! Goodbye!
The children say goodbye.
Educator: Guys, you are great. We helped Marya, a needlewoman. Everyone tried their best, and everyone did it very beautifully! You are real designers! Now it's time for us to return home. Where is our horse?
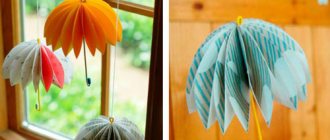
On frosty long winter evenings it’s so great to sit in good friendly company with a cup of warm aromatic tea.
We invite you to organize such a warm evening of creativity in the company of your child. The news portal “site” in this article has prepared for you two not difficult, but very interesting master classes on how to make cup and saucer appliques with your own hands.
Target:teach children to look at a work of art - still life; bring children to an understanding of the unity of the content of the meaning of the picture and the means of expression found by the artist; develop children's ability to make aesthetic assessments; learn to draw kitchen utensils on various materials, cut out the outline and stick it on, observing the composition; reinforce the technique of cutting silhouettes from paper folded in half.
Material:
pencils, paper of different textures, foil, leather, fabric, etc.; glue, brushes, scissors, napkins, oilcloths; painting by I. I. Mashkov “Still Life with a Samovar”, stencils, tableware templates; samples of drawing dishes, kitchen utensils - rolling pin, board, sieve, slotted spoon, etc.
Preliminary work:
examination of V. Stozharov’s still lifes “Kvass”, “Flax”; reading the poem by K. Chukovsky “Fedorino’s grief”; excursion to a hardware store; modeling, painting dishes, etc.
Progress of the lesson
The teacher invites the children to look at I. I. Mashkov’s still life “Still Life with a Samovar.”
— Guys, admire this picture. Tell me, what mood does it evoke in you, happy or sad, calm or anxious? What do you think this picture is about?
- That's right, about household supplies, about dishes. What kind of dishes are shown here? (Kitchen.)
— I. I. Mashkov called his painting “Still Life with a Samovar.” Let's find the samovar in the picture. If a samovar could talk, what would it say about itself? (“I am the most important, big, beautiful!”) What color is the samovar? (Grayish-violet, steel, cold, shiny.) What else in the picture is painted in the same color? (Tray behind the samovar, lamp in front of it, jug, iron, pan lid.)
— Copper utensils stand out with bright spots: a brownish-yellow plate, in front of it is a reddish-brown teapot, on the left is a small yellowish mortar. To the left of the samovar is a small saucepan with a handle, a crimson box with a lid, on which stands a wooden bowl with Khokhlo painting. And in the very corner there is a tray with light yellow spots. The light falling from the window plays on the dishes.
In the picture we feel a clash of two color tones - cold (gray-gray-blue) and warm (brown-red, yellowish-orange, reddish-crimson). What color tones are there more? (Cold.)
“That’s why there is a feeling of anxiety.” The artist painted the picture in a very difficult time, cold, hungry. Empty dishes indicate this. The dishes seem to be cold. Objects seem to huddle together to keep warm. Now we are in a time of famine, and we will try to create our own still life, more cheerful. Our still life will also be composed of dishes. We use a technique - collage. This is gluing onto a base materials that differ in color, shape, texture.
1. Let's choose kitchen utensils that we like.
2. Let's draw the outlines of these objects.
3. If you wish, you can apply a dotted pattern to the objects or paint them.
4. Carefully cut out the object along the contour and place it on the sheet, then glue it.
As you work, you need to help the children, remind them of the techniques for cutting out silhouettes from folded paper. Ask what color scheme they decided to use. How did the still life turn out, sad or cheerful?
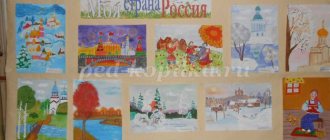
At the end of the work, an exhibition of still lifes is created.
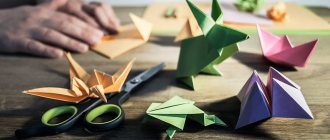
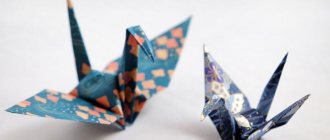
Cups and teapots
Using the cutout appliqué technique, create dishes for children's tea parties. If the product is made of white sheet, then it is decorated with paints or felt-tip pens, and scrapbooking paper will immediately make a beautiful cup.
Cut out the stencil and fold it in half. The dotted lines are the fold locations. Glue it together and the cup is ready.
They also make tea sets.
The composition of buttons looks no less interesting. It is important to choose a color scheme so that the work is not too colorful.
For the next creation you need an openwork napkin (it can be cut out), colored paper, cardboard, paints, scissors and glue.
We glue an openwork napkin onto the cardboard. A cup is cut out on top. Decorate randomly. Draw or cut out white steam. We complement the tea party with candy. You can create a cup from the cover of a magazine or newspaper, or special gift packaging.
For your attention – a teapot made of fabric.
Simply cut out the thin fabric and glue it onto the cardboard. The centers of flowers can be buttons or beads.