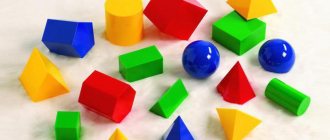
Before introducing your child to the world of appliqué, he needs to be shown the basic geometric shapes: circle, square, triangle, because it is on their basis that the entire creative process is built. Over time, the child will learn to independently cut out complex shapes from paper, but for now all pictures should consist only of basic shapes.
Applications made from geometric shapes are quite simple, and a child will not have any difficulties cutting out difficult shapes. All templates presented below contain an example picture, a general background onto which you need to glue colored shapes. All you have to do is print out all the templates on a color printer and glue them on.
The age for which this work is intended is from 1.5 to 3 years, but the simplest works can be done with the baby even when he does not know how to cut out - let the mother cut it out, and the baby glues the part onto the base-background. If it is not possible to use ready-made templates, then following the example, you can cut out all the shapes from colored paper. For older children, you can use not only colored paper for applique, but also other materials: cardboard, velvet or corrugated paper, felt.
To print application templates from the site - click on the image to enlarge
Application of geometric shapes “Chicken”
Picture, black and white background and templates for work:
Application of geometric shapes “Fish”
Picture, black and white background and templates for work:
The principle of operation for all applications is the same: we cut out the colored templates-details and glue them onto a black and white blank.
To work you will need tools such as:
- scissors;
- PVA glue.
It is important for children to choose comfortable scissors so that they do not have any difficulties during the cutting process. Scissors should be safe, with rounded ends.
Application of geometric shapes “House”
Example picture, background and templates for work:
Application for children “Castle” made of colored paper
The purpose of such work is to introduce the child to such simple geometric shapes as a circle, square, rectangle, semicircle, triangle. Some patterns use more complex shapes - trapezoid, torus, rhombus, oval. The sizes and colors of the figures are also different, which introduces the baby to the concept of shape and color.
All materials are the property of the Vkusnyasha.ru portal and are protected by copyright. This material is not intended for commercial use, only for work in children's groups and at home.
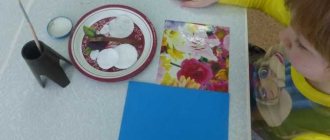
Summary of the lesson on the application “Rug for dolls” Completed by teacher: Petrukhina O.A.
Target:
- teach children to cut narrow strips along the folds of paper into pieces;
- fold the strip twice to get four squares or rectangles;
- symmetrically arrange the pattern elements at the corners and sides of the square;
- distinguish between two shades of the same color.
Materials and equipment:
- flannelgraph and figures for laying out patterns;
- large squares and circles, small squares and rectangles;
- strips for demonstrating folding and cutting techniques;
- character Parsley;
- for children, sheets of paper 15x15 cm (for rectangles)
Some children have large figures and stripes of the same color, but in different shades (red and dark red, green and dark green, etc.).
Progress of the lesson:
A flannelgraph is placed in front of the children. Parsley appears: “Hello! What are you going to do?"
Educator: I want to show the children how to make a pattern of large and small squares on this rug.
Parsley: Can I try to make a pattern?
Educator: Try it, Parsley.
Parsley places the figures on the flannelgraph in disarray.
Educator: Children! Is this a pattern? No, Petrushka (removes the figures from the flannelgraph). The pattern will be obtained when the figures are located in certain sheets. Look, I will place identical squares in each corner of the rug. These are the big ones. And on the sides there are two small ones.
Parsley: Yes, it turned out beautifully! Can children make a pattern?
Educator: Children, who wants to help me make a pattern from other figures! Calls the child who wants it, gives him the mugs and asks where they can be placed on the rug (in the corners).
Parsley: Now I know where to place these little rectangles.
Educator: Where?
Parsley: On the sides of the rug. Here, here...
The teacher and the child make a pattern on the flannelgraph. Parsley looks at the children’s visual material and says: “But children cannot make such patterns. They don’t have little squares and rectangles.”
Educator: But they have stripes. They will fold them and cut them with scissors. Like this. First, fold the strip in half, then in half again, unfold it and cut it along the folds.
Bottom line.
We invite children to fold and cut the strips. He asks what kind of figures they got. Confirms that some children have small squares, while others have small rectangles. Then he offers to lay out a pattern of large and small figures on their sheets of paper. Those who did it correctly are allowed to stick on the pattern.
Application for children “Steam Locomotive”
You can print all the templates as on regular white paper (for copier) in A4 format, or use landscape sheets so that the parts do not wrinkle.
Application from figures “Aquarium”
A very interesting and educational application of geometric shapes in the form of an aquarium. Well stimulates fine motor skills and imagination of the baby. Also, with the help of applications, you can introduce your child to the names of colors and surrounding objects.
loading…
Paper 3-D
Using curly scissors you can also cut out elements for 3D applique. Cut out a cross with sides 3 x 3 cm. Glue a cube from it (the base of the chair). Glue the back to the shape we need. Wait for it to dry completely and paint. Let's make the table: cut out a strip measuring 2 x 5 cm, roll it into a tube and secure it with glue. Cut out a circle and attach a tube to one side (this will be a table). We paint the table.
We attach these elements to a sheet of paper, finish drawing the background - the craft is ready.
Thus, we considered several creation options. Of course, the blank material at work looks much brighter, but if you know how to draw beautifully and select colors, then homemade elements will look no worse. Select shapes, tones, complement with invented elements, diversify your applications. With their help, children will be able to learn new words, develop imagination and imagination. Good luck!
Templates for work “Tractor driver”
Another option for a children's applique is a tractor driver. For crafts, the simplest shapes are used - a circle, a rectangle. square. By the way, if you don’t have a color printer, you can simply cut out all the indicated shapes from colored paper and paste them onto a base sheet.
"Mill"
Just like in the previous versions, we download the application templates and the base image (it is better to print it on thicker paper). We cut out all the indicated shapes and glue them - an interesting applique craft is ready!
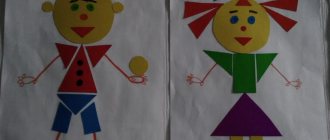
Templates for applique from geometric shapes “Boy”
Self-execution
Let's try to create a chair together. To do this we need colored paper (blue, yellow and red), a button without a needle, glue and scissors. We start from the back of the chair. Draw a shape resembling a crown on a blue sheet. We do the same on yellow, but smaller in size. Draw two orange slices on a red piece of paper. Let's move on to the legs and seat. Cut out 4 red pieces measuring 2 x 4 cm (3 pieces) and 2 x 5 cm (1 piece). We twist them into tubes and secure them with glue. We assemble a chair from the resulting material. We decorate the back with a button.
As you can see, such products look much brighter and neater. Let's look at a few sketches, having learned to draw which, you will be able to create creations with smooth, clear contours.
Let's create a TV and a sofa. We redraw them or translate them using carbon paper.
After you have drawn a sketch, color and cut out. We paste it onto the sheet in the required shape and complete the interior elements.
If you want to create a large room, then you need to draw a lot of furniture. We take a large sheet of paper or several small ones, draw a lot of different home furnishings, paint them with the necessary colors (for example, orange, blue and green). Carefully cut out with curly scissors and paste in the order we need.
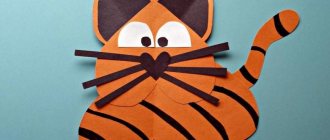
Applications from geometric shapes “Animals”
How to make a small cockerel or elephant from colored paper? Show your child that even the most ordinary geometric figure, such as a circle or oval, can turn into a funny monkey or a cheerful circus elephant! Animals made from colored paper are also very easy to make and are intended for children 2-3 years old.
Cockerel
Example picture, background and templates for work:
Monkey
Applique is the basis on which such a fascinating process as scrapbooking is built, as well as making holiday cards with your own hands. Over time, the child will learn to come up with stories and design his own work, but for now the parents’ task is to introduce him to the magical world of appliqué.
Templates for the application “Circus Elephant”
Templates for applique from “Dinosaur” figures
A dinosaur made of colored paper is another option for captivating a child with an appliqué of geometric shapes.
Templates for work “Parrot”
This bright and beautiful parrot can be made from simple geometric shapes. The application will help your child get acquainted with the names of animals. You can save the templates from the page (see below), or download the entire archive.
Templates for work “Butterfly”
All presented applications are best performed together with the child. Such a creative process develops not only fantasy, imagination and introduces the baby to the world around him. Such simple actions as cutting out small parts and gluing them exactly to the intended place develops the baby’s fine motor skills. Tasks. Teach children to cut out paper clothes for finger theater characters. Fix the method of cutting from paper folded in half. Arouse interest in playing out cut-out clothes in a mini-play of a finger theater based on the content of familiar songs and nursery rhymes. Nurture aesthetic emotions and feelings.
Preliminary work. Looking at doll clothes. Playing with silhouette dolls (selection of clothes for different situations - holidays, winter and summer walks, work, etc.).
Materials, tools, equipment. Rectangles and squares cut from colored and textured paper, soft fabric, foil, candy wrappers, scissors, boxes for scraps, felt-tip pens for finishing drawing faces on your fingers.
Contents of the lesson.
The teacher shows the children a silhouette doll and clothes to go with it. He asks whether children like to play with such dolls, why they like them. He agrees with the children’s statements that it is interesting and easy to play with these dolls: you can come up with different stories, dress up the dolls in clothes that match these stories and create many other things - furniture, vehicles, houses. All this is done quickly and easily.
Then the teacher invites the children to play with their fingers, turning them into dolls or some other characters. He reports that all you need to do to do this is cut out the clothes and put them directly on your fingers. He shows the silhouettes of clothes prepared in advance, puts them on his fingers and uses a felt-tip pen to draw faces on the pads of his fingers - eyes and a smiling mouth.
Demonstrates how to make a garment by folding a rectangle in half, cutting out a semicircle on the fold for the head, and cutting out the sides to shape the sleeves and garment. Displays options for cut-out clothes and invites children to choose the material of their choice - colored paper, foil, candy wrappers, fabric. After the children cut out the clothes and draw faces, the teacher advises them to perform a finger theater performance based on the texts of familiar songs and nursery rhymes.
Finger boy
- Where have you been?
- I went into the forest with this brother. I cooked cabbage soup with this brother,
With this brother I ate porridge, With this brother I sang songs.
Our Masha is small, She wears a scarlet fur coat, The edge is beaver, Masha is black-browed. Walk, Masha, along the path, Stomp, Masha, with your foot.
After class. Independent production of silhouette dolls and paper clothes, furniture, transport.