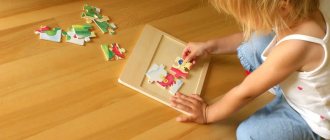
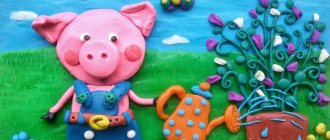
Winter house
The white sheet is torn into small pieces - this will be snow. This activity is great for developing fingers. Ready-made house templates are printed and cut out. The house is pasted onto the main background, the roof is decorated with cotton wool. Nearby, snowdrifts are created with cotton material.
And at the final stage it is decorated with a previously prepared paper snowball.
Products made from cotton wool
Cotton wool discs have a good texture for making winter applique pictures. And thanks to the light shade, you can create a snow woman and snowdrifts from them. Circles are very popular in preschool institutions.
Corrugated paper
Winter applique senior group can include corrugated paper. Ready-made winter-themed templates are pasted over with pieces of multi-colored paper. Embossed paper should be cut with scissors rather than torn. The material is glued using PVA glue.
Green paper is perfect for creating Christmas trees. The material is finely chopped and glued to a light base. After drying, triangular shapes are cut out of the sheet. The parts are glued onto cool-colored cardboard to form a tree.
Snow and snowdrifts are painted on with white paint. Using a hole punch and light paper, create falling snow.
Application in the middle group on the theme “Autumn”
Preschoolers of the middle age group begin to get acquainted with geometric shapes, they form the idea that the outlines of natural objects can be similar to figures. For the lesson, prepare a set of colored paper, PVA and scissors. The cardboard base can be of any color.
Application technology "Autumn":
- Cut a strip of green paper and glue it to the bottom edge of a thick base - this will be grass-covered ground.
- Choose from a selection of paper in fall colors: red, purple, yellow, light brown, burgundy, orange.
- Encourage children to cut out different geometric shapes. Emphasize that the shapes must correspond to the actual shapes of the trees. Let the pupils look out the window and say what shape the crowns have: triangular, oval, round. Moreover, it is not the same, but in some trees it is more elongated or wider.
- Once the shapes are cut out, have the children glue them onto the cardboard along the center axis, parallel to the previously glued “ground”. Some figures should be slightly higher - these will be tall trees, others lower. They can be partially overlapped.
- When all the figures are glued, all that remains is to draw on the trunk and branches with a felt-tip pen.
Application for younger groups
Melted snowmen can easily be made with small children. The younger group cuts out on their own, because the work does not require accuracy. Next, the figures are glued onto colored paper.
A simple mitten applique is also good for the preparatory group. A mitten figurine is cut out of thick cardboard in advance, and a snowflake is cut out of a snow-white sheet. The two parts are secured to each other and the work is ready.
What and how to make an applique from leaves
What we need:
- 1. Natural material: leaves of various sizes, shapes and colors (they can be dried in advance), twigs, flowers, herbs, seeds.
- 2. Colored paper, felt, glue, scissors, paints, pencils, cardboard.
- 3. Varnish can also be useful to fix the finished work and give it shine.
How to work with leaves:
To start working on crafts from leaves, they must first be dried. This can be done between the leaves of books, or using an iron. Store the leaves between the pages of books or newspapers.
Craft "winter"
A technique for depicting a winter landscape using small balls and a glass will be very entertaining for a child. To work, you will need several balls and a cylinder-shaped object, such as a cup.
A colored sheet is placed in the container, and the balls are dipped in white paint. Painted figures are poured into a glass and covered with a lid. Shake well and you will get a colored sheet with white streaks.
Note!
- How to decorate a Christmas tree for the New Year 2021 with your own hands: TOP-200 photos of the best ideas, choice of color, toys and style
- How to make a New Year's toy - beautiful and interesting ideas for New Year's toys. DIY instructions for beginners + 100 photos
How to make snowflakes: TOP-160 photos of the best ways to create snowflakes from different materials. Simple work plans for children
By analogy, you can experiment with colors. Parts for appliqués are cut from finished sheets.
Snow collecting machine
Boys will appreciate the snow blower. To make this craft you will need colored paper, a cardboard sleeve, cotton wool and bubble wrap. To create a background, the air film is painted with white paint. The material is tightly fixed on the blue sheet.
When the paint is dry, the car applique is placed on the background. The transport bucket can be made from a cut bushing. Cotton wool is used to imitate snow.
Applique Autumn bouquet
This craft is quite suitable as a gift for a teacher or mother from a schoolchild. After all, such a bouquet of leaves will last much longer than a fresh bouquet of real flowers.
Pre-dry leaves from different trees. Prepare glue, scissors and a sheet of cardboard.
Form a vase from the leaves by gluing them onto cardboard. And then help your child create a beautiful bouquet of leaves. To make it bright and neat, use light leaves for the craft, without holes or stains.
A vase for an autumn bouquet of leaves can be made from colored paper, or you can create a bouquet not only from leaves and do without a vase.
Hat with mittens
An applique is created from winter accessories. To make the details more realistic, they are decorated with pom-poms made from cotton wool. You can decorate the mittens with felt, bugles or beads.
Autumn applications: preparatory group
Applications made from natural materials in kindergarten occupy a large part of the children's development program. Autumn gifts of nature open up many possibilities for activities with children. Therefore, autumn fairs are a place where you can show off your talents.
You can invite the children to come up with a real composition of leaves.
If you combine drawing and applique, you can make such a cute hedgehog from seeds.
Using flower petals and grass sprigs, you can make beautiful applications
Polar bear
Foam board, which is easy to work with, can be used to create applications. The parts are cut out using the template and glued together. The tail is glued to the product and you can make a pendant from the bear by fixing a light braid on the product.
Forest and trees
Branches are glued onto a colored sheet. You can create an imitation of snow using cotton wool or fur. And with the help of cut rain or silver beads it is easy to depict snowflakes. On the finished sheet you can draw trees, placing a tubercle with cotton wool between them, and you will get a den.
Note!
How to make a snowman with your own hands: reviews of the best ways to create a snowman. Simple work schemes and step-by-step master class for children (130 photos)
- Crafts for the New Year 2021: TOP 110 photos and step-by-step instructions for creating New Year's crafts from scrap materials
Snowman made of cotton wool - TOP-170 photos of original ideas. Simple schemes for creating a snowman with your own hands + step-by-step instructions for children
Snowman
To form a snowman, you will need to cut out the base from a white sheet. Cotton balls are glued to the prepared material. A cap, eyes and a nose are attached to the snowman. Handles and pom-poms can be added if desired.
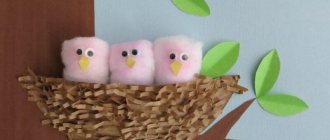
Bullfinch
Draw the details of the birds on a separate sheet, cut them out and assemble them into the overall picture. For the background, blue paper is selected or a regular sheet is painted blue. Snow is formed using glue and cotton wool.
A bird branch is cut out of brown paper and glued to the main background. There is a bullfinch on a branch. Rowan is created from red balls of paper.
Types of applications made from natural materials
- Overlay applique. A simple look that does not require additional work with leaves - they are glued to a sheet of paper or cardboard, creating the intended plot. These can be animals, trees, mushrooms. You can add some details.
- Mosaic or modular application. This technique involves gluing leaves that are identical or similar in shape. This way you can make a bird's tail or fish scales.
- Symmetrical applique. In this case, it is necessary to select similar leaves to create mirror images. This way you can make an image in water, a butterfly, a dragonfly.
- Ribbon applique. A type of symmetrical applique, but in this case you can make several similar images.
- Silhouette applique. The leaves are trimmed to create the desired pattern or shape.
Children become interested in applications and crafts even at the stage of collecting material. Kids like to collect leaves on the paths while walking, look for cones and chestnuts. Therefore, it will not be difficult to persuade your child to use all this to create a beautiful applique.
Deer
Disposable plates are very good as an applique on the winter theme. You can easily make a Christmas reindeer out of them. The plate is painted brown. Horns are created using handprints.
Cardboard rectangles are suitable for paws. All parts are cut out and attached to each other. Eyes made of beads or paper are glued onto the muzzle.
Autumn applications made from natural materials
With the help of activities with natural materials, you can also strengthen children’s understanding of changing weather conditions, explain to them what the seasons are and what happens with their changes.
The late autumn applique will help reveal to the child a new stage of nature that precedes winter weather. After all, in late autumn we observe a cooling, the leaves become less and less and the last leaves are blown away by the wind from the branches of the trees.
Application: autumn has come
An application on this topic will reveal to the child the concept of how summer changes to autumn, what happens in nature during this period. After all, there are still many leaves on the trees, some green, but also red, orange and burgundy.
Take unnecessary puzzle pieces, paint them with different colors, whatever color you want the leaves on the tree to be. The tree trunk can be drawn, or it can be glued from paper.
Winter ball
The glass ball is a popular souvenir. Using a minimal set of decorative paper, cotton wool and glue, you can create a paper version. Inside the winter ball, using colored paper, it is easy to arrange fairy-tale scenes: houses, Christmas trees, a palace or a snowy landscape.
Note!
New Year's decorations for windows 2021: 150 photos of beautiful templates for do-it-yourself window decorations for the New Year
Winter landscape
A simple and beautiful winter applique made from paper will appeal to middle school children. To make this you will need cotton pads and swabs. For the background it is better to choose blue cardboard. Holographic paper can convey the feeling of frost with iridescent snowflakes.
The contours of the tree are applied to a cotton pad and cut out. Nearby you can place a similar tree glued to a cotton swab. By cutting the disks in half, beautiful snowdrifts are formed, they are glued at the base of the picture.
It is easy to obtain a young moon from the edge of the disk. All parts are fixed using PVA glue. You can create stars and snowflakes from small rolled balls.
Autumn paintings, panels: applications
Using the appliqué technique, you can create beautiful and original paintings from a variety of natural materials.
Collect various leaves, twigs and flowers, dry them as a herbarium and start creating real panels and paintings.
The following are perfect for such a picture: moss, straw, spikelets, seeds, small flowers
Painting “Autumn Girl”
Night in winter
A wide variety of materials are used for winter nights. Therefore, this application is suitable for schoolchildren. For better results, just watch the video and repeat the finished master class. The result will be a nice decoration for your apartment.
At the initial stage, you should decide what will be depicted in the picture. On a winter night there is always a birch tree with a house and a fence, and everything is covered with snow. The desired idea should be sketched on cardboard.
The next step is to prepare a mass of papier-mâché. To do this, napkins are manually crushed and filled with hot water and finally beaten with a blender. Excess moisture is removed by normal squeezing.
PVA glue is added to the finished material until a plastic consistency is formed. The mass is thoroughly mixed and oil is added.
Using plasticine, snowdrifts, logs and branches are formed. The entire drawing is processed with the finished mass. The top of the product is coated with PVA glue. The work must dry well.
The final stage will be painting with gouache. Blue or black would be perfect for it. For snow, you should choose white, and light blue should be used as a shadow. Draw black stripes on white birch. For the house and fence you should choose the desired shade of brown.
DIY application “Medal” for February 23rd for school, step-by-step master class with photos
The next version of the DIY application “Medal” for February 23 from our step-by-step master class with photos is suitable for elementary school students. Its complexity can vary depending on the age of the child and the materials used. For example, in the next step-by-step master class, you can make your own DIY “Medal” applique for February 23rd for school from one colored paper or in combination with cardboard, napkins and plasticine.
Necessary materials for a do-it-yourself “Medal” applique for school
- old cd
- plasticine
- cardboard
- colored paper and cardboard
- office glue
- pencil
- napkins in red, blue and white colors
- scissors
- ribbon
- marker
Instructions for a master class on DIY “Medal” appliqué for school
- Cut out a medal blank from orange colored cardboard. We make a star blank from yellow cardboard. Ready-made templates for such blanks are freely available on the Internet. Glue a CD on top of the medal blank and use a black marker to divide it into three equal parts.
- From red and orange colored cardboard we cut out two strips 2 cm wide and 20 cm long. Glue them together, as in the photo below.
- We fold the strips like an accordion.
- Glue the finished accordion to the middle of the disk. Then cover the entire surface of the CD with a thin layer of plasticine.
- We cut the napkins into approximately equal squares, without mixing the colors with each other. You can also take multi-colored corrugated paper.
- Let's move on to trimming: starting from the middle, fill the plasticine base with blue paper. We repeat the same with red and white blanks.
- Glue a five-pointed star on top of the accordion. We decorate the medal with additional plasticine and congratulatory inscriptions. You can also attach a ribbon on top so that the medal can be worn around your neck.
An applique for February 23rd is a wonderful DIY gift option. We hope that our step-by-step applique master classes for children 3-4 years old, middle and senior groups of kindergarten and school on February 23 inspired you to get creative. Be sure to use these ideas with photos and videos for Defender of the Fatherland Day for dads, grandfathers, and brothers.
Snowfall
For winter style applique you will need: blue cardboard, sheets of brown, orange and red, white sheet, scissors and glue.
You should cut out the parts for the craft. A rectangle for a house made of red paper. Small orange squares for the window, and brown trunks for the trees. Snow is created from a white sheet torn into small pieces.
Markings are made on the background for the location of the finished patterns. The parts are glued to the finished strokes, and excess glue is removed with a clean cloth. Prepared paper snow is also fixed with glue.
You can use pencil glue for a cleaner job; it dries quickly and won’t leave streaks. The application is ready, all that remains is to place it in the frame.
Master class of applications for February 23rd in kindergarten for children of middle and senior groups with photos
Children in the middle and senior groups of kindergarten can master more complex versions of applications for February 23 than the master class above. For example, with children 5–6 years old you can already make multi-colored applications with many small details of different levels. Our next applique master class for February 23rd in kindergarten for middle and high school children relates specifically to complex craft options.
Materials for application for February 23rd in kindergarten for middle and senior groups
- colored paper
- thick cardboard
- scissors
- glue
- felt-tip pens
- simple pencil and ruler
Instructions for application to kindergarten on February 23 for middle and senior groups
- The next application will be a combination of several main symbols of Defender of the Fatherland Day - the state flag, military equipment and medals. At the first stage, you need to make blanks from cardboard, as in the next photo.
- Then you need to make a marking on a sheet of cardboard: using a pencil and a ruler, divide the sheet into three equal parts horizontally. This will be the basis of the applique and flag.
- Now we cut out rectangles from white, red and blue paper, the dimensions of which correspond to the markings on the cardboard. Glue the colored paper blanks tightly onto the cardboard.
- Using templates, we cut out silhouettes of military equipment - a ship, an airplane and a tank - from colored paper.
- We glue the blanks to the flag so that each piece of equipment is on the same stripe of the flag. We make sure that the colors of the equipment and the flag stripes contrast with each other.
- Now we move on to the next part of the application - the medals. Using previously prepared cardboard templates, we cut out a solid blank for the medal from yellow paper.
- Then we glue a star and numbers on top of the medal, also pre-cut from colored paper according to templates.
- To make the medal more voluminous and dense, glue it to cardboard and cut it out. You can also decorate the medal by additionally coloring it with felt-tip pens.
- At the last stage, we glue the medal onto the flag and make a congratulatory inscription with felt-tip pens.
Forest trees
For work you need sheets of blue, green, yellow and brown paper. The parts are initially cut out from newspaper, then from colored material. For the background, blue paper is used, ideally velvet.
Dashes mark the points for the location of the cuttings. Each tree is carefully fixed one by one to the base using glue. Excess glue is removed with a napkin. For snow you will need white paper
You can decorate trees with multi-colored confetti. To ensure accurate work, you should wait until each tree dries individually. With this approach, the glue will not smear across the background.