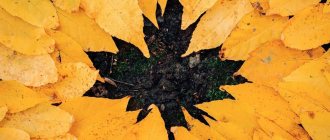
Crafts “Take care of nature”
Children love to color. Therefore, print a poster on this topic in black and white and give the children freedom of creativity. Let them use crayons, pencils, felt-tip pens or paints to add bright colors to the canvas. Tell them what color the elements of the poster should be, but if the children want to show their vision of the plot, do not interfere with them, let them show their individuality. Then teach them how to make crafts with the theme "Take care of nature." Prepare everything you need in advance.
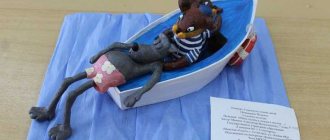
Craft “Waterfall”
If you go on a picnic with your children, after the feast tell them that plant remains can be buried in the forest, they will rot. But this trick won’t work with plastic bottles. Therefore, you need to take them with you to throw them in the trash container or to do a wonderful job for which you need:
- plastic bottle;
- cardboard;
- scissors;
- water;
- cup;
- beads;
- colored paper;
- markers;
- gouache.
Help your child cut the plastic bottle in half crosswise, almost in half, with scissors. The top part should be slightly smaller than the bottom. The child will paint this half with a neck to turn it into a fish, then draw an eye on it with a felt-tip pen. The blue cardboard sheet will turn into water. You need to glue beads at the bottom, and cut out something like pebbles from multi-colored paper.
All that remains is to glue the “fish” onto the blue cardboard and draw air bubbles in the water.
Crafts made from natural materials
To create it you will need:
- Walnut;
- cone;
- dry grass;
- tree branches;
- sawed from a dry tree trunk, which will become a stand;
- glue.
Place a wooden stand on the cut tree, the child will glue dry grass and attach twigs using plasticine.
Lesovichek will live in this forest. The baby will make it out of a walnut, which will become the head and cones - this is the body. These parts need to be connected with plasticine. Facial features are also made from it. But it is necessary to use plasticine of appropriate colors, as for plants and mushrooms that need to be attached to the stand. Use a bright marker along the edge of the stand to write “Take care of the forest!”, and if the child is already familiar with literacy, let him do it himself.
Drawings on the theme “Ecology of Nature”
Such creativity will also instill in children a love for their native land. If they were asked to bring drawings on the topic of environmental ecology to a children's institution, we can recommend the following.
In this poster, the author shows how specifically each person can help preserve normal ecology and nature. To do this you need:
- pick up trash after yourself;
- After relaxing by the fire, be sure to put it out;
- don’t waste water;
- save energy;
- take care of your home.
Reducing harmful emissions into the atmosphere will also help preserve the environment. It is not for nothing that in the summer motorists are encouraged to switch to bicycles in order to get to work using this transport.
Parents can go on bike rides with their children, thus also engaging in outdoor sports.
The following drawing on the theme of natural ecology is symbolic. Under a bright rainbow, the child depicted a representative of animals, birds, insects, plants and calls on everyone to preserve our nature.
The following work is intended for schoolchildren. To make it, you will need:
- a sheet of paper or whatman paper;
- a simple pencil;
- eraser;
- paints.
First, on paper with a pencil you need to outline the main elements of the canvas.
If some of them didn’t work out right away, you can erase them with an eraser and do them again. The picture is divided into 2 thematic parts. On the left is beautiful nature, a grazing horse, birds soaring in the blue sky, and on the right are industrial enterprises that produce harmful emissions into the atmosphere and, as a result, dead trees, bushes, and grass.
The following poster on the topic “Take care of nature” shows children that they need to protect the forest from fire.
If your child is asked to draw a picture on such a topic, you can give him the following idea. There is a forest, a river, a rainbow, and animals.
If this drawing on the topic “Ecology of Nature” is intended for middle school students, the next one can be reproduced by children from elementary school and older groups of kindergarten. Show them how to draw tree canopies with conical fora and lush canopy. Children will also be able to draw lilies of the valley and strawberries.
Another work was done using a very interesting technique. To make the same, take:
- a needle;
- colored threads;
- a sheet of white cardboard;
- simple pencil.
First, barely pressing the pencil, you need to draw a rainbow, below - the rays of the rising sun.
In the center of the picture are open palms and the inscription “Take care of nature!” We start from the bottom of the canvas. Help your child thread the yellow thread through the eye of the needle and tie a knot at both ends of the thread. The rays of the sun can be made long or consisting of several stitches. Children will embroider a rainbow using threads of different colors and finish the work using the same technique.
The following paintings are based on comparison and contrast.
On the right is a corner of the globe. Explain to the children that it will remain like this if we all protect nature. On the left you can see what it will be like if you litter, don’t take care to put out the fire behind you, or burn it in the wrong place. Pollution of water bodies will also lead to such sad consequences. A child will understand all this if he draws such a canvas.
Another work develops this idea and shows that people are able to resist air pollution; they need to reduce the amount of exhaust gases and pick up trash after themselves.
The following drawing is also intended to instill in children the right thoughts regarding the environment.
To let the kids know that you can make a lot of interesting things out of waste material, offer them the following ideas.
Using layouts in environmental education of preschool children
Using layouts in environmental education of preschool children
The author is Ishmukhametova Liana Ildusovna, teacher of the speech therapy group at MBDOU kindergarten No. 36, village. Mesyagutovo municipal district Duvansky district of the Republic of Bashkortostan.
Nowadays, the environmental problem is the most pressing and is attracting more and more attention. Labor activity and lifestyle of modern society have become a powerful transformative force that affects the biosphere and disrupts the course of its natural evolution. A way out of the environmental crisis, scientists note, is impossible by technical means. Environmental education is a necessary condition for overcoming the consequences of negative impacts on the environment and a factor in the formation of an individual’s ecological culture as a regulator of relations in the “person – environment” system.
Preschool childhood can rightfully be considered the beginning of the formation of an individual’s ecological thinking, since during this period the foundation of a conscious attitude to the surrounding reality is laid, vivid, emotional impressions are accumulated that remain in a person’s memory for a long time, and sometimes for a lifetime. One of the conditions for the implementation of the environmental education system in preschool educational institutions is the correct organization and ecologization of the developmental subject environment, which should contribute not only to cognitive, aesthetic and moral development, but also to the formation of environmentally literate behavior in nature, safe for both nature itself and the child.
According to the requirements of the Federal State Educational Standard, the subject-spatial environment must provide the opportunity for communication and joint activities of children and adults, and ensure the maximum realization of educational potential. Materials that activate cognitive activity are required in the equipment. Such materials are layouts. Today we will talk about environmental layouts.
Layout – a reduced model of an object (forest, mountains, field, lake, volcano, solar system, etc.).
In the process of developing a game with layouts, the following tasks are solved:
- conditions are created for enriching children’s ideas about nature and the conditions for life of the plant and animal world;
-develops cognitive interest in living nature, emotional responsiveness and curiosity;
- skills of correct behavior in nature are formed;
- goodwill, responsiveness to the natural world, and careful attitude towards it are cultivated.
In early preschool age, children are just beginning to form ideas about living nature. Simple layouts and models created by the hands of teachers form initial ideas about natural objects. But it is not the presence of the layout that shapes it, but the ability to communicate with it, the game. With younger preschoolers, work involves examining finished products and manipulating them. A conversation about nature or a natural object that the model depicts. In the life of older preschoolers, director's play with small toys occupies a large place, when the child creates an imaginary situation, invents an event with characters, identifying himself with them, performing one of several roles, and modeling real social relationships in a playful form.
Layout "Waterfall"
Layout "Mountains"
Layout "Lake"
Layout “Winter Forest”
Layout "Beehive"
Creating an anthill layout
Thus, we consider prototyping as an environmentally oriented activity that helps consolidate ideas about the natural world, allows one to transform acquired knowledge into play, saturating children’s lives with new impressions and stimulating children’s creativity. With the help of models, we form an understanding among preschoolers that all living beings need certain living conditions that satisfy their needs.
Crafts from garbage
Children love Kinder surprises, so they almost always have packaging for the gifts inside. Teach children by showing them what can be made from such waste material.
The result will be wonderful funny chickens. To make them, the kids will need:
- plastic containers for kinder eggs;
- glue;
- beads or pins;
- yellow and red cardboard;
- scissors.
To one plastic package you need to glue wings made of yellow paper and scallops made of red paper, and attach beady eyes in the same way.
You can pierce the top of the Kinder egg package with two pins. Then the remaining beads on the outside will become the chicken's eyes.
To make the shells, have parents cut the top of each package half in a zigzag pattern. This will be more difficult for children. Together with them, make a nest from straw or dry grass, or from thin twigs, fastening the elements with threads or glue.
You can make such a picturesque bouquet out of garbage. To create it, take:
- Kinder egg packaging of different colors;
- scissors;
- sisal or green plastic bottles;
- cocktail straws;
- nail.
Making master class:
- Also cut the egg halves in a zigzag pattern. On the reverse side, use a heated nail to make a hole.
- Insert a straw into each, first push the edge further to cut it into 2 parts. Then tie them in a knot, then this “stem” will be firmly fixed in the flower.
- Arrange them all in the same way. Connect the flowers, cover with sisal, tie with ribbon.
- If there is no sisal, then you need to cut off the top and bottom of the green plastic bottle and cut the remaining part into a thin strip in a spiral.
For the next craft on the theme take care of nature you will need:
- Kinder egg packaging;
- toothpicks;
- scissors;
- plasticine;
- paints;
- thin colored rope;
- flat lid from a cardboard box;
- green colored paper;
- glue.
Step-by-step production:
- Let the child glue colored paper inside the lid of the box, this is a carpet of green grass. Toothpicks need to be pre-painted, when dry, stick along the edge of the box, like a picket fence. These pickets are tied with rope in several rows to form a fence.
- Pierce the bottom parts of the plastic blanks with an awl and have the child insert toothpick legs here. He will coat them with black plasticine, make small circles from it, and attach them to the cow’s body. Then you need to sculpt the horns, and the muzzle from yellow plasticine.
- In the same way, let the child create other animals: a pig, a cat, a dog, a sheep. Then you’ll get a whole village farm, and you already know how to make kinder chickens.
The following crafts, take care of nature, are no less interesting in execution. After all, after a feast or celebration, plastic cups and disposable plates remain. Make a clown out of them together with your children.
For it you will need:
- strong wire;
- disposable plates and glasses;
- plastic tray;
- latex gloves;
- padding polyester;
- buttons;
- multi-colored threads;
- cardboard;
- plastic bottle;
- glue.
Manufacturing sequence:
- Make a frame of a man out of wire. Thread cups onto each wire that became arms and legs, piercing their bottom.
- Glue 2 plates together, first placing plastic hair between them. Glue threads in the shape of a mouth, cheeks, eyelashes onto your face. And the pupils can be made from a plastic bottle.
- Two trays will become the back and front of the clown. Decorate his clothes with buttons, sparkles, cardboard, which will turn into a jacket collar.
- Stuff the gloves with padding polyester and attach them in place. This is how the theme of natural ecology came into play. After all, this garbage will not harm her if you make crafts like this for the dacha or for a competition.
And an empty container from “Toilet Duck” or other household chemicals can easily become a toy bus. And the other bottle - by helicopter.
To make the first toy, you need to take an empty plastic bottle of a similar shape, for example, from a “toilet duck”, rinse it well, and remove the label.
Draw the windows and doors of this minibus with a felt-tip pen, cut them out with a knife and scissors. To prevent your child from getting hurt on the sharp edges of the plastic, sand them first with coarse, then fine sandpaper.
The covers can be glued with super glue, making wheels or using wire axles. Use an awl to make two punctures on one side and the same number on the other side of the bottom of the bottle. Insert one and a second wire into them, onto the ends of which you need to glue the lid, which will become the axes.
And to make a helicopter, you will need:
- 2 bottles of drinking yogurt;
- glue;
- 2 plastic bottle caps;
- cocktail straws;
- 2 nails;
- scissors.
The first bottle of drinking yogurt will be the main one.
You can simply draw a cabin on its bottom or cut off the bottom and glue half of a plastic package from a Kinder egg here. Make runners from two straws, attach them to strips of plastic cut from the second bottle.
Using a hot thin nail with a wide head, make a hole in the lid and its attachment point, as well as at the ends of the straws. Match these parts to create the top propeller. In the tail part, make it out of straws.
If you need to quickly make a craft about the ecology of nature, use plastic bottles. Tell your child that those who throw them away in the forest harm nature. After all, such containers will rot only after 200 years! It’s better to make a craft out of it for a competition. It will take very little time and materials to make the next one, here they are:
- milk bottle;
- plasticine;
- 2 buttons;
- black and white cardboard;
- glue;
- pliers;
- wire in a white winding.
Cut 4 pieces of wire with pliers and glue them to the bottom of the bottle, turning it horizontally.
Make a tail from the thinner wire in the winding. Have your child smear black play dough onto a bottle cap to create a nose for this rat. He will cut out ears from white cardboard, and a mustache for her from black cardboard. Using plasticine, attach the eyes to the muzzle.
To make fun snowmen, show children how to draw on Actimel bottles with a marker to create the characters' facial features. You can teach your child to knit. Cast on 2 knitting needles and show him how to knit a rectangular fabric using garter stitch. Then you need to sew it on the wrong side. After that, thread the needle and pass the thread into the upper part of the cap, tighten it.
How to make a fan from forks was described in the corresponding article. Next to him, such an animal made from a plastic bottle will look wonderful.
You need to cut off the necks from the other two and glue them directly with the partings to the main container. The legs are done. The ears are cut out from the remains of the auxiliary bottle.
It's easy to create an adorable horse using two colorful bottles and a thread mop attachment.
To make a cat you will need:
- 3 identical bottles;
- scissors;
- paints;
- brush;
- glue;
- piece of fur.
The necks of two bottles are cut off; they need to be inserted one into the other to form the body of a cat. From the third bottle you will only need the bottom; glue it instead of the head. Make ears from scraps of plastic and glue them in place. All that remains is to paint the base to make a cat, glue a piece of fur on the head, and the tail can be made from cardboard or plastic.
Flowers from a plastic bottle will also help turn waste into a decorative item or into an entry for a competition. Petals are cut out from this container. In order for them to bend like that, you need to hold the workpieces over the flame for a short time.
Making a didactic manual on ecology and the environment
handicrafts on ecology, teacher Kovaleva E.B. Novosibirsk, 2017
Making a didactic manual on ecology and the environment
together with younger schoolchildren.
Explanation.
A very convenient teaching aid for primary schoolchildren, such as the “Cashbox of Letters and Numbers” with special slots for cards with letters and numbers. The Letters and Numbers Box helps first graders learn letters and numbers; helps to form words syllable by syllable and perform simple arithmetic operations. Such aids are visual, develop and strengthen children’s visual and motor memory. The box of letters and numbers is used in mathematics, Russian language and reading lessons in elementary grades. But for lessons on the world around us, there are no such universal aids. I propose to make, together with schoolchildren, a didactic manual on the world around us for first-graders from cardboard.
Purpose and objectives of the lesson
: 1. Educational: children must understand the change of seasons, be able to list the seasons, identify spring natural phenomena, understand the useful activities of people in the spring. 2. Developmental: the teacher needs to develop children’s interest in nature and manual labor. 3. Educational: a teacher can instill in children a love of nature and work; foster friendly interaction in the team; teach each other to help each other.
Expected results:
a set of didactic teaching aids on ecology, made by yourself. Schoolchildren will acquire the ability to glue, cut, compare, perform actions in the correct sequence, reflect on natural phenomena, and determine the change of seasons by signs. These cardboard crafts can be used in didactic educational games during lessons on the world around us.
Materials:
cardboard, drawings, colored pencils, scissors, glue stick, plain paper envelopes, tape.
Lesson topic:
Spring came. Similar classes can be conducted on approximate topics: “Winter is an adventure,” “Autumn is a time for full pantries,” etc., selecting appropriate pictures.
Contents of the lesson:
In spring nature wakes up. The sun is shining brighter and the snow is beginning to melt. Spring drops are ringing! The day is getting longer and the night is getting shorter. It's getting warmer. The first spring rain drips from the clouds. Early grasses are sprouting and primroses are blooming. Buds are blooming on the trees. The first migratory birds arrive. And the schoolchildren have already prepared cozy houses for them - birdhouses. Birds will hatch their chicks in birdhouses. The coming of spring is the awakening of nature after a long winter.
For the lesson, schoolchildren can learn several poems and riddles about spring.
Progress
STEP #1.
We choose our favorite picture about nature in children's magazines. We chose from the archived issues of the magazine “Veselye Kartinki” the drawing “Spring has come” by the artist I. Savina.
STEP #2.
We print several copies of this picture on A4 sheets on a color printer. If there is no color printer, then print it on a black and white printer and color the drawing with colored pencils. Glue the sheets onto cardboard.
STEP #3.
Cut off the landscape part of the picture from the bottom. We make slits in the cardboard in the designated places of the picture. Separately cut out each object or element of the landscape from the bottom of the picture. Do not cut off the scallops on the cards, but check that they fit well into the slots in the picture. We put all 7 cut out cards with objects into an envelope (sun, bird, birdhouse, cloud, lily of the valley, grass, tools).
STEP #4.
We glue the envelope on the back of the picture onto the cardboard.
Application of the manual in the game.
After a conversation with first-graders about spring natural phenomena, the teacher divides the children into teams of two per team. One student holds the picture with both hands so that all classmates can clearly see it. The second student takes cardboard cards with objects - signs of spring - from the envelope and holds them in his hands. At the teacher’s command, children must quickly and correctly distribute the cards with signs of spring into places and insert them into the slots correctly. The teacher determines the winning team, consisting of two students, and counts the mistakes of the others. Everyone has fun!
Top view of the craft.
Side view of the craft:
We fix errors. What's wrong here?
Image source used:
https://detmagazin.ucoz.ru/load/135 library of children's magazines. The site allows you to print your favorite picture from your favorite children's magazine.
5