Starting from an early age, a child will probably ask his parents the following question: “what is my body made of?” To help him understand this, build a human structure using paper along with the craft. There are many master classes with step-by-step instructions, with which it is not difficult to create a paper applique.
Internal structure of a person
This application is suitable for preschoolers.
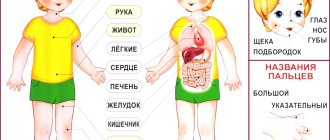
It helps the child quickly learn the basic human organs. Step by step execution:
- Draw the outline of a person on white paper. To make it easier, find a ready-made convenient template on the Internet and print it.
- Separately, we draw the contours of the organs: brain, heart, lungs, liver, stomach, bladder. It will be most effective to do this on colored paper. The child will probably like the idea of pictures of the food he ate today. Therefore, select food cards and stick them inside the stomach in advance.
- Carefully trim the organs according to their outlines.
- We glue the details onto the sheet where the previously drawn outline of the person was. Do this in the right places: the brain - in the head, the heart and lungs - in the chest, the liver and stomach - in the stomach, the bladder - in the lower abdomen.
All that remains is to label each organ and cut out the outline of the person. A useful craft is ready.
Human head
Work on this topic is suitable for middle and senior groups.
Such an applique is created not only from paper. Threads, buttons, plasticine and everything the soul desires are connected here. Step-by-step instruction:
- Draw an oval with ears on the sides. This will be the head.
- We cut the workpiece along the contour.
- On separate colored sheets of paper we draw eyes and a mouth. There should be different colors for the paper parts of the face. For example, draw lips on red paper, and make eyes on white: first draw an oval, then the iris and pupils.
- We cut off parts of the face and glue them into place, after which we finish drawing the nose.
- We take several thick twisted threads and attach them with glue to the head. If it's a girl, she gets ponytails if she wants. Plasticine is used for young children.
MAGAZINE Preschooler.RF
Objectives: Educational: Continue acquaintance with the types and genres of fine art. Developmental: 1) Arouse interest in the search for visual and expressive means that allow you to reveal the image more accurately, fully and individually (features of appearance, character and mood of a particular person). 2) Learn to compose a portrait from separate parts (an oval - a face, strips or lumps of crumpled paper - a hairstyle). 3) Strengthen the skill of cutting out an oval from paper folded in half. 4) Develop color perception (select a color tone for the background in accordance with hair color). 5) Continue to develop the ability to evaluate your own work and the work of a friend.Educational: 1) Foster creative activity and independence, using various methods of working with paper in appliqué work. 2) Make the child want to help. 3) Develop aesthetic perception. Preliminary work: 1) Introduction to portraiture as a genre of painting. 2) Examination of reproductions of paintings by famous portrait painters. 3) Looking at photographs. 4) Drawing portraits with sticks on the ground while walking, with felt-tip pens and pencils in independent artistic activities. 5) Experimenting with different ways of working with paper in appliqué work. 6) Looking at your reflection in the mirror. 7) Drawing up verbal portraits (of yourself and the doll). Methodological techniques: reading a poem, conversation, demonstration and explanation, productive activity, theatricalization (parish of Kapitoshka). Materials: a rectangle of white paper for the oval of the face, colored paper for hairstyles and other parts of the face, a set of colored cardboard for the background of the portrait, glue, glue brushes, oilcloths, cloth napkins, samples of portraits (works of older children) for display, slides, multifunctional toy A capitoshka with a set of different shapes of lips, eyebrows and mouths, an incomplete portrait, a strip of paper with different shapes of noses, mirrors, carpet. Contents: - Guys, do you know the name of our group? - Turtles. — Yes, the name of the group hangs on our door, and everyone who comes to us will know about it (slide). — But in addition to the name, there should be a business card hanging in the locker room. What it is? — This is a corner where a photograph of all the children attending this group is pasted. For example, like in the neighboring group “Sun” (slide). — I went to the photographer, but he is busy and cannot come to photograph you. What should we do? — You can draw yourself, make an applique, or bring a finished photograph from home. - Thank you for telling me how to get out of this situation. This means that each of you will have to take your own portrait. Let me remind you what it is. If you see that someone is looking at us from a painting - a pilot or a ballerina, or Kolka is your neighbor - the painting is definitely called a portrait. - Please note that the portrait should be such that anyone looking at it can recognize who is depicted in it. — I made the corner where your works will be placed. Here he is. What does it look like? - For a turtle. — Everything you need to do the work is on your tables. The background for the portrait will be colored cardboard. First, let’s clarify which background to choose correctly? You have light and dark colored cardboard on your tables. If you are fair-haired, what color cardboard do you choose? - Dark. - If dark-haired - light-haired. - Why are we doing this? — To make the hair more visible, the work turned out to be brighter. — I brought you several samples of portraits made by children of the senior group. The details of their faces are drawn, but you are children of the preparatory group and therefore you will make them out of paper. — Make an oval face from a rectangle. Fold it in half, hold it by the fold line and round the corners. “I’ll tell you guys that to quickly glue the oval to the background, glue should not be spread on the entire oval, but only on the edge, and stick it on the cardboard so that there is room on top for the hairstyle.” - Let's move on to the hair. A) Straight hair can be made from strips of paper. B) By cutting out wavy lines, we will get wavy hair or braids, they can be made by tearing strips from a large sheet of colored paper. C) You can make hair using a mosaic method - this is when small pieces of paper are torn off and glued on. D) You can get curly hair by crumpling pieces of paper. D) If the hair is curly, it can be made from serpentine, obtained by pulling a straight strip pressed to the edge of the scissors. — This is how we made an autumn birch tree (slide). (During the explanation I show examples from the samples).
- When the hair is ready, you can start shaping the hairstyle. It could be ponytails, braids or something else. Everyone knows their hairstyle. -What do we all have on our faces? - Two eyes, two eyebrows, nose, mouth. — Eyes are cut out circles that lie on your tables. Everyone glues a circle exactly the same color as your eyes. — For eyebrows, paper is black and brown. Eyebrows can be of different shapes: triangular, rectangular or arched (shown from the set for Kapitoshka). — We make the mouth out of what color paper? - Red. — It can also be different (show from the set for Kapitoshka). - From all these details you can get different facial expressions: sad, smiling, surprised, scared. I don’t know what yours will be like. — The nose can be like this (showing a tape with samples of noses of different shapes). — We make ears from semi-ovals or semicircles. — You can draw on some things with felt-tip pens. Like what? - Eyelashes, freckles, earrings. - Does everyone understand how to do what? — You can go to the mirror to look at yourself and get to work. “I would like to remind you of the proverb: “If you hurry, you make people laugh.” This means that before you start doing something, you need to think about how and what you will do. (Children complete the task. We hang the finished work on a business card - a turtle, remove the workspaces). - Oh, what beautiful and different portraits you turned out! What is a kindergarten? This is a home for all the guys. This is joy, this is laughter, This is a hundred friends for everyone.
If we become alike, how can we recognize each other?
You're not like others, that's why you're good for mom!
The only thing dearer to her is Andryushka’s freckled freckles, Tanya’s protruding ears and snub nose.
All shapes and colors of your hair and eyes. Dear children, very different, the best and most beautiful!
- Well done boys! Thank you for helping us design our group’s business card.
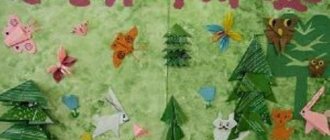
Children's work for the lesson “My Portrait”
| Next > |
Man made of geometric shapes
This model is ideal for children from the younger group of kindergarten.
Here we need only geometric shapes. To perform this technique, in addition to colored paper and glue, you will need to use a special template. Progress:
- Using a stencil, draw a circle on a beige or white sheet of paper. This will be the head.
- To create the body, draw a square (for a boy) or a triangle (for a girl). Any paper color can be chosen.
- To create the arms and legs, we draw triangles: wide for the legs, narrow for the arms.
- We create the eyes using stencil circles.
- The nose is a triangle shape.
- The boy's mouth is also made using a triangular shape, and for the girl we select a square.
- Cut out all the parts of the body and glue them onto a piece of paper as in the photo below:
Man in motion
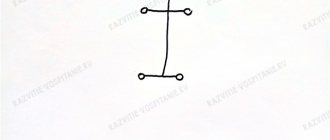
This application is created in middle and senior groups. A person is best depicted in movement when he is playing sports. Today we will make a tennis player.
Step by step execution:
- We take a sheet of white paper, draw on it a circle (head) and 6 stripes with rounded edges, of which three are identical (legs and left arm), one thicker (body) and two short (right arm).
- We cut out all the parts along the contours and glue them onto a separate sheet of paper, as in the photo.
- Let's finish drawing the racket.
Story
Its origins go back to prehistoric times, when ancestors sewed clothes from animal skins. Over time, the need arose to decorate it, to supplement it with details that today we can call decorative. With the development of society, it began to stratify: there were priests, artisans, warriors, leaders and farmers. And the appliqué on their clothes (among other things) helped them indicate their belonging to one category or another.
Among nomadic peoples, appliqué was used to decorate horse equipment, among warriors it became part of flags and coats of arms, and it was also used in the attire of clergy. The heyday of appliqué can be considered the intersection of the 18th-19th centuries. At this time, rural residents tried to decorate their life as much as possible. The focus was on the work of professionals, which folk craftsmen were able to look at. They did not have such materials, they were not trained in art, but their inspiration and desire to repeat what they saw and adapt it to their capabilities was great.
The materials used (and are now used) are very different. From fabric and paper, as the most obvious, to eggshells and scraps of yarn, natural materials and shavings left after sharpening pencils. The brightest, most unusual applications are sold at high prices at art auctions. In a word, it is definitely impossible to consider this type of creativity unworthy of serious artistic aspirations.