Drawing and application “Autumn fly agaric”
Using real leaves we draw a colored background. We are waiting for it to dry. Cut out the fly agaric cap from red paper, and cut out the stem from white paper. From a napkin we cut out a fringe for the fly agaric leg. We combine all the elements of the craft on a colored background and complement it with a dried maple leaf. All that remains is to paint the fly agaric’s cap with white dots. Our autumn fly agaric is ready!
Application and drawing “autumn fly agaric”
Autumn drawing with prints
Again we use freshly picked autumn leaves. We cover each of them with a layer of colors from the autumn palette and carefully turn them over onto a sheet of white paper. We carefully lift the sheet - a multi-colored imprint remains in its place.
Casting imprints
From such drawings you can organize a real autumn exhibition
Exhibition
Drawing with a white wax candle
For work we prepare thin paper, real autumn leaves (which we collect during our walk), a candle, a brush and paints.
Materials for work
We place a leaf with thick veins under a sheet of paper and run a candle along it.
We paint with a candle
Cover the entire sheet with paint.
Coloring with paint
Where the candle comes into contact with the veins of the leaf, its outline will appear.
The drawing begins to appear
Coloring paper leaves
This work also requires concentration and perseverance, but less caution - paper sheets cannot be broken and are difficult to wrinkle.
We color each leaf on both sides.
Coloring the leaf
We dry them and use them to decorate a group or hall.
Decorated paper leaves
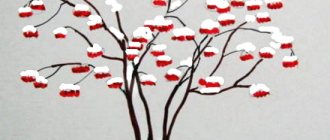
Drawing and application “Rowan”
A very beautiful craft in combination of a pattern and a rowan applique. Glue on a real branch. We draw the leaves with pencils (we draw some on the main sheet, and cut out some from another sheet of paper. We form the rowan from lumps of paper.
Drawing and application “Rowan”
Look at the video on how to make a beautiful autumn landscape from leaf prints:
And here is an example of a wonderful autumn drawing, drawn with watercolors and crayons. First, the outline of the drawing is drawn in pencil, then patterns are drawn on bushes, trees and grass with white or yellow chalk. After applying watercolor, the pattern will become bright and clear.
Drawing autumn with watercolors and crayons
Parents or teachers can draw the outlines of the leaves; the children will just have to color them with watercolors. After the watercolor has dried, outline the contours, veins and patterns with a black marker.
Autumn leaves in watercolor and marker
In this drawing, the contours are also highlighted with a colored felt-tip pen.
Autumn drawing in watercolor and pencil
Drawing with wax crayons
We again use the leaves that we collected during a walk in dry weather. They do not need to be dried because they will become brittle during the drying process. You will also need thin white paper and wax crayons.
Materials for drawing
Place the piece of paper under the sheet of paper and carefully color the entire space above it with chalk.
We drive with chalk
Where the chalk touches the veins, the clear contours of the leaf appear.
Autumn chalk drawing
To make the drawings look more impressive, we fix them on a bright background - for example, sheets of colored cardboard.
Coloring leaves
Children 5-6 years old can already cope with more jewelry work. We use well-dried autumn leaves, which must be handled carefully, as they break easily in your hands. We cover the leaves with different shades of paint.
Coloring the leaf
It is better to use gouache or acrylic paint; watercolor often rolls off the surface of the sheet.
Autumn palette
Having painted one side, dry it and paint the second.
Paint the other side of the leaf
In this case, the leaf itself is an autumn picture.
Autumn painted leaf
The result is bright autumn leaves that can be used to create various decorative compositions.
Leaves for autumn compositions
From painted leaves you can make an original autumn pendant on a branch.
Autumn pendant on a branch
Autumn drawing with crayons
We cut out templates of autumn leaves from thick paper in advance.
Cut out the leaves
Place the template on a landscape sheet.
Attached to a piece of paper
Carefully paint over the entire space around it with wax chalk, directing the strokes from the center to the periphery. Coloring a birch leaf.
Birch leaf
Coloring the maple leaf.
Maple Leaf
We lift the sheet - only its outlines remain, around which we see a real explosion of bright color.
The outline remains
Such non-standard drawing on the theme of autumn in kindergarten will help develop a child’s interest in creativity and awaken in him the desire to create new interesting compositions and paintings.
Bright autumn drawing with crayons
Finger painting “Autumn tree”
For example, children 3-4 years old will be quite capable of depicting an autumn tree by applying droplets of rich colors to the main trunk with their finger.
Draw leaves with your fingers
For such work, you will need to prepare in advance a palette and templates for drawings of tree trunks and branches. We invite the kids to cover the tree with leaves, choosing the most autumn colors from the palette.
Autumn with finger paints
Kids just love to draw with stamps. Stamps made from natural materials, such as potatoes, are especially attractive. The child dips the stamp in paint and the autumn leaves are ready to fall! You can pour the paint into a small saucer for convenience. You can make saucers with different colors and several different stamps.
Autumn drawing with potato stamps
Children 4-5 years old can be offered more complex drawing techniques:
