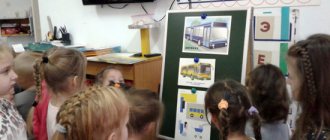
Receptions and techniques that are used within the framework of the theme “Fairytale houses”
A fairy-tale plot immerses a child in an amazing, mysterious world of fantasy and folk wisdom; the fates of the characters in their favorite fairy tales remain in the memory for a long time. Together with the main character, the children rescue the princess, go in search of wonderful objects, and overcome treacherous obstacles on the way to their cherished goal. Traveling through a fairy-tale country, you can visit the castle of the good fairy or the clearing of an enchanted forest in front of Baba Yaga’s hut, or escape from the wolf in the safe house of the three little pigs. Bizarre fairy-tale houses become the calling cards of every story, full-fledged heroes, without which the image of a fairy-tale episode becomes empty and lifeless, and loses the charm of magic.
Classic techniques:
- Drawing with simple and colored pencils.
- Drawing with wax crayons.
- Drawing with felt-tip pens.
- Combined method (colored pencils and watercolors, felt-tip pens or wax crayons)
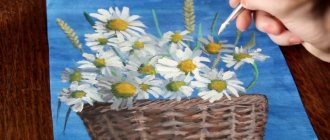
- Painting with a brush using gouache - a feature of this material is its opacity, which allows you to overlap layers with a new color. Thanks to this ability, gouache is a very popular material for decorative details.
- Painting with a brush using watercolors. Children continue to be taught how to correctly put paint on a brush and mix it to obtain the desired color shade.
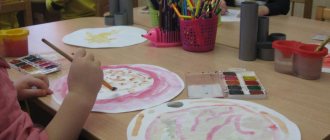
Children's work using classical techniques (photo)
Drawing with colored pencils
Drawing with watercolors
Drawing with colored pencils
Drawing with wax crayons
Drawing with watercolors Drawing with watercolors
Drawing with watercolors
Drawing using a combined technique (wax crayons and gouache) Drawing with watercolors Drawing with gouache
Gouache drawing
Drawing with colored pencils
Drawing with watercolors
Drawing with wax crayons Drawing with watercolors
Drawing using combined techniques (felt-tip pens and colored pencils)
Drawing with colored pencils
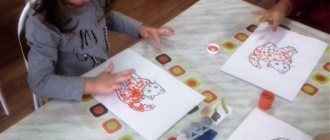
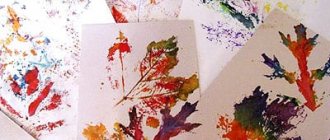
Unconventional techniques
- Finger painting - older preschoolers independently come up with options for using finger painting in combination with classical techniques.
- Palm impression - older preschoolers apply paint to their palm with a brush and make an impression themselves, then complete the contours and details of the object.
- Drawing with rock salt, cereals by filling a silhouette previously smeared with glue or by sprinkling the contour of an object greased with glue.
- Bleeding drawing - the contours of an object are drawn with wax crayons or a candle on a blank sheet of paper, then the top layer is applied with watercolors of one or more colors.
- Stamping is an image of objects by applying an imprint on paper using a stamp and stencil (foam rubber swab, wooden blocks made from vegetables, fruits, waste material, etc.).
- Scratching is scratching the outlines of a design onto a surface primed with wax or paint.
- Threadography is the creation of an image from whole and finely chopped threads using glue.
- Monotype is a mirror transfer of an image from a base (cellophane, plastic surface, foil) onto a sheet of paper.
Children's pictures in non-traditional techniques (photo gallery)
Drawing with cotton swabs Drawing with cereals
Drawing using the technique of nitcography
Drawing with applique elements
Drawing using palm technique
Drawing with semolina
Drawing with a candle
Drawing on wet
Drawing using monotype technique
work using grattage technique
Drawing techniques in the senior group
Older preschoolers work hard to improve their drawing techniques with pencils, crayons and felt-tip pens, since shading strengthens the muscles of the hand, develops fine motor skills and the eye, and therefore helps prepare children for writing.
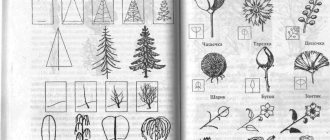
- Line - can be of different configurations (straight, wavy, spiral, broken, etc.) and helps to depict a contour, conveying the outline of the shape of an object, its size and proportional relationship of parts.
- Hatching is the simplest and most effective way of rendering color and drawing the texture of an object. The stroke is not only the most popular and accessible way to depict an object, but also an excellent simulator for the development of fine motor skills and coordination of movements. Types of shading: Chaotic - strokes are laid in a free direction, then modified by additional contour drawing of the silhouette of the object.
- Vertical - dense strokes are applied in a vertical direction. Adjusting the pressure force will allow you to achieve a smooth change of various color shades.
- Diagonal - most popular for sketching the silhouette of an object or background.
- Horizontal is a rather difficult technique from the point of view of technical execution, since it requires the child to constantly change the position of his hand during the drawing process.
- Shape-building is a complex and time-consuming option for drawing the shape of an object, for example, the sun, a flower or a cloud.
How to draw a house with a pencil step by step
Step one. We draw a small standard house, as it looks in the village, with a triangular roof. Step two. Let's straighten out the structure a bit, add some formal bushes around it and adjust the edges of the roof. Step three. Let's add design to this hut, a beautiful porch and facade ornament. Step four. Now let’s draw several windows in the front on both floors, as well as a few from the side. You also need some trees in the background and a path to the entrance. This is what my house will look like, what kind of house would you like to build? Draw and attach your work below this article. It will be useful for you to find out more.
Every year the construction industry improves, offering people more and more comfortable and beautiful houses and apartments for living. If you just think about how houses have changed in one century, you can close your eyes and visually imagine how much things can change after some more time. One can discuss this topic ad infinitum. However, not everyone can express their thoughts on paper. Therefore, in today’s article we decided to push our readers to creativity, demonstrating how a pencil drawing of a house of the future can be original and unique. The photo below offers ideas that can be used in creating your dream home, or as a sample for sketching.
House of the future - pencil drawing on photo
Below are more than 20 options for houses that differ in appearance and internal content in the cut. Each model is unique and inimitable, has its own characteristics and unusual details.
If you compare each home with each other, you cannot help but notice the discrepancy in shape, material, parameters and even details necessary for a comfortable life. We are talking about windows, the front door, the foundation of the house and even the external facade. After all, the decision about the landscape of the adjacent territory is up to the owner alone.
Think through all the details of the house of the future, visually representing each detail. This will help to depict a home in a short time, without resorting to help.
Make sure that all drawing supplies are at hand.
Use your idea of a dream home without copying from a finished layout.
Any paints, pencils and felt-tip pens will do.
Without artistic skills, it is better not to take on complex work. It is better to opt for one-story, simple living spaces, painted in one color.
How to draw a house of the future in pencil?
To draw a house of the future with a pencil, you need to prepare in advance all the tools for depicting the drawing. In addition to a simple pencil with a hard lead, you need to have on hand several white A4 sheets, an eraser, colored pencils, paints or felt-tip pens for coloring the finished work. The artists also recommend thinking through your own understanding of the house of the future in advance. For example, will it look like a royal castle, a spaceship, a geometric figure or a flower.
Don't forget about the facade of the house. It can have a panoramic view, unusual windows in the shape of geometric polygonal shapes, and even the absence of doors.
Drawing a house
How to draw a house with a pencil and still get a great result?! After this, the child should be taught more complex drawings.
For example, draw a house step by step. It seemed like just a few lines, but if you get more creative, it will be a little more complicated, but more interesting.
And so let's get started, we need:
- Colour pencils,
- A simple soft pencil
- Eraser,
- And one or two more simple soft pencils, in reserve, or shavings - in reserve,
- Album sheets.
- Having prepared everything and taken a comfortable place, you can begin. In this case, you and your child agree in advance:
- You draw one picture together,
- Or you have a competition to see who can draw the best house.
At the same time, take a laptop or tablet with you - this will help you watch a master class for beginners on drawing at home. You will need this if you do not have drawing skills.
Any artist can draw a house exactly the way he likes - a multi-story house, a village house, a castle, etc.
Before starting to draw, ask your child to cover and remember all the small details of the structure. And after he accurately remembers the outline of his beloved house, he can begin to depict it.
- There are several options, or rather based on several geometric shapes. Consider an image based on a diamond.
- Draw a horizontal line and place two points (vanishing points) along the edges of this line. We draw a vertical line that runs across our horizontal line at exactly 90 degrees. We connect each end of the vertical line with the placed points on the horizontal line.
- Add a vertical line on each side relative to the drawn vertical line. Using lines we get the outline of our house. In this case, our house will turn out to be voluminous.
- Next, stepping back from the center of our rhombus, draw a vertical line upward. Then we will draw two inclined lines, one on each side. At this stage we can clearly outline our future roof.
- After that, more clearly draw all the sides and edges we need. After which you can remove the auxiliary lines that were necessary in constructing our drawing of the future house.
- Yes, this option is best used for older children who roughly know what drawing and lines and geometric shapes are.
- Next, we determine the location for the door and windows. We draw a rectangle - this is our future door. Next, we draw our windows, decide for yourself whether there will be one or more of them.
- We draw the windows and door taking into account the vanishing points. Next, you can decorate the house with any additional elements - pipes, shutters, etc. It all depends on you.
Well, here is the last stage. If you decide to leave the house unpainted, it's worth going through and putting on the finishing touches. Well, if you still decide to decorate, then grab colored pencils or paints and make it beautiful. Our house is ready.