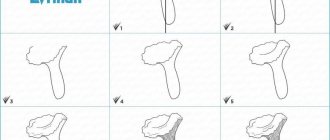
Step-by-step instructions for children and beginners
First of all, you need to make a plan and figure out which family members will be in the picture. Then mark the location of each object.
Advice: do not place everyone in one line, because... it doesn't look very aesthetically pleasing.
Next, the process of drawing real and cartoon families will be described.
Topics and conversations
For the senior preparatory group in kindergarten, you can conduct several drawing classes on the topic “My Family.” With all this, it’s enough just to diversify the methodology proposed above a little to get interesting and useful activities.
For example, let the guys bring photographs and tell them who is depicted in them. After that, let them draw and depict the family in all available ways. Plus, organize activities like “I’m helping mom,” “I’m going for a walk with dad,” “Family vacation,” and so on. Let children develop their imagination and learn to depict reality.
By the way, don’t forget to hold a variety of thematic exhibitions at the end of each lesson. Sometimes you can invite a child psychologist to them. After all, a child’s drawing of a family can say a lot about the atmosphere in it, as well as the relationships with its members. This is very important for the correct and correct development of the child. If you notice any obvious signs of anxiety in a student, which are expressed through a drawing, invite the parents to an individual conversation. In principle, it is generally better to hold parent meetings after drawing on the topic “My Family”, at which you will explain why the child drew each specific family member in one way or another. All this will help the child's development. Drawing in kindergarten on the theme “My Family” is an important learning process that should not be skipped. Give it due attention.
Mom and dad holding a baby
Now you will see that a family drawn in pencil is something that even a beginning artist can do.
- First you need to draw the outline of the parents. For example, you can make dad taller, so the outline of his head should also be taller. Do not forget about the distance between the bodies to accommodate the child.
- Using ovals and straight lines, it is necessary to make the contours more pronounced.
- Drawing large and small elements will allow the drawing to become more alive.
- Next you need to remove auxiliary lines that are no longer needed.
We recommend reading:
How to draw a star: 10 best options for drawing five-pointed and other stars with your own hands. Pictures of finished works with descriptions- How to draw a dragon with a pencil - the best step-by-step instructions for beginners. TOP pictures for quick visual learning
- How to draw a pony: TOP 10 best lessons for beginners. Detailed instructions for drawing My Little Pony step by step with a pencil
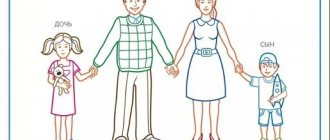
How to draw a picture “Mom, Dad, Me”
To do this work, prepare paper, a hard pencil and an eraser.
Instructions:
- Lay a sheet of paper horizontally and make a sketch: on the right side there will be a father, a mother, and a child in the center.
- Parts of the body of each figure are drawn in circles and ovals, thus maintaining correct proportions and reducing the chance of doing something wrong. When sketching at the second stage, if you make a mistake, they are easily corrected with an eraser.
- Facial features are clearly drawn along the lines of the frame. After them they move on to body parts and clothes, draw hairstyles and jewelry if necessary.
- The excess is removed, contours are drawn with a well-sharpened pencil, and folds are created on the clothes. Using a soft pencil, create shadows and hair. The work is ready!
Stage two – mother and daughter
After successfully drawing the father and son, you should move on to the next part of the family. It consists of a mother and daughter running side by side.
- First you need to make markings for the correct location of the parts.
- After this, you should move on to the designation of parts. First - the oval of the face and the contour of the hair.
- Next you need to draw a face with all the details. Just as in the case of the son, the daughter’s face is more rounded and her features are soft.
- Drawing details of clothing. Don't forget about your mother's shape - bust. Now you need to draw dresses and shoes for both heroines.
- After removing the auxiliary lines, the coloring stage begins.
Tasks and goals
Any activity in kindergarten has its own tasks and goals. They are important for the entire educational process. It’s not just that a drawing lesson on the topic “My Family” or “My Pet” is held. It all makes some sense. In addition to developing hand motor skills, of course.
In our case, this lesson will be held in order to summarize all the knowledge acquired about the family and its composition. It is advisable to conduct this kind of lessons with all kids. But special emphasis needs to be placed on the senior preparatory group.
In addition, drawing in a preschool educational institution on the topic “My Family” should teach the child to depict a person: proportions, facial features, differences between people.
Of course, there is a developmental element here too. The child learns to remember information, analyze it, and then express it in drawings. Plus, drawing in kindergarten (“My family” is the chosen topic) should teach the child to treat his family with care and attention.
Family portrait
If you want to draw a beautiful family, then a portrait is a win-win option. This type of drawing has its own particular difficulties, but the result is worth it.
This part of the article describes the process of drawing Family Guy - the heroes of the American animated series of the same name.
- Draw ovals corresponding to the faces of family members. It is worth remembering proportionality. Next you need to draw ovals indicating body parts.
- Next, the outlines of bodies and faces are drawn.
- Designation of small elements of faces, bodies, appearance.
- The final step. If you decide to leave the portrait in black and white, then you should take care of the shadows.
GCD in Fine Arts “Family” for the second junior group
Abstract of GCD in Fine Arts for the second junior group “Family”
Target. Introduce children to an unconventional drawing technique - poking.
Tasks:
• form ideas about the family
, teach children to name their
family
, about the friendly relations of relatives, about the emotional state of
family
;
• cultivate love and respect for your family;
• form the concept: my home, my family
;
• cause children to enjoy the image they created;
• develop the skill of careful work.
• Make the child happy and proud that he has a family
.
Equipment: envelope, pictures of family
, a picture depicting the whole
family
, a blank house on paper, gouache, glue brushes, jars of water, stands for brushes, napkins, oilcloths.
Progress of the lesson.
Q. Guys, look, we have guests today. Let's say hello to them. (Welcoming guests)
Q. Guys, I was going to work today and on the way I met Mishka. When he found out that I was coming to see you, he asked me to give you an envelope. To be honest, I already looked into it with one eye and saw riddles there. Do you want to guess them?
D. Yes.
Q. Then listen to the first riddle-poem: She emits light, and her smile gives her dimples. There is no one dearer than your own...
D. Mommy
V. Well done guys, that’s right! (I put a picture of my mother on a magnetic board)
V. Timur, what is your mother’s name?
Who are you to your mom? What does your mother affectionately call you? (Answers from 2-3 children)
V.V. Wonderful! Now listen to the following riddle:
Guess who it is? Kind, strong, dexterous, brave. I'm waiting for an answer, guys. Well done! Certainly…
D. Dad.
V. Well done guys, that’s right! (I post a picture of my dad)
.
Q. Vika, what is your dad’s name? Who are you to dad? (Answers from 2-3 children)
V. Great! We read the following riddle: The whole farm: quinoa, and Corydalis - Ryabushka. But he will always feed us with cheesecakes...
D. Grandmother.
V. Well, of course! Right! (I post a picture of my grandmother)
.
Q. Kira, who are you to your grandmother? What does your grandmother affectionately call you? (Children's answers)
V. Well done! And here’s another riddle: He soaks a piece of bread in warm milk, and walks with a stick in his hand. Our favorite...
D. Grandfather.
V. Yes, guys, that's right! (I post a picture of my grandfather)
.
V. Nikita, who are you to your grandfather? (Children's answers)
Q. You are all just smart. (I'm posting a picture of the whole family )
.
Q. Guys, what do you think all these people are called together, in one word? D. People. V. Yes, and in another word they can be called family
.
Let's say it together: family
.
Choral answer B. Guys, let's show our family on the palm of our hand
. Let's play with our fingers.
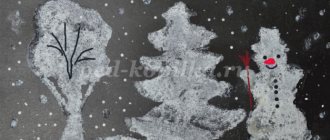
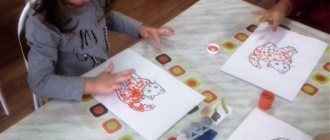
Pencil drawing of a happy family
The following shows the process of drawing a happy family using available materials. Then coloring with gouache. A good leisure option for small children.
We recommend reading:
- How to draw a girl - make a portrait and general drawing correctly and beautifully (150 photos and videos)
How to draw a child - stages of creating drawings and recommendations for their design (video + 125 photos)
How to draw a wolf: 115 photos and videos on how to create a stylish and original drawing of a wolf
First you need to take additional “tools”: pencils, rulers, paints, bottles and bottles.
The sheet is placed vertically, and the bottle is placed on the right. On its left side is a smaller bottle. It is necessary to circle them with a gentle pressure of the pencil.
To draw a baby wearing a hat, you need to put one bottle on top of another.
The lids will be good helpers for drawing hats. Don't forget your arms and scarves.
After marking the small details, you need to decorate the creation and fill in the background.
On the topic: methodological developments, presentations and notes
Integrated activity (modeling and drawing) in the junior group. During the lesson, children sculpt, draw, develop fine motor skills of their fingers and hands, learn new methods and techniques for drawing, and dance.
Article for the parent corner in the group.
Abstract: The Federal State Educational Standard for preschool education is aimed at solving the following problems: - development of coherent monologue speech; - development of communication and interaction of the child with.
OOD in the second group of early age.
Abstract of GCD on the formation of elementary mathematical concepts Topic: “The kitten has lost its ball” in the second group of early age.
The lesson is aimed at improving the skills of sound-letter analysis and synthesis, and improving the isothreading technique skills of older preschool children.
Every parent is interested in knowing how classes are held at a preschool educational institution, but unfortunately, during a pandemic, it is impossible to hold an open class for parents. Therefore, we filmed the lesson and sent it to everyone.
Source
Family tree
Often children at school are given the task of drawing a family tree. And in the final part of the article, recommendations for its implementation will be given:
- First of all, you need to use a simple pencil to mark the roots of the tree and the trunk.
- Depending on the number of tribes of the family, it is necessary to designate the branches.
- For aesthetic design, you can conventionally depict photo frames on the branches. For example, in the form of flowers or fruits.
- Fill the frames with photographs or children's drawings.
Family coat of arms
A family coat of arms is no less popular to draw, as is a drawing of a family and a tree. Most often, such an idea is translated into reality in schools, but if there is a desire, then they themselves draw it at home together with the whole family.
The coat of arms got its name for a reason - like the coat of arms of any country on our planet, it speaks of the owner living in a particular territory or locality.
In order for the coat of arms to more fully express the personalities of each family member, the hobbies of each person and their aspirations in life must be taken into account.
What materials will be needed for a family coat of arms:
- White cardboard and paper
- Pencil and eraser
- Paints and marker
Instructions:
- Each coat of arms includes basic details, such as a shield, motto, helmet and mantle, and a crest. To begin with, they study the location of all the details, the base will be a shield, the family slogan will be a motto ribbon, the elements inherent in a certain family will be a marking.
- Select any shield shape you like - square, rhombus, rectangle (geometric shapes) or classic European coats of arms (national). In order not to be confused in the choice, they look at the distinctive characteristics of the family.
- Color meaning plays a special role - the color should suit each family member, the colors themselves have their own specific role and any randomly chosen color will not work here.
- Drawings are applied on top of the shield itself; their location can be anything depending on the preference of the one who draws. For example, if you wish, you can draw animals or some weapons. Before drawing the selected element, carefully study its meaning; each animal, for example, has its own role: a snake means wisdom, a lion speaks of courage, etc.
- After certain elements have been studied, they begin to draw the coat of arms. The outline of any of the selected shield shapes is drawn on the cardboard.
- Draw a ribbon to write the motto on the base, while clearly drawing all the lines to obtain a more accurate image.
- They come up with a slogan, then write it in block or lowercase letters on the tape. Even in the absence of a slogan, you can write the family’s surname, which will also reveal the family coat of arms, but take into account leaving indents between the letters.
- They beautifully draw either the initials of the family on the shield, or draw a plot from life or an object that describes the whole family.
- At this stage, the characteristic hobbies of each of the relatives are reproduced; for this purpose, objects are drawn on each side of the shield, and objects that characterize the profession are depicted.
Subtleties of work:
- All details are drawn more clearly, unnecessary strokes are erased.
- Prepare a palette for diluting the selected flower paints, take thick and thin brushes for work.
- Paper is applied to cardboard with a pattern, all elements are applied to the glass, this is done to completely transfer the image to the material.
- Start coloring the light elements, moving on to the dark ones. Contours and details are drawn with a thin brush. Black ink is needed for the initials and motto.
- At the end of the work, the drawing is placed on the surface to allow the paints to dry completely.
Practice and final lesson
As you know, you can’t catch a fish from a pond without difficulty. To improve the quality of work, you need to constantly practice. Try drawing a picture of your family as a reinforcement. Good luck!
Photo tips on how to draw a family
Did you like the article?
3+