Space crafts. How to make a rocket with your own hands
The easiest way to make a rocket for Cosmonautics Day is from a cardboard roll. In the photos below you will find a detailed master class on how to make this space craft with your own hands.
Make cuts on one side of the roll. Twist the strips into a cone and glue them together.
Use an extra piece of cardboard to make a rocket stand and engines.
Paint the rocket with paint. The space craft is ready!
Robot made of corrugated cardboard. Link
Robots made from cans
Robots made from cardboard boxes
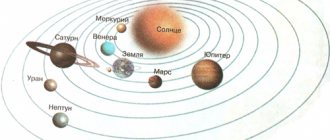
Starry sky
The starry sky in the background is the main general feature of space-themed applications. You can make such a background very simply, using a sheet of black cardboard, white paint and a brush. A sheet of black cardboard will be used as a backing. You will need to put stars on it.
A brush to make a lot of small stars will not help us. The paint should be applied in splashes. The necessary fine sprays can be easily done using a small brush with hard bristles; a toothbrush works well for this purpose.
The brush needs to be generously smeared in white paint and rubbed over its bristles with your finger so that splashes are made. To begin with, it is better to practice splashing on rough paper to avoid misunderstandings and unnecessary blots. If everything works out, then you can apply paint to the black cardboard backing.
The starry sky for the application for Cosmonautics Day is ready!
DIY Cosmonautics Day crafts. Starships, space stations
In this section we will tell you about one interesting way to make crafts with your own hands for Cosmonautics Day. A beautiful starship or space station can be made from waste material that you can easily find at home. Using a glue gun or double-sided tape, fasten all the parts of the craft together. Finally, paint your Cosmonautics Day craft with silver spray paint. Additional details can be painted with acrylic paints.
Here is another example of a similar craft for Cosmonautics Day. The body of the space station is made from an old aquarium filter, a wheel from a typewriter, a plastic bottle, remnants of pens and all sorts of broken toys, the wings are a cut floppy disk. Everything is covered with spray paint. Link .
If your space-themed craft made from scrap material doesn't have many small parts, you can simply wrap it in foil at the end. Look at this lunar rover made from a plastic jar and bottle caps.
Shine
The glitter will fit very harmoniously into the star theme and add brightness to the craft. They can be used to outline the finished application, highlight some elements of the rocket, or make a beautiful inscription “Happy Cosmonautics Day!”
You can use either ready-made glitter gel from the creativity kit or dry small glitter. In order for the latter to stick well, they will have to be applied using colorless nail polish: first apply a layer of varnish to a small area, and then sprinkle glitter on it, and shake off the excess.
Crafts for Cosmonautics Day. Paper applique on the theme of space
A simple craft for children for Cosmonautics Day is a paper applique.
Geometric rocket applique
Paper rocket using origami technique
Yulia Titova
GCD Application “Space” (preparatory group)
Goals
: — Continue teaching children to work with stencils, fold paper in half;
Strengthen the ability to cut exactly along the intended contours of the figure;
Activate children's vocabulary: space, astronaut, planets, stars, moon, satellite, rocket, spaceship;
To develop children's curiosity and interest in the world around them.
Material:
1/2 sheet of black cardboard (you can use a whole sheet, colored paper, scissors, PVA glue, glue brush, glue napkin, simple pencil, blank templates “Rocket”, “Cosmonaut”, felt-tip pens.
Preliminary work:
Conversation “The first man in space”, watching the video “He said let’s go. “, looking at slides about space.
GCD move
1. Conversation between the teacher and the children.
V.: - Guys, tell me what holiday does our country celebrate on April 12? (children: Cosmonautics Day)
Q: Who was the first astronaut?
V.: Well done, guys, you answered all my questions correctly. The first cosmonaut was Yuri Alekseevich Gagarin.
Q: Guys, why is our cardboard black? (D: There is nothing dark in space.)
IN. :
I suggest you make an application on the theme “Space”
2. Practical part. Children's work.
V.: So. Guys, you must circle the templates of “Rocket” on purple paper, and “astronaut” on a white sheet, you have the stars ready and a piece of earth, blue.
V.: Guys, why is the earth made of paper blue? (d.: because from space our planet looks like a blue ball, because there is a lot of water on our planet and for this our planet is called the “blue planet”)
IN. :
That's right, guys. I remind you guys, we work carefully with scissors; after cutting, put the scissors on the table, closing them.
children's work.
IN. :
after you glue the “astronaut” and it has dried a little, you need to draw a face, the flag of our country.
Here's the kind of work we got.
Literature
:
.Korotkova E. A “Drawing, appliqué, design in kindergarten.”
Rocket
Now is the time to think about what the main image on the application will be. The center of attention is usually the rocket. The rocket either plows through space, flying past planets, or lands on one of them. Perhaps an astronaut even looks out of it and waves his hand at the local planets in greeting!
There are several ways to depict all this on an application for Cosmonautics Day for children, here are two of them:
- It will be enough to cut out the rocket and planets from colored paper and glue everything in place on a previously prepared star backing.
- If you want to make it more interesting, the rocket and planets can be made a little convex. To do this, you need to cut out the parts with a margin. It is better to glue them not over the entire surface, but only along the edges, so that in the middle there is a raised area and emptiness inside. Moreover, it is advisable to bend the edges and stick this small folded area onto the substrate.
It is better to glue the rocket with a cone - so that the nose of the rocket becomes pointed, and then thickens towards the nozzle. On the nozzle side of the rocket, you can glue flames cut out of paper along the contour.
To make the rocket in the Cosmonautics Day application more like the real thing, you can cover it with colorless nail polish. You just need to do this with a completely finished rocket, since you won’t be able to paint anything on top of the varnish.
Preview:
Node Theme: Application “Rocket flies into space”.
Age Group: Middle
Date of: __.__. 2021
Program content:
Artistic creativity
Goal: To clarify children’s knowledge about the concepts of “space”, “spaceship”, and about planet Earth.
Tasks:
Give knowledge about the holiday “Cosmonautics Day”. Activate the dictionary. Strengthen children's ability to create a composition from geometric shapes. Strengthen children's skills in applying a glue brush. Learn to create a composition with elements Materials: Illustrations with views of space, a spaceship, a portrait of Yuri Gagarin, cardboard, plain napkins, blue gouache paint, a glue brush, a glue stick, scissors for each child, photographs - a portrait of each child with the diameter of a porthole.
Progress of activities:
Guys, we are soon celebrating Cosmonautics Day, we talked about it. Let's remember what kind of holiday this is. Why do we celebrate it?
Children's answers.
Who will tell me what space is and where it is?
Children's answers.
What do you call a person who flies into space?
Astronaut.
Fine. What was the name of the first person who flew into space?
Children's answers.
Yes, his name was Yuri Gagarin. He probably flew into space on an airplane? Or by helicopter?
No.
Well, then in a hot air balloon?
No, on a rocket.
On what kind of rocket?
He got into the spaceship and flew away.
Of course, in a spaceship. Tell me, what did he see in space?
Planets.
Yes, but which planet?
Ours.
What is the name of our planet?
Earth.
Well done. And now you and I will go into space, but we don’t have transport. Let's make a rocket and go into space. But first we need to refuel.
Physical education minute.
We get up, go to the airfield and play the game “Planes”.
Well, we've arrived at our places. You have different napkins on your table.
We will make balls from these napkins and make a rocket. Look what a ball I got, to do this you need to cut the napkin into four squares and roll each into a ball. The teacher shows a sample.
Now try to make your own spaceship on cardboard.
Children complete the task. It turns out to be a big rocket, children are looking out the windows
Well done, we launched a rocket into space. What do we see in space?
Planets, stars.
Let's draw stars and planets with paint. We take brushes, paint and start painting.
Children draw stars by dipping.
After completing the work, the children lay out their compositions on the table.
Guys, look how wonderful the rocket turned out. Today, like real astronauts, we visited space. Did you like it?
Children's answers.
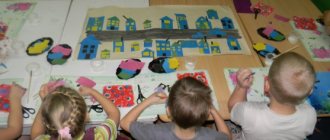
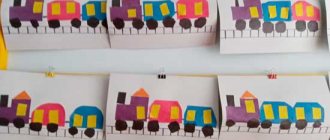
Creating applications from colored paper on a specific topic helps to develop a child’s work culture, instills artistic taste, and also develops fine motor skills in the child’s hands. In this article we will talk about how to make applications from colored paper on a space theme. Both master classes have detailed descriptions and high-quality photos that will make the creative process as convenient as possible.
Application No. 1 on the theme of Space
For work you will need the following materials: paper of various colors, multi-colored cardboard, pencil, scissors, glue.
Description of work
1. First you need to choose a suitable background from colored cardboard.
2. Draw a cloud on a piece of white paper.
3. Then we cut out the drawn cloud or tear it off and attach it to the cardboard base with glue.
4. To make rocket elements, you need to draw squares measuring three by three centimeters on red paper. A similar task will come in handy for first-graders so that they can once again consolidate their skills in using a ruler. Preschoolers will be able to use ready-made templates of the required size.
6. 1 of the resulting squares must be cut along a diagonal line, and the second is cut in the shape of a cone.
7. After this, we place the elements of our rocket on the base and glue them to it.
8. On the opposite side of a sheet of yellow paper you need to draw a porthole window, as well as a flame emanating from the rocket itself. Next, the porthole should be cut out, and the flame of the fire can either be cut out or torn off.
9. After this, we place these elements on the base and glue them to it.
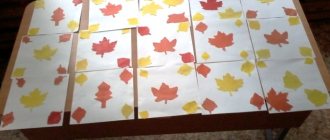
10. To create stars, fold a piece of yellow paper into an accordion shape. You need to fold it two or three times, then connect it with a paper clip. And only then we draw the stars themselves.
12. After this, we place the star-shaped parts on the base and glue them to it. The view can be complemented by the moon.
Our space themed applique is complete!