Card index of experiments with water with children in the preparatory group for school.
Card file of experiments with children in a pre-school group
Water
Experiment No. 1
“Properties of water”
Purpose. Introduce children to the properties of water (takes shape, has no smell, taste, color).
Materials. Several transparent vessels of different shapes, water.
Process. Pour water into transparent vessels of different shapes and show the children that the water takes the shape of the vessels.
Bottom line. Water has no form and takes the shape of the vessel into which it is poured.
Experiment No. 2 “Taste of water”
Target. Find out if the water has a taste.
Materials. Water, three glasses, salt, sugar, spoon.
Process. Before experimenting, ask what the water tastes like. After this, let the children try plain boiled water. Then put salt in one glass. In another sugar, stir and let the children try. What taste does the water have now?
Bottom line. Water has no taste, but takes on the taste of the substance that is added to it.
Experiment No. 3 “The smell of water”
Target. Find out if the water has an odor.
Materials. A glass of water with sugar, a glass of water with salt, an odorous solution.
Process. Ask the children what does the water smell like? After answering, ask them to smell the water in the glasses with solutions (sugar and salt). Then drop a fragrant solution into one of the glasses (but so that children cannot see). Now what does the water smell like?
Bottom line. Water has no odor, it smells of the substance that is added to it.
Experiment No. 4 “Color of Water”
Target. Find out if the water has a color.
Materials. Several glasses of water, crystals of different colors.
Process. Have the children put different colored crystals into glasses of water and stir until they dissolve. What color is the water now?
Bottom line. Water is colorless and takes on the color of the substance that is added to it.
Experiment No. 5 “Living Water”
Target. Introduce children to the life-giving properties of water.
Materials. Freshly cut branches of quickly blossoming trees, a vessel with water, the label “Water of Living”.
Process. Take a vessel and label it “Water of Living.” Look at the branches with your children. After this, place the branches in the water and remove the vessel in a visible place. Time will pass and they will come to life. If these are poplar branches, they will take root.
Bottom line. One of the important properties of water is to give life to all living things.
Experiment No. 6 “Evaporation”
Target. Introduce children to the transformation of water from liquid to gaseous state and back to liquid.
Materials. Burner, vessel with water, lid for the vessel.
Process. Boil water, cover the vessel with a lid and show how the condensed steam turns back into drops and falls down.
Bottom line. When water is heated, it changes from a liquid state to a gaseous state, and when it cools, it changes from a gaseous state back to a liquid state.
Experiment No. 7 “Aggregative states of water”
Purpose: To prove that the state of water depends on air temperature and is in three states: liquid - water; hard – snow, ice; gaseous - steam.
Procedure: 1) If it’s warm outside, then the water is in a liquid state. If the temperature outside is sub-zero, then the water turns from liquid to solid (ice in puddles, instead of rain it snows). 2) If you pour water on a saucer, then after a few days the water will evaporate, it will turn into a gaseous state.
Experiment No. 8 “Water expands when it freezes”
Goal: Find out how snow retains heat. Protective properties of snow. Prove that water expands when it freezes.
Procedure: Take two bottles (cans) of water of the same temperature for a walk. Bury one in the snow, leave the other on the surface. What happened to the water? Why didn't the water freeze in the snow?
Conclusion: Water does not freeze in snow because snow retains heat and turns into ice on the surface. If a jar or bottle where water has turned into ice bursts, then we can conclude that water expands when it freezes. Experience No. 9
"
Ice is lighter than water."
Place a piece of ice in a glass filled to the brim with water. The ice will melt, but the water will not overflow.
Conclusion: The water that ice has turned into takes up less space than ice, meaning it is heavier.
Experiment No. 10 “Dependence of snow melting on temperature”
Target. Bring children to understand the dependence of the state of snow (ice) on air temperature. The higher the temperature, the faster the snow will melt.
Procedure: 1) On a frosty day, invite the children to make snowballs. Why don't snowballs work? The snow is powdery and dry. What can be done? Bring the snow into the group, after a few minutes we try to make a snowball. The snow has become plastic. The snowballs were blinding. Why did the snow become sticky? 2) Place saucers with snow in a group on the window and under the radiator. Where will the snow melt faster? Why?
Conclusion: The condition of the snow depends on the air temperature. The higher the temperature, the faster the snow melts and changes its properties.
Things to consider
The teacher’s idea to conduct several experiments for children 5-6 years old that clearly show the properties of water requires a little preparation before its implementation. This is especially true for the duration of the activity - children in kindergarten are unlikely to be able to concentrate for more than half an hour; long classes tire them. Let the program include only three experiments with water - but interesting ones, and meeting the following requirements:
- Possibility of group participation . That is, the teacher shows, and the children, united in 4-5 people, enthusiastically repeat;
- Safety . The requirement comes from the first point - children 5-6 years old are quite likely to spill water, drop containers for experiments, etc. Therefore, work with hot liquids, fire, and harmful substances is excluded;
- Availability of change of clothes . Most likely, it won’t be possible without small puddles. A baby who accidentally wets his clothes may get sick. For the same reason, experiments are carried out exclusively in a warm room without drafts.
It is possible that one of the children will suddenly want to try the water prepared for the experiments - it is good if it is boiled.
Experiments with water in kindergarten are a great way to explain to children the basics of its physical properties in an interesting and accessible way, so do not forget to comment on what is happening on the desktop.
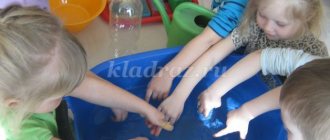
Experience with glasses
In kindergarten, plastic cups can be used instead of glasses. Place the containers nearby and pour some water into one.
Fold the napkin and place its ends in different glasses.
Soon the water will “move over” into the second glass, and after half an hour the level of liquid in the dishes will become the same.
These simple, but very interesting experiments for children 5-6 years old can be carried out in kindergarten, and if they wish, the kids can repeat them at home themselves.
9 likes
Rainbow water
To make experiments with water more entertaining for preschoolers, it is better to paint the water in different colors using ordinary watercolor paints. For the next experiment you need paints, granulated sugar, a glass glass, water, a syringe, and four small glass cups.
- There is no need to pour sugar into the first glass, half a teaspoon of sugar should be thrown into the second, a full teaspoon of sugar into the third, and one and a half teaspoons into the fourth.
- Now you need to add water to each glass and stir the sugar.
- For the first, take red and mix it, for the second - green, add black to the third, and add yellow to the fourth.
- Then you need to take a syringe and draw water from the first glass of red water without sugar. Pour the contents of the syringe into an empty prepared glass.
- Next, using a syringe, draw green water from the second glass, in which half a teaspoon of sugar is dissolved; the syringe must be lowered to the bottom of the glass with the red water collected and slowly release the water with green paint.
- Now the same procedure should be carried out with the third glass, where the water is black and contains one spoonful of sugar. You need to release it from the syringe in the same way as the previous step.
- And there was a fourth glass left. Everything is the same - water is drawn from it using a syringe and released to the bottom of the glass.
At the end of the experiment, you can notice how the glass turned out to be “rainbow water”; all the colored layers of water did not mix, but were located one after the other, having clear boundaries. The more sugar added, the greater the density of the water, which explains the lack of mixing. The more colors you use, the more colorful and visual the experience will be.
Experiment with string and napkin
Children 5-6 years old will be interested in seeing how water is absorbed into objects of different structures and densities. Take a white string, a piece of paper napkin, two glasses of water, the neck of a plastic bottle, and markers.
In kindergarten, entrust the preparation of equipment to the pupils. Make bright marks on the lace and paper, as shown in the photo.
Next, place these objects so that their lower edge is in the water - as it is absorbed, it will rise. Colored marks will indicate that “water is flowing upward.”
Solid liquid
To conduct the experiment, you will need a deep plate, water, liquid dye, and starch.
- Pour starch (half a glass) into a plate and add water, add a little liquid paint, you can take food coloring.
- The resulting mass must be mixed well.
The result will be an unusual liquid that pours easily, but if you hit such a liquid sharply, it will turn out to be solid.
Galileo STS - Non-Newtonian fluid
colorful lamp
Such spectacular experiences with preschool children are especially popular.
- Mix half a glass of sunflower oil with the same amount of water, add dye.
- Take an aspirin tablet and drop it into the bottom of the container with the resulting mixture.
The aspirin begins to fizz and mix the oil and water, and the paint droplets begin to dissolve. A very beautiful sight. For illumination, you can direct the beam of a flashlight.
Experience with arrows
Water refracts light, so objects in it appear larger than they really are. You can verify this by putting a tennis ball, for example, in a jar of water. But it is much more interesting to carry out the following experiment: draw three arrows on a landscape sheet as shown in the photo, and place it vertically.
Next, place a transparent (in kindergarten it is better to use a plastic) jar in front of the sheet and gradually fill it with water. And a miracle will happen - the arrows will change direction!
By moving the jar along the sheet, you can fully appreciate the visual effect.
++