Working with paper in kindergartens is given a special place, because the creation of paper crafts contributes to the comprehensive development of children. Children learn to carefully cut out patterns, glue, create three-dimensional compositions, and mastering these skills, in turn, trains thinking, memory, attention and creativity.
A bright and colorful applique on the theme of summer is one of the favorite activities of teachers in the older group. Children of this age are already skilled enough to implement complex, interesting ideas, and the summer theme gives wide scope for imagination. With older preschoolers, you can perform a variety of subjects using various techniques. Flowers, fish in an aquarium, insects, a chamomile, a butterfly or just a sunny forest landscape - all these are ideas for summer-themed applications. By combining a visual arts activity with a lesson on road safety, you can even make a city sketch as the plot of the picture, explaining one of the points of the traffic rules.
For younger children
Crafts for children 3-4 years old seem like something magical to them. Children are proud of the work they have done and are happy to show it off to others. When choosing an idea, remember that children's motor skills are different from those of adults. Details should be large and simple. It is advisable to prepare the preparations in advance.
Children of primary preschool age should be creative. This contributes to the harmonious development of personality. Preschool educational institutions conduct weekly group classes. The task of parents is to reinforce these skills.
Crafts from plasticine
Children 3-4 years old do not know how the learning process works. There is no need to rush when working together. All movements must be slow and accompanied by a voice explanation.
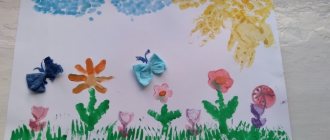
Application “Summer lawn”.
Materials you will need:
- a sheet of green cardboard;
- plasticine 6-8 colors.
The goal is to create an interest in sculpting.
The lawn is a sheet of cardboard. We talk with the child that in the summer flowers grow in the meadow and the sun shines brightly. We show how to sculpt flowers, such as daisies, from plasticine. The middle can be made in a different color. We make a sun in the right corner.
For middle group children
Children of middle preschool age pay attention to details. The creative process becomes more meaningful. Applications on the theme of summer are becoming more diverse. The child begins to fantasize and add details on his own. When setting a topic, use your imagination with your child.
From colored paper
At the age of 4-5 years, children own scissors. This skill needs to be encouraged. The development of motor skills is directly related to brain processes. A wonderful way to reinforce a skill is through joint creativity between a child and a parent.
Application "Hello Summer".
Materials:
- A sheet of colored cardboard for the background (blue, green, white);
- Colored paper;
- Glue;
- Scissors;
- Black felt-tip pen.
The goal is to consolidate the skill of working with colored paper and cutting.
- Cut a sheet of white paper in half. Fold half the sheet several times. It should look like a tube. This will be a birch trunk.
- Glue a paper birch trunk onto a sheet of cardboard. Draw strokes on the trunk with a black felt-tip pen that imitate the color of a birch trunk.
- Cut out leaves from a sheet of green paper. They can be of different shapes and sizes. Glue them around the top of the trunk.
- To create a landscape, you can cut out flowers, the sun, butterflies. They are also glued to a sheet of cardboard.
Application “Hello, summer!” from colored paper
Watch the video on how to make a simple summer application “Bee” from colored paper:
From cotton swabs
Cotton swabs are a wonderful material for creating compositions. In summer applications they can be conveniently used as flower petals.
Application "Daisies".
Materials:
- A sheet of colored cardboard for the background;
- Green colored paper;
- Cotton buds;
- Yellow plasticine;
- Glue.
The goal is the development of fine motor skills, the development of spatial thinking.
- Cut out stems and leaves of daisies from green colored paper. To do this, first draw an outline with a simple pencil on the back of a sheet of colored paper. Glue the resulting stems and leaves onto a sheet of cardboard.
- Roll the yellow plasticine into a ball, pressing it lightly. The yellow circles will be the centers of the daisies.
- Cut the cotton swabs in half with scissors. Stick the resulting “leaves” into yellow plasticine.
“Chamomile” applique made from cotton swabs
Don't rush your child. At this age, children pay great attention to the smallest details. It’s not surprising if the baby spends 20 minutes inserting cotton swabs into the plasticine.
Origami
Paper is one of the most accessible materials for creating handicrafts, and the variations of crafts made from it are very diverse, which will definitely not leave your child indifferent.
Ladybug made of colored paper
In the summer you can meet countless hardworking ladybugs flying through fields, vegetable gardens, and flowers. Children really like these beetles, they are beautiful and bright. Your child will love to make their own ladybug with their own hands.
We will need:
- Colored paper or cardboard in red, orange and black;
- Scissors;
- Glue;
- Felt pen and simple pencil;
- Eyes (you can buy them at a craft store or cut them yourself);
It is necessary to cut out the future body of the ladybug from orange colored paper or cardboard. Below is the template.
You will need to bend this template along the dotted lines. Next, cut out the remaining templates. These will be the wings, antennae and legs of our ladybug. We also cut out circles on the wings.
The wings need to be glued on both sides of the future ladybug. If for some reason the wings turn out to be too large, the excess part can always be cut off. Next, you need to glue the antennae and eyes onto the body.
The last step remains - the legs of our ladybug! We glue them on the bottom.
Our wonderful “Ladybug” craft is ready!
Craft “Sheep in the meadow”
Your child can easily make this craft with his own hands and get a cute little sheep that looks like a cloud.
We will need:
- Green cardboard;
- Colored paper;
- Scissors and glue;
- Single-layer white napkins.
Green cardboard will serve as a background. Cut out grass, flowers, sun and clouds from colored paper and glue them onto cardboard. You can cut out a strip of blue colored paper and make a blue background - the future sky.
From white colored paper you need to cut out the body and head of our future sheep, gluing them onto green cardboard.
Next, use a pen or markers to draw her eyes, nose and mouth.
Take white napkins and roll them into circles of various sizes. This is the future wool of our sheep. Then glue it onto the body, spreading it over the entire area.
This is such a wonderful sheep we have! It will undoubtedly delight both children and adults.
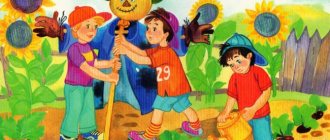
Craft "Sunflower"
The summer season is characterized by countless different flowers that decorate our nature and benefit all living things. Walking out into a field of sunflowers on a warm summer day, you never cease to be amazed by their beauty and grandeur. Make the same beautiful flower with your child and please him and yourself!
We will need:
- Colored paper;
- Green cardboard;
- Scissors;
- Sunflower seeds;
- Glue;
Initially, you need to select a background - this will be a green field on which our flower will grow. If desired, you can additionally cut out a strip of blue sky.
Next, we proceed to the manufacture of plant parts. You need to cut out a stem and leaves from green colored paper. From yellow - petals. Orange paper is suitable for the future core.
All parts must be glued with green cardboard.
Next, pour glue into the middle of the core and glue sunflower seeds in a circle, you get a kind of spiral.
Try to glue them as close to each other as possible so that the glue is not visible and the seeds are well fixed on the surface of the colored paper.
The craft is ready!
Applications for children of senior and preparatory groups
Children 6-7 years old master all creative techniques. At this age, they are able to independently come up with and implement a composition. The Hello Summer application will not cause any difficulties for children.
From cardboard
Application on the theme of summer made of cardboard has many variations. Trust your child to choose what he will do. Believe me, the work will turn out wonderful.
Application "My yard".
Materials:
- colored cardboard;
- scissors;
- glue.
The goal is to develop fine motor skills and develop imagination.
Children of the preparatory group feel like adults. Give the children a theme for playing in the yard. Ask them to make a composition from colored paper or cardboard of the yard in which they live or the area in the kindergarten.
Each yard has a slide, swings, carousels, a sandbox, and trees. Making them from colored paper or cardboard is not difficult. Every child will be able to show their imagination and create a beautiful composition.
Watch the video on how to create a voluminous summer paper applique:
From cereals
Bulk material is loved by all children. A kindergartener will do this type of creativity with pleasure.
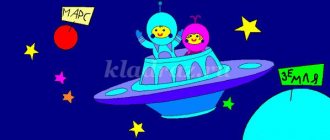
Application “At the Sea”.
Materials:
- a sheet of white cardboard;
- semolina;
- millet;
- buckwheat;
- glue.
The goal is to develop three-dimensional thinking.
- Take a sheet of cardboard and cover it completely with glue.
- Sprinkle with semolina - this is the beach.
- At the top of the sheet, use glue to draw the sun and sprinkle with millet. Shake off the remains.
- At the bottom of the sheet, similarly, using glue, draw shells and sprinkle with buckwheat. Carefully remove any remaining residue. The work must dry thoroughly.
Application “Sea” from cereals
Application made of cotton wool “White cat”.
For this application you will need: a sheet of thick blue paper, cotton wool, green paper, pieces of red and black paper, scissors, glue.
First, glue white cotton clouds to the blue background. To do this, draw them on the background with a simple pencil, smear the drawn areas with glue and put lumps of cotton wool there. Gently press down the cotton wool with your fingers, working especially well on the edges of the clouds. Let's let them dry.
Then draw the silhouette of a cat on a blue background with a simple pencil.
Cut a strip of green paper. Let's make cuts on one side and glue a strip at the bottom of the background. This will be our green grass.
Let's prepare a ball of cotton wool and place it along the silhouette of the cat. Let's try it on. Then we will remove the cotton wool. Lubricate the silhouette of the cat generously with glue and glue the cotton wool to the background in the drawn place, giving it the shape of a cat. Press the cotton wool onto the background with your fingers.
When the application dries, you can fluff the cotton wool a little with your fingers to make the cat seem fluffier.
All that remains is to glue the paper cat’s eyes (it’s better to make them green), a mustache and a red mouth. The application is ready. The cat turned out to be flirty and graceful.
For children 1-2 grades
An application on the theme of summer in grades 1-2 is a favorite task for teachers. You can also practice at home. Children at this age can make their own applique. The adult’s task is to teach new techniques.
From napkins
This technique requires patience and perseverance. This is an ideal option for schoolchildren.
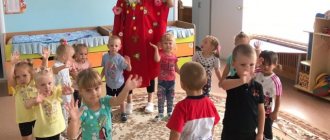
Application “Summer meadow”.
Materials:
- Sheet of cardboard;
- Napkins of different colors;
- Glue.
The goal is to develop attention and perseverance.
- Prepare the material for the applique - roll small balls of different colors from napkins.
- On the background, draw a diagram of the arrangement of elements with glue. It can be anything: flowers, rainbows, sun, trees, mushrooms.
- Then lay out the prepared small balls. You will get an interesting three-dimensional picture.
Application “Summer meadow” from napkins