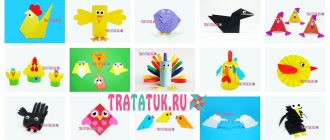
Small children experience the world by touch. Application helps to embody the images and objects seen on paper or using other materials. For small children, paper dishes using the appliqué technique will be a good opportunity to learn the names of objects. And adult children hone their skills of believability in crafts.
It can be made from paper, fabric and plasticine. Tableware applique is most often simple and almost all of its types are suitable for preschoolers and kindergarteners. And having supplemented the basic craft with his own elements, the child will take the craft to school.
Glasses in applique
Offer to make your child a refreshing glass of lemonade. Cut out the glass. The lemon circles will be made from circles and triangles of colored paper. Ice cubes are made from soaked thin napkins. Add a straw and the craft is ready.
You can make a summer cocktail using a colored paper coffee cup. Cut it in half lengthwise and stick it on cardboard. Garnish with a citrus slice (umbrella). Decorate the background as desired.
Summary of a lesson on application on the topic “Dishes” in kindergarten
- April 2, 2021
International and All-Russian competitions
Laureate of the All-Russian competition of pedagogical excellence “Methodological piggy bank of a kindergarten teacher”
Summary of a lesson in the second junior group of kindergarten on the topic “Utensils.”
Goal: To reinforce the names of utensils with children.
Tasks:
- Develop memory, attention, speech of children.
- Activate the dictionary on the topic: “Dishes”.
- Develop the ability to coordinate words in a sentence.
- To develop skills of cultural communication, hospitality, and friendliness.
GCD move
Educator: Guys, hello.
(There is a knock on the door. Winnie the Pooh enters the group and cries).
Educator: Good afternoon, Winnie the Pooh. What's happened? Why are you crying?
Winnie the Pooh. Good afternoon guys. How can I not cry? Today is my birthday. Eeyore, Piglet, Owl and Rabbit will come to visit me in the evening, and I have completely forgotten how to greet guests. Also, I don’t have any mugs in my house, because I broke the last mug this morning.
Educator: Winnie the Pooh, don’t be upset. The guys and I will definitely help you. Really, guys?
Children: Yes.
Educator: Guys, who knows what they usually treat guests to at birthday parties?
Children: Tea, sweets, cake, fruit.
Educator: Well done. Guys, let's show Winnie the Pooh how to properly set the table.
Children: First you need to cover the table with a beautiful tablecloth (demonstration). Then you should put the sugar bowl. It contains sugar. And this is a napkin holder. Napkins are placed in it to wipe your hands. And this is a candy bowl. You need to put candy in it.
Educator: That's right, but fruits can be put in a vase like this. It will look beautiful on the table. Guys, where will Winnie the Pooh put the cake?
Children: The cake can be placed on this spread.
Educator: Everything is correct. And for tea you need teaspoons (demonstrates), a teapot and mugs.
Guys, let's play a little with Winnie the Pooh.
Fizminutka
(Children form a circle. The teacher is in the center of the circle, reads the text and shows the movements that the children repeat) Knock - knock - knock, knock - knock - knock. (They knock their fists against each other.) A loud knocking sound is heard. A loud chime is heard. (They stomp their feet, hands on the belt). Ding-ding - dong, ding - ding - dong. It is in the kitchen that spoons, forks, cups, and ladle are dancing. (Tilt left and right arms with a shelf in front of the chest). Tra-ta-ta, tra-ta-ta All the dishes started dancing! (Perform a “spring”, hands on the belt). Kettle lid here, there! Spoons in a cup - knock, knock! And the pots - boom - boom! Frying pans - don - don! (“Dance”, alternately putting the left and right leg forward on the heel, hands behind the back). That's how the dance is - beauty! Tra-ta-ta, tra-ta-ta! (Clap their hands.)
Educator: Guys, did you like playing?
Children: Yes.
Winnie the Pooh: And I really liked it.
Educator: Guys, now I propose to make multi-colored mugs for Winnie the Pooh and his guests.
Children go to the tables. In front of each of them lies a ready-made mug made of colored cardboard. There are multi-colored circles on a plate. Children take a circle, smear it with a glue stick and place it on the circle in any order. Each child must glue 3 to 5 circles. The teacher and Winnie the Pooh help the children when they have difficulty.
At the end of the work, Winnie the Pooh and the teacher praise the children. Each child says what color his mug is and what color he pasted the circles (if the child has difficulty, other children help).
The teacher invites the children to give their mugs to Winnie the Pooh. Children are happy to give. Winnie the Pooh says “Thank you” and gives the children balloons. Children congratulate Winnie the Pooh on his birthday and sing “Loaf” to him. Winnie the Pooh says goodbye and leaves.
Educator:
- Guys, who came to visit us today?
- What happened to Winnie the Pooh?
- How did we help him?
- How did we congratulate the bear cub? What did he give us?
- What did you like most?
The work was presented by teacher Maria Aleksandrovna Druzhkova.
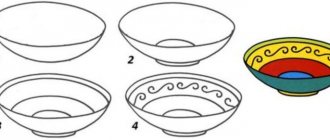
Cups and teapots
Using the cutout appliqué technique, create dishes for children's tea parties. If the product is made of white sheet, then it is decorated with paints or felt-tip pens, and scrapbooking paper will immediately make a beautiful cup.
Cut out the stencil and fold it in half. The dotted lines are the fold locations. Glue it together and the cup is ready.
They also make tea sets.
The composition of buttons looks no less interesting. It is important to choose a color scheme so that the work is not too colorful.
For the next creation you need an openwork napkin (it can be cut out), colored paper, cardboard, paints, scissors and glue.
We glue an openwork napkin onto the cardboard. A cup is cut out on top. Decorate randomly. Draw or cut out white steam. We complement the tea party with candy. You can create a cup from the cover of a magazine or newspaper, or special gift packaging.
For your attention – a teapot made of fabric.
Simply cut out the thin fabric and glue it onto the cardboard. The centers of flowers can be buttons or beads.
Children's applique – Teapot and teaware
I suggest you consider a composite applique made of cardboard and colored paper “Teapot”.
For kids, you need to cut out all the necessary details in advance, and children 5-6 years old will be able to do it themselves, using downloaded template files from our website, and for decoration - a visual example of a picture of a teapot.
In this application I used my own template. For you and your child, we have drawn printable files “Teaware”. The set of files consists of templates: teapot, mug, saucer, teaspoon, pie dish. I believe that such templates will be of help to educators in children’s educational institutions. Let's first look at making a simple version of the applique for five-year-old children.
To apply the teapot we will need:
• Colored cardboard; • Template of teapot parts; • Colored paper; • Album (1 sheet for the base); • Glue; • Scissors; • Pencil.
Attention! The child must do the craft entirely himself. Your task is to control, explain and give hints.
MANUFACTURING PROCESS.
Using the template, we will transfer the details of the teapot onto cardboard. The base of the teapot is yellow, and the spout, handle, bottom and part of the lid are red. Photo-1.
Carefully cut out all the parts of the teapot. Photo-2.
At this stage, you can invite your child to make a teapot from parts themselves.
This task develops a holistic perception of the subject.
If the child is at a loss, offer him a sample as a hint. Photo-3.
Let's start assembling the teapot.
We will use a landscape sheet or a sheet of white cardboard as a base for the applique.
First, glue the container itself (circle), then glue the part of the teapot spout to it.
All that's left is to glue the handle! Photo-4.
Next we glue the red bottom of the teapot and the first part of the lid.
At the end, we glue the last part of the lid and the circle - the handle. Photo-5.
The base of the teapot is ready! To decorate the pot-bellied teapot, cut out several circles from colored paper. Photo-6.
Now let's decorate the teapot to your taste with multi-colored circles - peas, arranging them randomly, or making up your own pattern from them. Photo-7.
(
Templates come with decorations such as stickers or decals.
).
We have a bright and elegant teapot! Please bring some cups - we'll drink tea!
How to make a flat object visually voluminous?
In this joint work, we are examining not only the topic “Dishes”. The teapot is pot-bellied, remember?
And after completing the craft, you should definitely draw the children’s attention to this word. Such a word will amuse them and arouse visual interest.
In our application example, and of course, in the template files, attention is paid to highlighting (giving) volume to flat parts. After all, visual volume is created not only by details, but also by their location in an application or drawing.
This makes the object look flat. Let's attach an oval-shaped part. So what's going on? A flat object, as if by magic, looks three-dimensional (round, like an inflated balloon).
Why is the oval black? Black color can mean emptiness, and we may have coffee or tea in our cup. What's in the kettle? Black tea is brewed in a very hot kettle. Be careful!
For children, this is the simplest, most understandable and visual explanation. In their next creative works, they will definitely try to make their own appliqué or drawing with a volumetric effect. In any case, they will definitely want to experiment!
Download “Teaware” file templates.
ONLINE VIEW: tableware.pdf
— If you do not have a program for reading PDF files (Russian version), download it from the official website. — Free program “ Adobe Acrobat Reader DC”
» — A program for reading, printing and reviewing PDF files.
The files are distributed free of charge in electronic PDF format, and only on the website www.asreda.com.
Not for commercial use. Article on the topic: “ Samovar template for applique .”
Article on the topic: “ Finger Theater. Felt geese ."
Article on the topic: “ Sew a phone from felt and learn numbers .”
__________________
© Anastasia Obolentseva, for www.asreda.com
Comments on posts are temporarily disabled.
✉ MESSAGE TO THE AUTHOR - for registered users.
◈
REWARD FOR HIGH VIEW RATING OF A PUBLICATION. ☆ ∉ ☆
◈
AWARD FOR HIGH PUBLICATION EVALUATION RATING. ☆ ∉ ☆
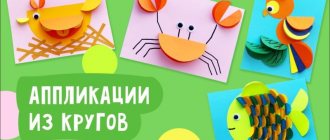
Applications fruits and vegetables
Applications in the form of fruits and vegetables are quite popular; they are created by both younger and older children. Using them you can glue real compositions, and from different materials.
The depiction of fruits and vegetables using the appliqué technique facilitates their quick learning and memorization, which is very important for a small child.
Materials for their manufacture
To make applications depicting fruits and berries, you can use not only the usual material - colored paper, but also others:
- corrugated paper;
- felt;
- some types of fabrics;
- dried tree leaves and berries;
- seeds;
- cereals and pasta;
- beads;
- eggshells;
- threads
An application on this topic with several types of materials turns out to be quite interesting and original.
Technicians
As a rule, fruits and vegetables are depicted in the form of standard applications, but they also look very interesting in 3D volume. If desired, you can make the applique using the origami technique or by twisting narrow strips of paper.
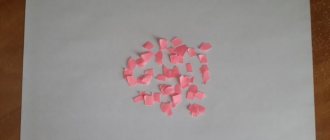
They also often do work using the mosaic technique, that is, they tear paper or break eggshells into small pieces, and then fill them with the required image.