Read also
Topic of the week: “Poultry”
Topic of the week: “Poultry” Lesson 29. Chicken (Modeling from plasticine) Program content. Cultivate interest in fairy tales. Strengthen children's ability to sculpt objects consisting of several parts. Demonstration material. Toys - heroes of the fairy tale “The Ryaba Hen” (grandfather,
Theme of the week: “Wild birds”
Topic of the week: “Wild Birds” Lesson 30. Owl (Plasticine modeling) Program content. Teach children to combine natural materials and plasticine in crafts. Develop perception, attention. Demonstration material. Pictures with half-drawn images of birds (without a wing,
Theme of the week: “City Birds”
Theme of the week “City Birds” Lesson 6. Sparrow (Modeling from plasticine using natural materials) Program content. Learn to sculpt a bird from plasticine using a walnut as a base. Continue to learn to understand the content of the poem. Develop small
How to draw a sparrow
Want to learn how to draw a bird with a pencil? Another simple option is the sparrow.
To begin, draw the outlines of the torso in the shape of an oval, head (circle) and tail (triangle).
A triangle line needs to be drawn for the tail, followed by the contours of the legs. For the front part, draw a circle (the head), then the body and tail.
The dividing line will be needed for the wing.
Now let's move on to the paws. Once they are drawn, return to the head. Start with the eye, then draw the beak, and for coloring, start with the markings.
We recommend reading:
How to draw a fox with a pencil? Detailed instructions with photos and descriptions. Step-by-step lesson for children + master class- How to draw a girl - make a portrait and general drawing correctly and beautifully (150 photos and videos)
How to draw a child - stages of creating drawings and recommendations for their design (video + 125 photos)
The next step is to feather the sparrow and give the drawing a realistic look (there are many pictures and videos on the Internet showing how easy it is to draw a bird).
How to draw a bright bird
To begin with, you will need: 1 black felt-tip pen, an A4 sketchbook, an eraser and several multi-colored pencils.
We draw with a simple pencil first the body with wings, then the legs. To do this, you need to place the album vertically. Then a semicircle is drawn, from each end of which a strip is drawn, rounded towards the end to form wings. Below you need to add several small and long ovals.
Next, draw a second semicircle from one wing to the other to complete the body. You need to add paws to it. To do this, draw a pair of triangles, then another pair on the other side.
To give the bird something to sit on, you need to draw a branch by drawing 2 stripes under its paws (not necessarily even).
A bird without a tail is not a bird. It can be depicted as 2 long triangles with blunt ends.
We recommend reading:
How to draw a star: 10 best options for drawing five-pointed and other stars with your own hands. Pictures of finished works with descriptions- How to draw a dragon with a pencil - the best step-by-step instructions for beginners. TOP pictures for quick visual learning
- How to draw a pony: TOP 10 best lessons for beginners. Detailed instructions for drawing My Little Pony step by step with a pencil
The next stage is the muzzle. First, the beak is drawn, represented by a triangle. Round or oval eyes are drawn above.
The next step is to adjust the drawing and outline with a felt-tip pen.
Next comes coloring the drawing. To give expressiveness, the sides of the beak should be brighter than the center. The same goes for the paws. Color the eyes black.
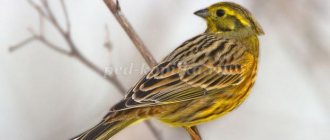
If you want to make the bird bright, you need to paint it in the appropriate colors. For example, the wings and tail are painted green. The head is painted orange, the chest is painted yellow, and the lower abdomen is painted green again.
A brown or black pencil is suitable for coloring the twig.
We recommend reading:
How to draw lips with a pencil - simple instructions with descriptions and pictures. Step-by-step master class for beginnersHow to draw a family: a master class on creating a drawing “My Family” for kindergarten or school. The best lessons for children on drawing with pencil and paints
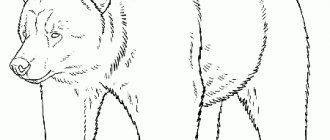
How to draw a bear with a pencil? Review of simple and step-by-step instructions for children and beginners (120 pictures of a bear)
Capturing the moment of flight
Let's take a seagull as a basis. The process itself is quite simple, even children can do it:
- A circle is drawn, the basis for the head and body, the lower and upper parts should be slightly sharp.
- The eyes and beak are drawn, then the outline of the circle is removed using an eraser.
- Draw the span of the wings and tail in flight mode. The wing placed on the right edge of the sheet will be larger than the left wing and in relation to the entire body.
- The paws folded together are completed, the hips are drawn using a line from the paw down and the wings.
- Everything is decorated with feathers and finally there is a tail.
- Errors and unnecessary contours are cleaned up.
- Shadows are drawn, the wings themselves are black and the lower part of the bird is darkened. There is also a shadow from the wings.
- The work is completed, let's evaluate our work.
This completes the first stage of mastering the wonderful world of birds in the fine arts. If the topic was interesting and aroused creative interest, it is worth continuing to study it and practice, improving your skills and results.