What drawing techniques are suitable
There are some indicative standards for what needs to be taught to a 3-year-old child:
- draw various lines: crossed, left to right, top to bottom;
- use several colors for coloring;
- depict objects that include the connection of two different parts (for example, the rays of the sun) and the rhythmic repetition of the same shape (for example, branches of a Christmas tree);
- use several uniform shapes in the drawing (for example, a snowman).
Anya, 3.5 years old. "Chicks"
You can teach a child to draw the listed elements at the age of 3, using traditional and non-traditional techniques (palmprint, fingerprinting, stamps, lines, blots, splashes, hatching and others).
Shading
Coloring is used to teach the child not to go beyond the contours of the drawing. You can draw balls with your child (circle a glass, draw strings) and offer to paint the circles in different colors.
You can practice both with paints and with a pencil. This is not an easy task for a three year old. But with each attempt there will be fewer and fewer deviations from the contours, and the drawing will become more accurate.
Lines, dashes, spirals
Children's art begins with various dashes and squiggles. However, even in the image of doodles, one should strive for progress and promote the development of graphic skills. Lines - straight, wavy, interrupted - are the basis of any image.
At 3-4 years old, tasks are given in a playful way. Invite your child to draw green grass (similar oblique strokes), a road for a car (a long, relatively straight line), a boat sailing on the sea (wavy lines), a snail (spirals), etc.
Misha, 3 years old. "Sea"
Points
Using dots you can draw a lot of interesting things: snow, falling leaves, rain, peas, berries. Paint (watercolor or gouache) and a “tool” are used to apply dots. These are the child’s fingers, cotton swabs, and foam rubber stamps.
Splashes and blots
If you carefully blow on a large blot with a cocktail straw, it will spread out in an unusual color pattern. This is the “blotography” technique. From such a blot, in the process of finishing the details, you can get a cloud, a tree crown, a lawn. For older children, you can ask the question: “What does it look like?”
The “spraying” technique, which is organized by an adult, is very interesting for preschoolers. He holds a toothbrush in his left hand and puts some paint on it. Then, any flat stick quickly runs along the bristles towards you. Many small dots appear on the paper, with which you can fill the template or create the effect of snow or rain on a finished drawing.
How to interest a child
To attract your child to drawing, you need to think about what motives might prompt children to take up the activity.
Basically, three motives are triggered:
- imitation of an adult;
- interest in drawing supplies,
- the desire to act - to depict something on a sheet of paper.
These are the motivators you should focus on. Show the child how a house, sun, flower, tree, etc. appears on a blank sheet of paper. If the preschooler has already practiced with a pencil, offer him paints or crayons. You may be interested in non-traditional techniques (painting with your palm, finger, branch, tube).
The following techniques will be useful in the future:
- game motivation (for example, a toy chicken enters into a dialogue with a child and asks him to draw her baby chickens);
- artistic word (an adult can come up with a riddle about rain and invite the child to draw it).
With the efforts of an adult, even the most indifferent child will be affected by at least one of the methods. In most cases, children 3-4 years old willingly respond to an invitation to draw.
How to teach a three-year-old to draw a man
A 3-year-old preschooler draws each detail separately. In his opinion, he can connect the two main parts. That’s why three-year-olds’ little men look like “heads.”
A child does not come to such images overnight. First, the baby must learn to confidently draw circles with a pencil. Then he may be “struck by the idea” of drawing two lines extending from the circle. This is already a clear attempt to portray a person, and then you will need the help of an adult to designate the eyes (dots), mouth and nose (dashes) on the face.
It is important to know that three-year-old children depict only those parts that are especially significant to them. Therefore, at first, the little man in their drawings consists only of a head and legs. After the adult shows the baby the details of the face in the drawing, he will also try to depict them.
The eyes and mouth will appear first on the face. A three-year-old child will not remember the existence of a nose for a long time.
Closer to 4 years, the image of a nesting doll or a snowman is taken as a basis. The preschooler draws two circles, one of which is smaller (head), the other larger (torso). Next, the eyes, nose, mouth, arms, legs (dashes) are drawn. Children begin to learn more complex drawings of a person at the age of 5.
What and how can a child draw?
In early preschool age, you can use a variety of art materials for drawing:
- colour pencils;
- markers;
- paints (gouache, watercolor);
- wax crayons.
You should also pay attention to additional tools for children's creativity:
- ready-made templates (they can be purchased in the toy department);
- cocktail straws;
- seals and stamps (homemade and purchased in the office supply department);
- dried twigs, etc.
Drawing methods can be very diverse. From the traditional option - with a pencil and paints - to applying paint with a finger, the edge of the palm, a cotton swab, “on glass”, etc.
Drawing techniques must be appropriate for the child's age. At 3 years old it is enough to practice with colored pencils and paints. And with a 4-year-old child, you can already experiment with various visual techniques.
Misha, 3 years old. "Forest"
Pencils
Colored and simple graphite pencils are suitable for the child. When working with a pencil, a child's hand feels the resistance of the material, so it is more difficult for a preschooler to draw on a sheet of paper. At this age, it is recommended to use triangular pencils with a soft lead. They can be used to outline the outline of the depicted objects, outline the basic template, and simply draw all sorts of dashes and curls.
At first, children learn to press and move the pencil so that a path runs behind its tip. And this is a significant effort for children's fingers.
It is important to ensure that your child holds the pencil correctly. Help a three-year-old artist grasp a pencil properly, determine the location of his fingers, so that from the first trials they get used to the most comfortable use of a pencil and then a ballpoint pen.
Brush and paints
When painting with children, you must first explain to your child how to use a brush. Add a game moment: “Let's stroke the paper with a brush.” When introducing paints, show the “magic transformation”. Add water to it, explain that the paint begins to “make friends with the brush,” and then a drawing is created on paper. Show how this happens.
Painting with a brush does not require strong pressure, the hand does not get tired. When painting with paints, it is easy to cover large surfaces of the drawing with color, which children really like.
Anya, 3 years old. "Sky and Sun"
Another advantage of a picture drawn with paint is its brightness, which evokes a particularly positive perception among three-year-olds. At the same time, the movement of the hand is much freer. The contour line when drawing with paint is not very clear and blurry.
Finger paintings
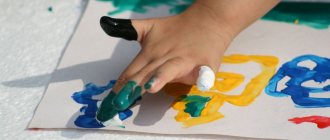
Children love to paint with their fingers. It's simple and interesting. Use one color first, suggesting rain or dandelions. You can cut out a dress from paper and decorate it by drawing polka dots. In the future, the tasks become more difficult. An adult draws the outline of an object (sun, Christmas tree, apple, chicken, can), and the child needs to poke his finger with paint only inside a given area.
A very interesting and challenging task involves drawing with your finger on one line. For example, “Beads”, “Birds on a branch”, “A squirrel is drying mushrooms”.
You can apply paint with your finger to the drawing where you first practiced with a brush.
Anya, 3.5 years old. "Meadow, cats, flowers"
Seals and stamps
Kids enjoy drawing with seals and stamps, perceiving this process as a game. You can make your own seals and stamps. The simplest option is to wrap a piece of foam rubber on a stick, secure it and dab it into the paint.
You can make a stamp using plasticine, a sheet of wood, a dish sponge, or vegetables (beets, carrots, potatoes). For example, on the surface of half a potato we cut out a design (leaf, flower, star), remove the excess along the edge, and the stamp is ready for the baby. An interesting option is a celery stamp. Using a sharp knife, cut off the stalk from the celery, or divide the stem crosswise. The cut should be very smooth, and then the print will be even.
Wax crayons
The child must learn to hold the wax crayon with three fingers just below the middle in order to see the tip of the crayon. At a younger age, this art material is used as an alternative to colored pencils.
At 3-4 years old, using crayons is still difficult, although the first attempts are quite possible. Active drawing with wax crayons is recommended for children from 5 years of age.


