Master class on making a stand “Our Creativity” in a kindergarten group
Olga Azimova
Master class on making a stand “Our Creativity” in a kindergarten group
Master class on making a stand “Our Creativity” in a kindergarten group.
“Stand “Our Creativity”.
Purpose:
placement of children's creative works.
Age category:
a kindergarten teacher.
Materials and equipment:
pink self-adhesive
white paper,
pictures for decoration.
The course of the master class.
1. Take a sandwich panel.
2. Using a knife, cut out the workpiece of the desired shape.
3. Take a pink self-adhesive sticker.
4. Carefully glue the self-adhesive onto the sandwich panel blank.
5. Bubbles may form when gluing the self-adhesive.
They can be removed by piercing the bubble with a needle and smoothing the surface.
6. Using a figured hole punch, make flowers from white paper.
7. Glue the flowers along the edge of the workpiece in two rows.
8. We secure the flowers to the workpiece with tape.
10. One part of the stand is ready. There should be two such parts.
11. Take metal profiles.
12. Cover the metal profiles with pink self-adhesive tape.
Children's creative works can now be secured with magnets.
In the fall, the stand can be decorated like this.
This is how you can decorate your stand in winter.
The design can be permanent like this.
Thank you for your attention.
I wish you creative discoveries and success in your work!
“This is what it is, our summer!” Report on preparing the kindergarten site for the summer health season This is what it is, our summer! There is exactly one week left until the long-awaited, beloved summer. Everyone has already started preparing for summer long ago. Master class “Day of the National Flag of Russia in the middle group” of the kindergarten Patriotic education of the younger generation in the field of education in Russia occupies a priority place. It starts from the very first. Master class for kindergarten teachers on making poppies from crepe paper Making “Poppies” decor Nomination: Kindergarten, master class for preschool teachers to unlock creative potential. Creped and. Master class on making an album “Our Winter Fun” in the junior group of a kindergarten Teacher: T. A. Nazarova In our kindergarten there was an event “Presentation of albums about winter sports.” Parents are happy to do so. Master class on making a New Year's card "Rukavichka" for kindergarten employees. Our children and I decided to congratulate the kindergarten employees on the New Year! And we came up with a postcard "Rukavichka"! And we want to show you. Master class on making a holiday card “Bouquet of flowers in a vase” using the iris folding technique for the anniversary of the kindergarten. Kindergarten - pensioner! He was born in the USSR! Sadiq is 55 years old! He sends his best greetings to everyone! February 14 MBDOU Kindergarten No. 14 “Smile” of the city. Our New Year's creativity. Master class Throughout December, in anticipation of the most magical and long-awaited holiday, the children and I tried, decorated, created, crafted. In a word, we were preparing. Scenario for summer entertainment “This is what it is, our summer!” for all kindergarten groups the holiday is held outside. To the music “This is what our summer is like,” children line up on the kindergarten playground. Presenter: - Hello, kids. mother daughter and son at the dacha
Source
DIY stand for February 23rd in kindergarten
Stands for Defender of the Fatherland Day are popular in preschool institutions. To create them, you can use various materials, but the main attention here is given to its filling.
What to put on your holiday stand
First of all, you need to choose a background. The materials used are paint, colored paper, and fabric. The background color can be khaki (camouflage), bright colors (red, orange), the colors of the national flag, are suitable. To fill it, you can and should use the imagination of students - their drawings and military-themed crafts will fit very well into the overall picture.
Images of warships, airplanes, tanks, and crafts in the form of paper soldiers will help fill the space without leaving any gaps. Such a stand should show children how responsible the profession of defender of the Motherland is.
Master class on making a stand “Our Creativity”
Evgenia Nemtseva
Master class on making a stand “Our Creativity”
Master class on making a stand “Our Creativity”
Purpose: Decoration of the reception area.
Goal: to decorate the reception area beautifully.
Objectives: To arouse interest in creating a beautiful corner.
Develop aesthetic taste.
2. Colored paper, colored cardboard.
8. Brush, glue bottle.
How to choose material for making a stand?
The most popular material for making information boards is cork. This material has a lot of positive characteristics and is suitable for use in institutions of any type. It is cork that is chosen for stands for kindergartens, as it is a safe and hypoallergenic material. Let us also note other advantages of cork boards:
To decorate the back side of the stand, you can use a thin sheet of plywood or fiberboard.
Progress:
1. Cut out two blanks in the shape of pencils from thick cardboard. I used cardboard that is used for re-arranging furniture.
2. Then we paste over the blank pencils with colored paper. I have green and orange.
3. Cut out elements to create an image from colored paper - eyes, eyebrows, noses, lips, stripes. This is how I got a boy pencil and a girl pencil.
4. Then cover the surface of the pencils with tape. Add pens, scissors, glue, palette and brush.
5. Let's proceed to the final stage. Using a glue gun, glue satin ribbons of the same length to the back side.
6. We print the letters on a color printer for the inscription “ Our creativity ”
. Glue the letters onto the colored circles. We attach the inscription to the top tape.
The stand is ready . Now, using stationery clips, we place children’s works on satin ribbons.
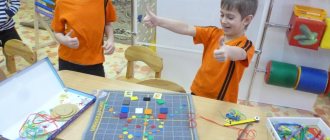
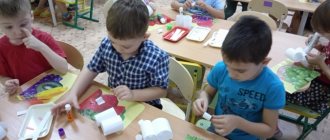
Photo report “Our creativity!” The joint creativity of teachers, parents and children plays a large role in the educational process. To organize the child's free time. Photo report “Our summer creativity” (part 1) This year the summer was not very good, there were many rainy days, but this did not stop us from creating both in the group and on the street. I want to introduce. Photo report “Our summer creativity” (part 2) I bring to your attention the second part of our summer work. As I already wrote, due to the fact that only up to 20 can be placed in a publication. Master class with children of the middle group “Oral folk art” BDOU Kindergarten “Solnyshko”. Onokhoy village. Master class with children in the middle group “Oral folk art”. Quiz “Travel. Photo report “Our autumn creativity” Today there was a real commotion in our group. Everyone worked hard and tried to create a masterpiece. We sculpted and painted, glued and created beauty. Our creativity on the theme “Autumn” Varvara Shchedrova’s family. Family of Timofey Zaitsev. A fabulous autumn has come to visit us! Autumn is a wonderful and beautiful time of year. In many. Photo report “Our creativity” Hello, dear colleagues! You all probably know the feeling when you are happy for your students? When you want to create.
Source
Stand for school from a student
An information stand is a mandatory school attribute that you can make yourself. A sheet of plywood, PVC or cork material is suitable for the base. The dimensions of the future stand are transferred to it, then the blank is cut out according to the measurements.
The elements are glued together with wood glue or any suitable glue. Fasteners are installed on the reverse side. After the glue has dried, the base is painted and decorated with paper or fabric.
For pockets in which sheets are placed, you can use simple transparent files, but plexiglass pockets look more aesthetically pleasing. It is important to correctly distribute the pockets over the stand area so that there is not too much free space on one side.
Plexiglas pockets
To make the stand look presentable, you need to spend a little more time on the work using plexiglass.
- Mark the length and width of the pocket, taking the dimensions of an A4 sheet as a basis, adding 15 cm to them on each side.
- Cut out the workpiece by cutting off one of the corners for the convenience of the user (this way the sheet will be easy to get out).
- Strips of the same material, up to 10 mm wide, the same length as the pocket, are glued to the workpiece on each side, with the exception of the side with a cut corner, which will create space between the pocket and the stand.
- Attach the finished pocket with the stand clearly according to the marked marks to avoid distortion.
For the title of the stand, stencils with letters are used, which will make it more noticeable.
Corner “Our creativity”. Design option for a creative corner for an exhibition of children's work
Oryshchenko Galina Andreevna
Corner “Our Creativity”. Design option for a creative corner for an exhibition of children's work
Hello, dear colleagues, friends and just guests of my page! I present to your attention an option for designing a creative corner for an exhibition of children’s works in the reception area “ Our Creativity ”.
When we moved to a new group, we did not have a special corner for hanging our children's creative works . And then a brilliant idea came to my mind! Why not make a corner “ Creativity of our children ”
with your own hands! And this is what came of it!
To create it I needed:
• Paint “Ruduga-26”
for ceilings and walls
(for children's institutions)
water-based, acrylic white, matte, economical;
• Kohler paint of different colors;
• Clothespins or clips for fastening works ;
• Glue liquid nails + gun;
• Colorless acrylic varnish for finished works ;
• Wide wooden slats for decorating birch trunks ;
• Thin plywood for the tree crown;
• Artificial leaves for decorating tree foliage ;
• Decorative elements of butterflies and flowers to decorate the finished corner ;
can a cohabitant apply for an apartment?
The creative corner turned out to be bright and big! Children like to display their work on a stand and then look at it with their parents in the evening.
Another creative corner smoothly flows into a stand for parents, decorated in the same theme, also with their own hands, where visual information for parents is posted: a schedule of activities, daily routine, useful information.
"Winter meadow". An element of the winter design of the “Winter Glade” natural area. An element of winter decoration of a natural area. Good afternoon, dear guests and friends of my page! With the onset of winter. Photo report from the exhibition of children's creative works “Spring is coming to us with quick steps” Every year in our kindergarten we hold creative thematic exhibitions of works by children and their parents. This year we haven’t changed either. Photo report on the exhibition of joint creative works of parents and children “Our Summer” Good afternoon, dear friends and guests of my page! I present to your attention a photo report about the exhibition of joint creative works of parents. Master class “Butterflies for decorating a corner of nature” The kindergarten is a second home for employees and children. And you always want to decorate your home, make it cozy, original, warm, unique, etc. Master class “The snail crawls and brings gifts.” Second design option for crafts Purpose: gift for February 14, March 8. Goal: teach children to design from paper, develop creativity and imagination. Material: printer. Our creativity for the New Year (works of children in the preparatory group) Today I want to present you with a short report on our preparation for the New Year. There was a lot to do: this included memorizing poems and songs for. Designing the “Our Mood” corner in kindergarten Goal. Teach children to recognize their own emotions and feelings, which help them respond adequately to the mood of a peer or adult. Group room design option. Poster for the holiday of May 9. Master class An important holiday for all people is just around the corner. It's Victory Day! The celebration of Victory Day on May 9 in kindergarten is always bright. Exhibition of works from the Interregional Creative Competition (photo report) Exhibition of works from the Interregional Creative Competition within the framework of the VII Interregional “Arsk Readings” “Let's Revive Holy Rus'!” A little history.Source
Do-it-yourself stand: features and manufacturing principles
So, the first thing you need to start with is the basis of the design. Once the size of the stand is determined, you need to select a cork board and plywood of the appropriate size and glue them together using glue or liquid nails. Next, the workpiece must be painted, covered with fabric or film, and you can begin to decorate it.
You need to start designing the design with the pockets in which sheets of information will be placed. For this purpose, you can use plexiglass of a suitable size or durable stationery files. The number of pockets can be absolutely any.
Next, you need to determine the theme of the design. This could be a lesson schedule, a corner of a healthy lifestyle, congratulations on the holiday, and so on. The name of the stand is an important part of its design. The title should be bright, large and eye-catching. Remember that an information stand is a business card of an organization, so special attention should be paid to its design. Letters for the title can be cut out from bright plastic or from unnecessary magazines.
Remember about the frame of the stand. With a frame, the design will look more aesthetically pleasing and laconic.
Sheets with information and other important information can be attached to the stand using buttons or safety pins, but if we are talking about a child care facility, then it is worth finding an alternative method.
Advantages of making your own stand
Making the structure will not take much time and will not take much effort. In just 30 minutes you can make a simple, small-sized design. With stands of larger size and complexity you will have to tinker a little, but rest assured that the result will exceed all your expectations.
The stands are actively used by people, both at home and in educational, medical, transport and other institutions.
Important information, plans for the future, memorable photographs, an organizer, a list of employees, a class schedule, and this is not an exhaustive list of information that can be located on the stand.
Source
Do-it-yourself art corner.
Larisa Savchuk
Do-it-yourself art corner.
Corner of fine arts “Country of Creativity”
with your own hands for children of the fourth year of life .
The most important condition for the implementation of tasks is the creation of a developmental, subject-rich, emotionally comfortable, aesthetically attractive, accessible, safe and other educational environment in accordance with the needs, interests, age and individual characteristics of children.
In our group, we try to create all the necessary conditions for the development of creative expressions by all available means that encourage self-expression.
We placed a desk on the right and placed pencil cups on it, also made by us.
Also on the table is a box with stencils made of thin, colored plastic.
Pencil holder made from 6 identical cream boxes, glued together and covered with self-adhesive paper
Covered boxes for coloring books, papers for free drawing
Next to the table, on the wall there is a small stand for children's work. To make it, we used a mosquito net for plastic windows, stretching colored ribbons over it.
On the left side they placed a small cabinet with shelves and decorated it.
On the top shelf were placed pencils made of thick cardboard and covered with colored self-adhesive wallpaper.
We pasted over different boxes containing a variety of materials for visual arts with children.
On the wall are our irreplaceable voluminous pencils, which are restored year after year.
Caterpillar placed on the wall of the cabinet
we have such a bright and attractive
And for parents in the reception area we have a large stand “Our Creativity ” made of ceiling slabs
Do-it-yourself musical corner The musical development of a child comes down not only to classes with a teacher, but also to the opportunity to play independently and play music freely.
my house apartment renovation in Tver
Master class “Duty Corner” with your own hands To decorate the group, we needed a duty corner. Of course, now you can buy different designs for corners, but I wanted to make it. Decorating a creativity corner with your own hands Dear colleagues and friends, I want to share the design of a creativity corner in our kindergarten in my group, made by myself. Often. Do-It-Yourself Mummering Corner Children really like the Mummering Corner. I made a dressing corner in the shape of a matryoshka doll. We also sewed all the outfits ourselves. Here is the princess outfit. Modern theater corner with your own hands To ensure an optimal balance of joint and independent theatrical activities of children in the group, a theater should be equipped. Do-it-yourself stencils for free creativity of children In our MAAM spaces there have already been many publications with different types of stencils. I also want to share the making of stencils that... Do-it-yourself theatrical corner for the younger group. I invite you to see our new corner! Let me start with the fact that the work of a teacher is creative work. And creativity is a must.
Source
How to make an information stand with your own hands?
It is absolutely not necessary to have special knowledge and skills to build a stand yourself and add it to a room, a group in a kindergarten or a school class. In order for the product to fit harmoniously into the interior of the room, you need to carefully consider its design. You can experiment with both the main shade and the design of your stand. As the main finishing material, you can use paint, fabric, self-adhesive film and much more.
To frame the stand, you can use a frame made of wood, plastic, aluminum, foam, cable ducts that are suitable in width, and so on.
During manufacturing, it is also necessary to take into account the method of fastening. For more convenient use, a hanging mounting method is recommended, since installation with glue can cause a lot of inconvenience in the future.
Master class on designing the “Our Creativity” stand
The master class is intended for preschool teachers. Children are also very actively involved in the stand design process. They are very fascinated by watching how their toys, pencils, long-abandoned construction parts, which they considered no longer needed and broken, take on a new life.
To make it you will need:
5. And give free rein to your imagination.
This unusual stand adorns our group.
Project: “What do we know about water?”
Teaching preschool children how to transform a square into a triangle
Teaching preschool children how to transform a square into a triangle Additional technical education provides ample opportunities for preschool children to become acquainted with.
Summary of a subgroup lesson by a teacher-psychologist for children in a preparatory group for school...
Summary of a subgroup lesson by a teacher-psychologist for children of the preparatory school group “Blooming Meadow” Goals: 1. Relieve the intensity of physical and mental stress; 2. Attract attention and.
Summary of continuous educational activities “We’ll play with Kapitoshka about water...
Summary of continuous educational activities “Let's play with Kapitoshka and learn everything about water” for children 3-4 years old Tasks: Types of tasks Integration of educational areas. Educational Continue introducing.
Long-term plan for the labor education of children in the middle group...
Long-term plan for the labor education of children in the middle group under the “Childhood” program September Organized training Joint activities of the teacher with children Independent activities of children Lesson No. 1 topic.
Comments
In blogs
“People take care of the planet!”
Methodological development of a game situation for cognitive development with children of senior preschool age “People, take care of the planet!” Prepared by teacher of the highest qualification category Murko E.V. Age of pupils: senior preschool (seventh year of life). Goal: to form the principles of ecological culture, conscious respect for nature. Tasks.
Ecological project “Water Sorceress”.
Ecological project “Water Sorceress”. Type of project: educational - research. Duration: medium-term (from November 6 to November 30). Relevance: The world around us is amazing and diverse. Every day children gain new ideas about living and inanimate nature and their relationships. The task of adults is to expand.
Consultation “Non-traditional drawing as a way to develop creativity in children”
Sukhomlinsky V. A.: “Children should live in a world of beauty, games, fairy tales, music, drawing, fantasy, creativity.” Jan Amos Komensky: “Children always willingly do something. This is very useful, and therefore not only should it not be interfered with, but measures must be taken to prevent it.