Maria Montessori is an Italian teacher, scientist, psychologist, and doctor.
She worked with children with intellectual disabilities and poorly speaking children. M. Montessori developed and tested a set of developmental exercises and games, thanks to which her students were surprised by the results in their development. So, Montessori educational games. Today, this is the most popular development method for children chosen by parents. Montessori educational games provide for the development of the following skills in a child: work independently, concentrate attention, coordinate movements, work according to the order of actions, be able to sort (identify the main features, priorities, etc.). All these games aimed at developing skills allow you to form and successfully develop a child’s sense of self-esteem.
Working with children, Maria Montessori determined for herself the directions in which she needed to help the child develop.
The main directions of child development in the Montessori system
“PRACTICAL LIFE” - so that the child is fluent in many life skills, acquires life skills;
“SENSORICS” - the development of a child’s sensory perception of the world around him; "MATHEMATICS" - exercise for the mind; “LANGUAGE” - development of speech, ability to communicate with others; “COSMOS” is the development of a child’s abilities and talents that can be reborn into a future profession. M. Montessori included children studying the basics of chemistry, biology and physics in the “space” direction.
Using the Montessori method, it is possible to organize other activities: drawing, music, a foreign language or the physical development of the child. All Montessori-inspired tutorials can be made independently.
Conclusion
Montessori classes from 1 year old are a whole world for children. Here, special toys and ordinary objects, structured tasks and free flight of imagination, joint work with an adult and independent activities of the child can coexist.
In Montessori classes for children 1-2 years old, the most important thing is to maintain a balance of activities: do not force the child to continue if he is tired, help him find new interesting games, chat more with the baby, know how to let him go on his own in time and monitor the child’s physical activity during the day.
Development of self-care skills in children
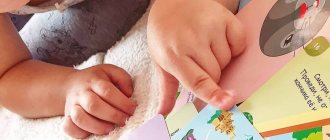
Game for developing fine motor skills “Cinderella”
Purpose of the game: development of the child’s fine motor skills, development of the eye, development of the skill of working independently, concentrating, coordinating movements, working according to the order of actions, being able to sort (identify the main features, priorities, etc.), speech development.
Required materials: tray, 3 bowls, 3 types of cereal (additionally, you can offer tongs, Chinese chopsticks)
Progress of the game:
- Place three empty bowls on a large tray.
- Place a handful of seeds in the middle of the tray: beans, peas, beans.
- Invite your child to play “Cinderella” and sort the seeds into different bowls with their fingers.
- Show an example of how to lay it out. Tell your child the names of the seeds and ask how they differ? How are they similar (color, shape, feel)?
- If the child copes, then move away and let him finish the game on his own. Be sure to praise at the end of the game
- Boil the disassembled seeds and let your child taste them. Find out how they differ in taste.
- The lesson is considered completed when all tools are put back in their place. There is no waste left in the workplace. The table has been wiped with a cloth. The child must do all this independently.
Advanced game options:
- Sort seeds by touch while blindfolded
- Take smaller grains for the game: buckwheat, rice, semolina
- Take a larger number of cereals for the game (4-5-6 types)
- Disassemble the seeds with tweezers (Chinese chopsticks)
The game can be played either individually or in a group.
Educational game "Lacing"
Purpose of the game: development of the child’s fine motor skills, development of the eye, development of the skill of working independently, concentrating, coordinating movements, working according to the order of actions, preparing for sewing with a real needle.
Materials needed: colored laces, cardboard figures with hole punch holes
Progress of the game:
- Give the child a string and a cardboard blank. Invite your child to lace up the second cardboard “shoe.”
- Show and explain on the first “shoe” how to hold the lace, how to thread it through the holes, and in what order the two ends of the lace should be threaded.
- Let your child do the lacing on the second cardboard sample. Give praise when done correctly.
- If the child makes a mistake and does something wrong, offer to unlace his “shoe”, look carefully at your sample, think and try to complete the task again.
- After successful execution, teach your child to tie a bow from laces. Demonstrate a sample of the bow on your “boot”. The child then tries to do it on his own.
- If it doesn't work, untie your bow and show it again. Continue this way until the child is able to do it on his own.
- To reinforce the skill, have your child lace up real shoes and tie a bow. Be sure to support your child with praise. It’s a good idea to praise the child about such a “feat” in front of other significant adults (father, grandmother or grandfather). This will give the child confidence in future tasks.
- The lesson is considered completed when all tools are put back in their place. There is no waste left in the workplace. The table has been wiped with a cloth. The child must do all this independently.
Advanced game options:
- Offer more complex “boot” lacing.
- Invite the child to look at the new lacing pattern without demonstration from an adult and try to make it himself on his own “shoe” sample.
- Prepare other templates (matryoshka, giraffe, elephant, house) and offer to make patterns with laces using the “sewing” or “embroidery” technique
Educational game "Braids"
C
spruce games: training concentration, development of fine motor skills of the fingers, eye-hand coordination.
Necessary materials: Prepare two cardboard blanks with attached thread pieces for weaving. They are also on sale.
Progress of the game:
- Give the child a cardboard blank with loose “hair” in his hands.
- Show and explain in the first example how to weave a simple braid.
- Let your child do the weaving on the second cardboard sample. Give praise when done correctly.
- If the child makes a mistake and does something wrong, offer to undo the braid, look carefully at your sample, think and try again to complete the task.
- If the braid is successful, offer to tie the braid with a bow. Demonstrate with your example and ask your child to do the same.
- Praise your child for his diligence and accuracy.
- The lesson is considered completed when all tools are put back in their place. There is no waste left in the workplace. The table has been wiped with a cloth. The child must do all this independently.
Advanced game options:
- Suggest braiding a lot of small braids on the sample.
- Offer a more complex braid (4 strands, 5 strands)
Educational game “Neat hands”
Purpose of the game: training concentration, development of fine motor skills of the fingers, eye-hand coordination, learning to cut nails using a nail clipper and scissors
. Materials needed: Two cardboard blanks of hands with images of nails.
Progress of the game:
- Give the child a cardboard hand blank.
- Point to the nail plates, compare them with those drawn and explain to the child that nails need to be trimmed and this can be done with two tools: a nail biter, scissors.
- Tell your child that you can’t cut close to the skin, because it will cut and bleed. To help your child understand how to cut, suggest using a pencil to draw a cutting line on the workpiece.
- Demonstrate this on your workpiece.
- Let your child independently draw the cutting line on the second cardboard sample. Give praise when done correctly.
- Demonstrate how to cut a nail with a nail biter.
- Invite your child to perform the action independently. Give praise when done correctly.
- The lesson is considered completed when all tools are put back in their place. There is no waste left in the workplace. The table has been wiped with a cloth. The child must do all this independently.
Advanced game options:
- Suggest performing the same steps using scissors.
- Offer to trim the “nails” on the sample without drawing a cutting line using scissors.
- You can offer the girl to paint her nails in some color and decorate her jewelry as she wishes.
Games based on the Maria Montessori method - exercises with liquids
Do-it-yourself Montessori classes are very easy to organize. In childhood, babies love to play with water. Activities related to liquids will arouse true interest. For example, you can suggest pouring water from one vessel to another; they should differ in shape. It is important not to spill anything during the game.
Note! A simple everyday activity can easily be turned into a game. You can invite your child to pour the juice into a glass themselves. This exercise will teach him independence and accuracy. If he accidentally spills juice, you need to tell him how to clean up after himself.
Exercises with liquid
Sensory development in children
Game for the development of fine motor skills “Torn Applique”
Purpose of the game: development of fine motor skills of the fingers, eye-hand coordination, development of creative thinking
Materials needed: Coloring sheet, colored paper, old magazines
Progress of the game:
- Show your child that you can color a picture not only with paints and pencils, but also with scraps of colored paper.
- Show your child how to carefully pinch off the desired piece of color and glue it to the drawing.
- Offer to “decorate” the drawing yourself in this way.
- The lesson is considered completed when all tools are put back in their place. There is no waste left in the workplace. The table has been wiped with a cloth. The child must do all this independently.
Advanced game options:
- Invite your child to “decorate” the picture using crumpled paper balls. Teach your child to crumple paper and roll paper balls from the crumpled sheets, and then glue them. Pay attention to the surface of the pattern that such a volumetric applique looks good for making the fur coat of an animal, for example a lamb.
- Invite your child to design the drawing using strips of paper rolled into snails. Teach your child to carefully roll and glue paper strips. Pay attention to the beautiful paper ornament of such work.
Awareness game “The Cheerful Gardener”
Purpose of the game: development of fine motor skills of the fingers, sensory skills, development of visual memory, attention coordination
Required materials: ten apples (pears, oranges) of the same variety
Progress of the game:
- Place 10 prepared fruits of the same variety on the table in front of the child. Show your child that they are all the same, but each has its own characteristics.
- Take one apple in your hand and demonstrate how it differs from the others (for example, the absence of a stick or a speck or color is different)
- Invite your child to choose one fruit and, after carefully examining it, find the differences from the others. Let him name all the differences out loud.
- Return all the apples to the table, ask the child to turn away, and stir.
- Invite your child to find his own apple among others.
- The lesson is considered completed when there is no trash left in the workplace. The table has been wiped with a cloth. The child must do all this independently.
- The game is more fun and educational with the entire Ifamily.
Advanced game options:
- Offer your child more fruits (15-20 pieces)
- Offer your child less varied samples: walnuts, apricots, plums
The game can be played either individually or in a group.
Family game “Bouquet for Mom”
Purpose of the game: development of fine motor skills of the fingers, sensory skills, development of visual memory, coordination of attention
Necessary materials: wild and garden flowers, water, vase (jar)
Progress of the game:
- Place the prepared flowers on the table in front of the child.
- Pour water into the jar, showing the level to the child. If you spill water, wipe it off with a cloth.
- Show your child how to prepare flowers in a bouquet: cutting off the lower leaves and a piece of the stem, aligning the length of the flower stem.
- Demonstrate how to arrange flowers in a vase (jar), adding one at a time.
- Give your bouquet to the child, saying good wishes to him.
- Invite your child to repeat all the steps.
- If a child makes a mistake (for example, cuts a stem too short), do not interfere with him, let him notice it himself.
- After work, offer to clean up the table together and arrange bouquets at home.
Sensory development game “Wonderful Bag”
C
spruce games: development of fine motor skills of fingers, sensory skills, development of tactile memory, attention coordination
Materials needed: opaque bag, small items that fit in your hand, Kinder Surprise toys, bottles, school supplies, etc.
Progress of the game:
- Find at home a regular opaque bag made of fabric or linen in which you can put small objects: plastic or wooden geometric shapes, voluminous bottles, small fabric toys, Kinder Surprise toys, various stones.
- Invite your child to put his hand into the bag and find something with his hands.
- Next, without pulling out the object, you need to feel it with your hand, describe what it is made of, what it consists of, and suggest what it could be.
- Take out the object and make sure your answer is correct or incorrect.
- This educational game is fun to play with the whole family, forming a queue. Parents can set an example for their child on how to correctly describe an object and what to pay attention to when guessing.
Game for the development of visual perception “Simple puzzles”
Purpose of the game: development of fine motor skills of the fingers, visual perception, development of visual memory, coordination of attention.
Materials needed: old postcards, scissors.
Progress of the game:
- Place old postcards on the table in front of your child. Offer to choose one.
- When the child makes his choice, ask him to carefully look at the postcard and remember what is where.
- Then, in front of the child’s eyes, you cut the picture into 8-10 squares. (If the child is small, then it is enough to cut into 4-6 squares the first time). Mix up the parts of the card.
- Ask your child to put this puzzle together correctly.
- If the child copes, then the next picture can be cut into smaller parts (triangles, polygons).
- If the child cannot cope, do not scold, put this puzzle aside. He'll collect it later. Practice with simpler options by cutting the card into fewer pieces.
- It is better to store each cut puzzle in a separate envelope.
- The next day and beyond, the child will return to this game. And it will have a different developmental meaning, because the visual image of the postcard will already be forgotten by the child. And you will need to use your thinking to create a picture.
- The lesson is considered completed when there is no trash left in the workplace. The table has been wiped with a cloth. The child must do all this independently.
On the development of a child’s sensory and fine motor skills, read also:
Child sensory development “Sand therapy”
Development of fine motor skills “Drawing with plasticine”
DIY Montessori games, what and how you can make them
The technique pays great attention to sensory skills, so it is recommended to make toys from natural materials. First of all, you need to make sure of their safety. If a DIY Montessori toy is made of wood, it should be well hewn and painted with non-toxic paint.
One of the most popular didactic games is the creation of cards on various topics. You can either draw them yourself or print them on a printer. Drawings should be bright and expressive. The card index can be dedicated to animals and their babies, vegetables and fruits, equipment, clothing. For example, rubber or painted animals are given out, and the child must find the corresponding card with a description for them.
Note! You can make your own sensory mats at home. You can use an old thick blanket or a large towel as a basis. Buttons are sewn onto the material as desired, and appliqués are made on various themes. Such toys develop sensory skills and prevent flat feet.
It is important that all activities are focused on the interests of the child. Parents and educators only observe their changes from the outside in order to promptly propose a new stage of development.
Montessori kindergarten HappyBee
Address: Ostrovnoy proezd, 12/1. This is a beautiful and quiet place, without the bustle of the city. The territory of the kindergarten is well guarded.
Interior, security
In the center there are large rooms with high ceilings and spacious windows. The furniture is made of high-quality wood and corresponds to the height of the child. All teaching materials are safe, original, and have appropriate certificates.
Working hours, groups
HappyBee has 2 Montessori groups:
- Toddler (age 18 months – 3 years). It is open daily from 9.00 to 17.00, 3 meals a day are provided;
- Primary (age 2.5-6 years). Opening hours from 9.00 to 19.00, 4 meals a day.
Peculiarities
HappyBee employs certified teachers and pays great attention to learning English. For this purpose, native English speakers were invited to join the center's team. Every month, the kindergarten administration holds family events and trainings, and parents regularly receive photo reports on their children’s successes.
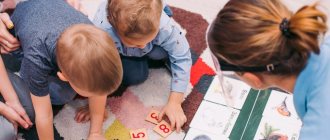
Selecting objects with the same texture (2–5 years)
This game is suitable for developing tactile sensations. You will need a set of wooden squares or circles with one of the surfaces having a different texture. You can create it by applying a thin layer of glue and attaching a piece of fabric, Velcro, seeds, sand or something else. Objects must be paired so that the surface texture of two circles or squares is the same to the touch. If you turn them over, they should all look the same.
Invite your child, with his eyes closed or blindfolded, to “see” objects with his fingertips and find paired ones. When turning objects over, the child will be able to clearly see how correct his choice was.
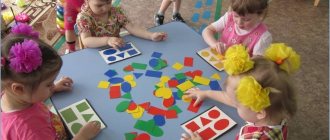
Combining multi-colored signs (3–5 years)
Montessori schools use ready-made sets of multi-colored wooden tablets, with the help of which children learn to distinguish primary colors, tones and shades, and also learn their names.
You can make the signs yourself. The signs can be used to create three separate sets of colors. The elements in the set must be the same size and differ only in color.
For kids, you can start with a set containing 6 signs in three colors: two each yellow, red and blue. Ask your child to match the paired signs and learn with him the names of the 3 primary colors.
When the child has mastered this task, prepare a set of signs of 11 pairs of primary colors and tones: yellow, red, blue, green, orange, purple, pink, brown, gray, black and white. Offer to find paired signs and name the colors.
To make it more challenging, create a third set of signs consisting of 7 shades of each of the 9 colors (yellow, red, blue, green, orange, purple, pink, brown, grey). Invite your child to arrange them in order from lightest to darkest. Once all the signs are neatly arranged on the tray, you will have a beautiful display of different colors.
There are also many games with such signs. For example, ask your child to find a sign of the color that is closest to the color of an object in the room. Another option: show your child a plate from the third set of colors and ask him, from memory, to find a plate with a color that is one tone lighter or darker than the one you showed.
The third option is to teach how to create lighter or darker shades by adding white or black paint to the base color. By starting with a base color and adding white paint little by little, a child can create a set of dark to light shades, similar to a set of wooden signs.