Preview:
Summary of direct educational activities on artistic and aesthetic development (sculpting)
in the preparatory group
on the theme “Child with a kitten.”
Educational field: artistic and aesthetic development (sculpting)
Integration of areas: physical development, speech development.
Children's age: 6-7 years
Teach children to depict a simple scene in modeling, to consolidate the ability to convey the proportions of a person and an animal. Strengthen the ability to use techniques: pinching, pulling, rolling, rolling, joining.
Developmental: develop techniques for creating proportions between humans and animals, a sense of composition, and imagination.
Preliminary work: Familiarizing children with animals (based on the works of V. Bianki, S. Marshak, E. Charushin, M. Chizhikov, etc.), their appearance, habits. Reading fairy tales, stories about animals, about their friendship with humans. Looking at illustrations.
Individual work: Continue to teach Egor and Raibek how to perform sculpting techniques correctly.
Motivation: let the children determine for themselves what we will sculpt (show illustration)
Source
Plasticine unicorn
The pattern of the unicorn, deer and giraffe is the same as in the case of the lion. The figurine is seated, so the parts are attached to the back, and the remaining parts are attached to the front, almost on the colored “collar”.
As an option, a unicorn can wear a decoration in the form of a motley mane, which is obtained by mixing several shades. Knead several pieces for five minutes, no more, otherwise you will get a dirty color instead of clear multi-colored stripes.
Summary of a modeling lesson in the preparatory group “Pet - cat”
Marina Razykova
Summary of a modeling lesson in the preparatory group “Pet - cat”
Goal: development of creative abilities in children.
Tasks:
2. Teach children to create a cat figure on their own.
3. Strengthen the ability to roll out a ball, oval (cylinder, thin “sausages” from a shapeless piece of plasticine).
4. Learn to follow the sequence of attaching the elements of the cat’s figure.
5. Expand your vocabulary, activate words in speech: flatten, roll out, fasten.
5. Develop fine motor skills, attention, and the ability to work independently according to a model.
6. Develop imagination when “decorating” the cat with its breasts and spots.
7. Foster love and respect for pets.
Guys, today we will sculpt something with you. And what exactly, you tell me yourself! To do this, please listen and guess the riddle.
What kind of animal is playing with me?
Doesn't moo, doesn't neigh, doesn't bark,
Attacks balls
Does he hide his claws in his paws?
Educator: Guys, which one of you has a cat or a male cat living at home?
Educator: Why do people keep cats at home? (they bring joy, positive emotions, they greet you home from work or kindergarten in the evening, they catch mice).
Educator: So, today we will sculpt a cat.
Sample Show
Educator: What parts do we need to sculpt to make a cat?
Showing clearly the sequential execution of the product. Providing a choice of cat color: orange (red, black, white.
1) Making the head. We will need a small part from the whole piece. Let's roll a ball.
2) We mold small triangular ears and attach them to the top of the ball.
3) We sculpt the body. It will be in the shape of a cylinder. To do this, take a piece of plasticine, a little larger than for the head, make an oval between the palms, it should be larger than the head.
4) Our cat will be sitting, so we’ll place the oval on the table and press lightly so that the oval has a flat base.
5) Attach the head to the body.
6) Let’s make the front legs, roll two “sausages”, they should not be too thin so that our cat does not fall. We attach them to the front of the body, closer to the head, with a stack you can cut through the claws.
7) In the same way we mold the hind legs. We will attach them to the back of the body, towards the front legs, since our cat sits on them.
 From a similar “sausage” shape we will make a tail for our cat.
Let's make green eyes and a pink nose
9) “Decorate” the cat with a white breast (or black if the cat is white).
Educator: Now let’s take a little break. We have done a great job!
Turn them however you want.
One two three four five.
They can't sit again.
And they wanted to work.
Summing up.
Educator: Guys, now let's see what we got. Each of you cats turned out great! Let's treat our pets with love: cats, dogs, birds. If we took them in, it means we must take care of them, care for them, and feed them. Thanks to all! Well done boys!
Photo sketch “Our beloved pet!” I like animals a lot. These are truly our little brothers, without whom life would be boring and meaningless. I want to tell you about ours. Photo exhibition “My Pet” Whoever loves animals lives long, And the youth in him will never die, Whoever gives shelter to a cat and a dog in the house, There will be warmth in his soul. Summary of the integrated lesson “House Doctor at the Window” in the middle group Summary of the integrated lesson in the educational areas “Child and Nature”, “Art. Visual activity" in the middle group. Summary of the lesson on sculpting “Girl with a kitten” in the preparatory group Synopsis for sculpting “Girl with a kitten” in the preparatory group. Goal: To create conditions for depicting a simple scene with advanced movement. Summary of the modeling lesson “Cockerel with his family” with children of the preparatory group Integration of OO: “Social and communicative development”, “Cognitive development”, Artistic and aesthetic development” Objectives: - expand.
Summary of a sculpting lesson in a preparatory group on the topic “Bird” Program content: To consolidate the ability to sculpt from a whole piece, conveying their character, using a variety of sculpting techniques.
Master class “Pet” Hello, dear friends and guests of my page! I offer a children's master class “Pet”. For work we will need:.
Source
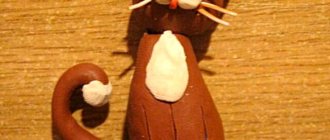
Plasticine cat
The step-by-step scheme consists of three stages:
- Warming of the selected layer and, as a result, softness and pliability of the material;
- Formation of parts;
- Final assembly.
Operating procedure:
- To make a graceful, beautiful cat or a rowdy, street cat, we tear off two larger round pieces from the total mass.
- This is the future head and body: smooth the muzzle as much as possible to the shape of a ball, but the base should be slightly rolled into a sausage.
- Not too much so that the slight roundness does not disappear. Tear off five more slices, but comparatively smaller in size compared to the previous elements.
- These are four legs, as well as a slightly arched tail. All that's left is just two ears, very tiny, in the form of small triangles.
- Now we connect everything, putting the parts in their places. As a result, a scorched cat standing on four legs.
- Using a plastic knife or toothpick, make slits like toes.
- Then we add a different color muzzle, eyes, nose and “apron”.
- That's it, the pet is no longer averse to having breakfast or dinner with dry food.
Summary of the lesson on modeling “Favorite Kitten” in the preparatory group
Marina Kapitonova
Summary of the lesson on modeling “Favorite Kitten” in the preparatory group
Teach children to depict a simple scene in modeling , consolidate the ability to convey the proportions of a person and an animal. Strengthen the ability to use techniques: pinching, pulling, rolling, rolling, joining.
Developmental: develop techniques for creating proportions between humans and animals, a sense of composition, and imagination.
Educational: to cultivate hard work and accuracy .
Preliminary work: Familiarizing children with animals (based on the works of V. Bianki, S. Marshak, E. Charushin, M. Chizhikov and others, their appearance, habits. Reading fairy tales, stories about animals, about their friendship with humans. Examination of illustrations .
Lion made of plasticine
- Two balls are the basis of the entire structure, which is united by a toothpick, and one element should be slightly rounder than the other.
- Head and torso respectively. Then you will need four sausages: two are attached to the back, the rest are glued to the front of the base.
- Use a different color to highlight the bottom of the legs and chest, highlighting them in different shades.
- Make the cheeks the same color, and black or brown the nose and button eyes.
- All that remains is to add round ears, a mane in the shape of flower petals and a tail at the back, decorating it with a red tassel.
- If desired, roll up a few gray stones and place the king of beasts on top; a few tufts of grass will not be amiss.
NOD “Sculpting a cat” in the preparatory group
Anna Orpanen
NOD “Sculpting a cat” in the preparatory group
Direct educational activities.
Topic: sculpting a cat
Objectives: educational - strengthening the skill of sculpting in parts , from a whole piece. Improve the ability to freely use different sculpting (pulling, attaching, fastening parts, strengthen the ability to convey the proportions of the animal’s body.
Developmental: develop aesthetic feelings, the ability to work carefully.
Educational: to cultivate interest in knowledge of nature, independence, interest in modeling , the desire to complete the work started.
Equipment: plasticine, stacks, oilcloths, illustrations of cats, toys (cats and cats)
.
Preliminary work: examination of illustrations, photo illustrations about cats and cats, children's stories about their cats and their habits, drawings “My favorite pet”
, presentation
"Cats"
.
Making an elephant from plasticine
The only difference from previous products is that the base will require one oblong ball, to which smaller parts are attached.
- Long, elongated paws are not needed.
- On the contrary, they are round, slightly flattened, since the legs of an elephant are heavy, massive giants.
- It remains not to forget the ears, trunk, eyes and an almost invisible tail at the back.
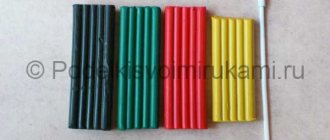
To make it easier to sculpt animals from plasticine, prepare the material in advance by placing it on the battery.