Birdhouses made from milk bottles
Don’t rush to throw away milk bottles and Kinder surprise containers, because you can make an attractive craft out of them. Round holes are cut in milk bottles, clothespins are glued to the bottom of the bottles, and the birds themselves are on them in the form of kinder boxes. Just decorate the birds' bodies with down or feathers, colored paper, and also draw eyes on them with a felt-tip pen, then the craft will be completely ready.
How to make a bird craft yourself?
To remove bird crafts with your own hands well, you need to find suitable instructions on the Internet and decide what materials will be used.
To begin with, you should choose the most affordable and simple options for crafts, so that the materials for them are inexpensive and easy to find.
Next, you need to find suitable instructions on the Internet or rely on your own preferences and experience if you have previously made other crafts.
Paper bird applications
There are many options that depend on the child’s age, abilities and desire to follow a certain procedure. A little help from adults will, of course, be needed, but in general children can do a lot on their own.
You should also not limit their imagination if somewhere they want to deviate from the planned plan - after all, this is creativity, and it does not always fit into the framework.
Arrival of birds
A very appropriate theme for spring, and the craft is as simple as possible:
- green (blue) cardboard for the base is prepared;
- white paper is cut into strips - these will be birch trunks; horizontal lines should be applied to them with a black marker along the entire height in different places;
- a birdhouse is cut out of brown paper, the window in it can be made of black paper, or painted with black paint;
- birch leaves are cut from green paper;
- the birds are cut out according to a template and painted (or decorated with cotton balls, confetti, beads, etc.);
- Now all the details are glued onto a cardboard base: first the birch tree trunks, then the birdhouse, followed by the leaves and, finally, the birds.
The missing parts can be painted on or made from plasticine.
Dining room for the birds
Once you start with appliqué, it may be difficult to stop, and you may end up making a real bird feeder. But first, it’s worth getting your child interested in a three-dimensional appliqué of birds on a paper feeder.
A sheet of white cardboard is prepared. Using the “wet” watercolor method, you can apply the blue sky and thawed patches in the snow to it. By the way, if you take initially blue cardboard, you can simply spray the snowball by dipping a hard brush or an old toothbrush into diluted white gouache. And paint on the snowdrifts.
While the paints are drying, cut out tree trunks from brown paper and add a few branches. It would be best to glue the feeder from corrugated cardboard.
You can cut out birds for applique from colored paper according to the template, outlining the contours of the wings, beaks and eyes. The figures are glued to the base - everything is ready!
Swallows on wires
For this work you will need gray woolen thread (twine will also work), white, yellow and black paper, blue cardboard, glue, white felt-tip pen (you can take a proofreader), scissors.
The blue cardboard is unfolded with the wide side down. From edge to edge horizontally, through the middle of the sheet, two threads are pulled and secured with glue on the back side of the base.
Strips 8-10 cm long and 3 cm thick are cut from white paper. Strips of the same thickness should be cut from black paper, but they should be 15-16 cm long, and the lower edge should be thicker. It is cut into a dovetail shape.
You also need to cut out wings from black paper (a curved strip with tapered tips, resembling the open wings of a swallow in shape), and from yellow paper - small squares that fold diagonally - these are the beaks of birds.
Now you should assemble the parts sequentially: the black strip is glued in the middle to the “wire”, tail down, its upper part is folded forward, and the edge is glued to the tape - you get a bird’s head. The wings are glued a little lower.
The white ribbon is folded into a ring, the edges are glued together, after which it is attached under the head of the bird - this is the breast of a swallow.
The beak is glued to the head, and eyes are drawn above it with a white felt-tip pen (corrector).
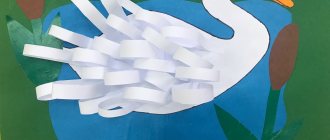
Paper palms
You can create an impressive craft even without a bird stencil for applique - you will only need multi-colored paper, white cardboard (A3), glue, scissors, pencil, felt-tip pens and decor.
In the middle of the white sheet, closer to the bottom edge, the body of the bird along with the head is drawn. You can only outline the wings and outline everything with a black felt-tip pen (or any bright, saturated color).
You need to trace the child’s palm on colored paper and repeat on several sheets of different shades. Cut out and glue the back of the bird like a fan - this will be the tail.
Now you can give free rein to your imagination: for example, outline the glued-on palms with a liner, glue the body of the bird with cotton balls and color them, draw the eyes and beak or cut them out of paper and stick them on.
You can use sequins, gold leaf, beads, confetti, threads and much more for decoration.
How to make a craft correctly?
There are several important rules that should be followed when creating crafts:
- strictly follow the instructions if it is made on the basis of a ready-made solution on the network;
- if all materials are not available, then you should look for analogues that are similar in appearance and properties, otherwise all the work may be done in vain;
- It is recommended to make blanks that will help you make not one, but several crafts at once, and will also “insure” in case one of the birds is damaged while working on it;
- If you want to learn how to make a bird craft for the first time, then it is best to look for options using the corresponding request on the Internet.
Bird applications using quilling technique
One of the most interesting techniques for creating three-dimensional paper appliqué. These are rolled paper strips that can be shaped into circles and droplets.
By varying the width of the ribbons, the thickness of the twist, the sizes of individual elements and, of course, colors, you can create paintings that are completely different from each other each time - even if you take a finished work you like as an example.
The name itself translates from English as bird feather, which is great for bird appliques. You can involve not only children, but also adults in the process by creating a Firebird - colorful, alluring, magical.
To work, you need double-sided colored paper - you need to cut thin long strips from it using a ruler and a stationery knife. However, many specialized stores sell ready-made kits.
For a fairytale bird you need red, orange, burgundy, and golden shades. For the background you need to stock up on cardboard and beautiful paper. You also cannot do without a pencil and eraser, scissors and white paper. To twist, you can use a regular toothpick (skewer).
The cardboard base is covered with beautiful paper. Although you can paint the cardboard yourself, or simply paint it. You should draw a sketch of the future work on a separate sheet so as not to get confused in the placement of parts.
Yellow and orange stripes are twisted; they will be used to decorate the head, beak and some places on the body. After this, you should try on the parts on the sketch and glue them together. The voids can be left as is for now, or you can twist a few more elements and fill the gaps.
Yellow and golden paper will become the basis for the feathers. It is easier to cope with this task if you have templates of different sizes. The edges of the feathers must be cut into fringes. The parts for the wings need to be folded in half; for the tail elements this is not necessary.
The top of the wings will be decorated with curved strips; for strength, three parts should be glued together.
Now the assembly of the Firebird applique begins on the basis. The body is glued, the base for the wings is attached to it - it should immediately be bent to shape. Now it’s the turn of the feathers, including the tail ones.
A fringe is cut out of golden paper and glued under the bird's neck. The crest on the head is made in the same way. Now the twisted elements are glued onto the feathers. When working, you should adhere to the greatest possible realism of the image.
Choosing the most suitable application technique for yourself is easy. This type of creativity is extremely attractive; once you have mastered the basics, you will be able to create entire canvases with a variety of subjects and characters.
In addition to the fact that children learn about the world with the help of applications, it also contributes to closer communication with parents, the development of motor skills, and the relief of emotional stress.
