Children's master class on painting with paints using non-traditional techniques on the topic “Pets”
Marina
Children's master class on painting with paints using non-traditional techniques on the topic “Pets”
Materials for the master class : printouts of coloring books with images of pets, gouache paints paint brushes , foam rubber attached to a glue brush - “poke”
.
Stages of children performing a master class .
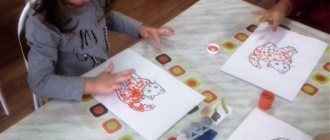
The guys performed the master class in pairs .
1. At the first stage of the master class, the guys chose coloring pages with images of pets .
Zlata chose a coloring book with a picture of a sheep, and Ilya chose a coloring book with a picture of a cat .
Vika and Zakhar liked the coloring pages with a picture of a dog.
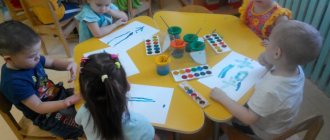
The children independently decided what color the fur of the animals , and prepared gouache paints of the desired color .
The guys first carefully made the prints with a “poke”
along the entire contour of the
animal .
Then they just as carefully filled it in with fingerprints.
the entire surface of the
animal of the animal unpainted .
3. At the final stage of the master class, the guys very carefully drew the eyes and tongue of the animals .
The guys worked really hard and they came up with some interesting work!
Thank you very much to all colleagues for your attention and support!
Children's master class on applique on the theme “Animals” Dear colleagues, I bring to your attention a master class on applique from my students. There are no classes now, it’s summer, but we are with my children. Children's master class on non-traditional techniques of painting with paints “Sunflower” The demonstration of the master class uses non-traditional techniques of painting with paints “Leaf imprint on paper” and “Poke painting”. Children's master class on painting with paints “Fruits on a dish” using the non-traditional “imprint” technique Materials for the master class: a sheet of whatman paper for the general background, format A - 3, a set of colored paper, scissors, a glue stick. Children's master class on drawing using the frottage technique "Flowers in a Vase" Children's master class on drawing using the frottage technique "Flowers in a Vase" Goal: Continue to introduce children to non-traditional drawing techniques.
Notes on drawing using non-traditional techniques on the topic “Willow” Notes on drawing using non-traditional drawing techniques Direct educational activities. With children in the middle group in visual arts.
Summary of a lesson on drawing in the non-traditional technique “printing with leaves” with children 5–6 years old on the topic “Autumn Landscape” Topic: “Autumn Landscape” Purpose: To create conditions for children to become familiar with the non-traditional drawing technique “Imprint”. Educational objectives:. Master class on the non-traditional technique of drawing on water “Flower” Purpose: To introduce teachers to the non-traditional technique of drawing “Ebru”, to increase the motivation of teachers to master non-traditional techniques. Master class on non-traditional drawing techniques “Tulips” In preschool education, along with traditional types of fine art such as: drawing, modeling, appliqué.
Source
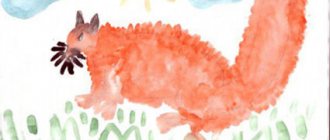
cat
Well done! But we cannot stop there. Let's now draw each child's favorite. And it will be the cat Vasya. Redhead is the favorite pet of all children. And of course he loves milk and sleeps sweetly all day long.
What do you need to draw this handsome guy? We'll need pencils
Let's get started? I can't wait anymore.
Let's start with the torso. To do this, we will draw an oval in the middle of the sheet, and so that it appears to be lying on the ground.
So, the body is ready. Let's draw Vasya a big fluffy tail. To do this, we make a long oval on the side of the body.
Moreover, it is worth noting that our tail should seem to stand on a large oval.
Ready? Now we decorate our finished ovals with an orange pencil. After all, our cat is red.
The next step will be the cat's paws.
Draw four identical small sticks under the body. These will be our paws. Now we paint them orange. Great!
Let's move on to the most interesting part - the cat's head. Let's draw a circle. Color it orange.
Now let's do some magic on the muzzle.
We place two small circles inside the head. Draw black lines. This will be Vaska's mustache.
Well, does your drawing look like a cat now?
Well, this is the last stage. Let's draw the cat's nose and ears.
Place a small triangle with the corner down between the two circles with the cat's antennae.
We decorate this triangle with a pink pencil. Let your nose be gentle.
And the final part is the ears. We place two middle triangles on the top of our Vasya’s head. Let them be orange too.
This is how Vasya turned out. What is yours? Send your photos in the comments.
And here are some simple diagrams for drawing cats. Explore:
Drawing animals in the senior group step by step with photos
Author: Tushmakova Natalya Nikolaevna, teacher, ANO DO “Planet of Childhood “Lada”, kindergarten No. 203 “Alice” Description: the master class is designed for preschool children. Purpose: teaching preschool children how to work with the algorithm. Objectives: 1. Develop aesthetic perception, aesthetic emotions and feelings, emotional response to manifestations of beauty in the world around us. 2. To form experience in the perception of various aesthetic objects, to develop aesthetic interests, the desire to learn art and master visual activity. 3. Bring children to understand the value of art, promote the development and use of various aesthetic assessments regarding manifestations of beauty in the world around them, artistic images, and their own creative works.
The world surrounding a person is beautiful and diverse. A child, having a great desire to convey his impressions on paper, often encounters difficulties in depicting what is intended in a drawing. Not every child has the ability to independently and step by step correctly convey the image of a particular creature. Most often, children experience difficulties when starting to draw, i.e. don't know where to start or don't know what to draw next. The child can be helped with this by samples depicting the necessary sequence of drawing various objects, i.e. algorithms. With their help, it is easy for a child to navigate the number and shape of body parts, see their proportional relationship, as well as the final result. As preliminary work, you can use templates of various animals. This will help the child orient himself in the number of certain parts of the body, their shape and size, but will also make it possible to convey any movement.
You can accompany the demonstration of drawing an animal with artistic words. For example, when showing an image of a bunny, you can use the following words: We draw a snowball, We made the ears later. And just instead of eyes, we found Coals. The bunny came out alive! He has a tail and a head.
For older children, algorithms with a large number of steps are used, because more details are added. It can be done graphically. In addition to oval shapes, the structure of the figure can consist of axial lines that coincide with the axes of the bone. This method of drawing is otherwise called “stick”. A lot depends on the shape and nature of the axis (it can be straight or curved): whether the figure is standing, moving or preparing to jump. The artist sees this constructive basis, the skeleton, immediately and constantly keeps it in his head while drawing, without displaying it on paper. But a beginner needs this, because... this disciplines the drawing, allowing for proportional accuracy and typical similarity. But in time you need to make sure that the child does not press too hard on the pencil, because... the centerlines are subsequently removed.
Where to start learning
It is advisable to teach children to draw animals by mastering a simple pencil. It will create an outline of the image, which you can later happily color. In addition, children quickly get upset if something doesn’t work out for them. In the case of a simple pencil, it’s not difficult to fix everything: erase the missing element with an eraser and continue creating.
Which animal to choose for drawing
The first lesson is the most important, because you can teach a child to draw animals in a few minutes, provided that the object to be depicted is chosen correctly. You shouldn’t immediately suggest drawing a horse or a giraffe. The best option is a duckling, kitten or puppy. The images of these pets consist of a small number of elements, which minimizes the risk of failure in the lesson.
Interesting! Parents who decide to try to learn drawing techniques using step-by-step templates themselves rejoice like children, amazed at the result.
What you need for drawing
Any activity, be it drawing or morning exercises, should be started when the child himself wants it. It makes no sense to force someone to draw, because creativity is closely related to the state of the soul. For the first lessons you will need a minimum of tools:
- paper;
- a simple hard-soft pencil (marked TM or HB);
- eraser.
Note! It is preferable to take A4 paper or a classic sketchbook, but a notebook sheet will not work, the lines and cells in it will interfere with the baby, and the sheet will seem initially unclean to him.
Educational song in English for a child - learning the language with children
It is recommended to give preference to a hard-soft pencil, because it is easiest to work with. Drawing with a hard stylus is inconvenient because it requires stronger pressure and the mark left behind is not bright. It will not be possible to erase it efficiently - a groove from the rod will remain on the paper. On the contrary, a soft lead does not require pressure at all, its mark is bright and clear, but when you try to erase the line, the eraser will smear the soft mark, leaving dark stains.
Drawing in the senior group “Pets” using algorithmic schemes
Olga Veryaeva
Drawing in the senior group “Pets” using algorithmic schemes
Drawing is a type of visual activity, the main purpose of which is a figurative reflection of reality.
In practice, some children do not show much desire to draw in free activity; they draw only at the request of an adult and reluctantly. The reason for this is not so much a lack of interest in drawing as difficulty in depicting objects, a lack of drawing .
You can teach children to draw and depict only by developing targeted visual perception - observation. In order to draw or sculpt any object, you must first become familiar with it, remember its design, shape, color, size, and arrangement of parts.
One of the techniques that allows you to comprehensively analyze an object, see its properties and characteristics, is learning to draw based on the algorithmic sequence of depicting the object.
When teaching preschoolers subject drawing , the teacher first offers to analyze the subject by showing a toy or drawing. It suggests mentally dividing an object into parts, its components - torso, neck, head - comparing them with geometric figures and drawing in a certain sequence, observing proportions. This kind of work is called algorithmic drawing schemes .
For example, when drawing an animal, children name the shape of the body and head, then the teacher shows the algorithm (sequence)
of drawing , naming the parts of the body and their shape (head - round, body - oval, triangular ears, tail, etc.)
.
Subsequently, children can use these skills by drawing according to their own ideas on a specific topic.
Such diagrams consist of geometric shapes familiar to children (rectangle, circle, triangle, oval, square)
.
When a child is shown an algorithm , he recognizes familiar figures that he can already draw .
At the initial stage, the teacher and the children consider what geometric shapes the object consists of, and the child traces them with his finger. The image of an object according to an algorithmic scheme begins with a geometric figure, the basis of the object (the body of an animal , a person, to which the remaining parts are sequentially drawn (head, legs, etc.)
.
For example, the image of a pig begins with drawing a geometric figure - a circle. Inside a large circle, a smaller circle is the head, and another circle is the heel. It can be compared to a pyramid when viewed from above. Ears are drawn on the head using small triangles . The arcuate line is the mouth. Using horizontal lines we depict legs with triangular hooves.
The image of a rabbit consists of ovals of different sizes: a large oval is the body, a small oval is the head. Long ovals are ears, small ovals under the large ones are paws and a tail on the right. It is important to explain to children that we draw a rabbit sideways, so we see and draw one eye.
We draw a horse using rectangles and a triangle tail. And, of course, we never forget about the background.
Gradually, children cease to feel a sense of uncertainty and fear of drawing ; they take up pencils with interest and draw, first together with the teacher, and later, having mastered the experience of drawing according to diagrams, on their own .
At first glance, it may seem that mastering algorithmic schemes is characterized by monotony of execution techniques and hinders the development of a child’s artistic creativity, but this is not the case, since children are given as many options as possible for depicting the same object, and are offered variability in color solutions and details. As a result, the child remembers the sequence, the essence of drawing , retains the technique, but brings creativity and individuality to the image.
The use of drawing sequence diagrams promotes the formation of creative abilities in children and activates the potential of their abilities in learning to draw . Having mastered the skills of subject drawing , it is much easier for preschoolers to move on to a more complex type of image - plot.
Game technologies on the lexical topic “Pets and their young” in the senior group Goal: To expand children’s generalized ideas about domestic animals and their young. Didactic games: “Guess what kind of animal” Goal:. Lexico-grammatical lesson in the older group of children with disabilities “Pets” Goal: To know: Names of domestic animals (4-5, appearance, nutrition, benefits brought to people. Baby pets. Preliminary. Lapbook “Pets and poultry” for children of early preschool age Dear colleagues, I present to your attention a thematic folder. For a very long time I studied what a lapbook is and whether we need one at all as educators. Layouts “Wild Animals of Our Forest” and “Domestic Animals” using MAAM templates Along with traditional methods for Innovative pedagogical methods are used for the intellectual development of children in preschool institutions.General lexical and grammatical lesson in the older group of children with disabilities “Wild and domestic animals and birds” Objectives: 1. Consolidation of ideas about domestic animals, birds and wild ones, their appearance and way of life. Formation of a general concept.
How to easily start drawing
Here are my little tips to make the creative process easier and more fun.
First, we will depict domestic animals and birds. And at the same time this will help to learn new species of the animal world or repeat already familiar ones.
And this is the simplest thing I want to start with.
Secondly, we will draw with geometric shapes.
At the age of 6, when children are preparing for 1st grade, they are already familiar with such concepts as “circle”, “triangle”, “stick”, “oval”. Therefore, the child will not have any major difficulties with drawing.
If children are not familiar with these mathematical terms, there will be good motivation to familiarize themselves with them and remember them.
And thirdly, we will start drawing with colored pencils. This further develops the motor skills of children's hands. In addition, children aged 4-5 years old will not get very dirty with you.
However, if your child loves to paint, then let them enjoy coloring.
So, let's start studying our drawing schemes.
First we will draw an owl. Usually she sits on a tall tree and watches other inhabitants of the forest. The owl's eyes are large and round, so this bird sees well at night. It is at this time that she hunts, and during the day the owl sleeps in a secluded place.
Materials we need: pencils
First of all, let's draw a large oval. This will be the body of an owl and at the same time a wise little head.
Color the body with a beige pencil.
Inside the head we add two circles - these are the eyes. There are two more in them, only smaller ones. We paint them black.
The next step will be triangles. The owl will have as many as 3 of them.
We make ears for the bird so that it can hear everything. To do this, we draw two small triangles with the corner up.
Summary of the drawing lesson “Pet - cow” in the preparatory group
Elena Belkova
Summary of the drawing lesson “Pet - cow” in the preparatory group
MUNICIPAL BUDGETARY PRESCHOOL EDUCATIONAL INSTITUTION "KINDERGARTEN OF GENERAL DEVELOPMENTAL TYPE No. 21"
Abstract
On direct educational activities in the preparatory group FIREFLY .
Artistic creativity ( drawing )
On the topic: Pets cow
Prepared by the teacher
Materials and equipment:
1. Demonstration: photo of a cow with a calf
2. Handout: For each child, a piece of paper, pencils.
Looking at an illustration on the theme Cow in the meadow .
Purpose of the lesson : To consolidate and expand children’s ideas about domestic animals and the features of their appearance.
Learn to draw a cow , continue to develop the ability to think through the compositional construction of an image, continue to learn how to mix paints, develop imagination and memory.
Step-by-step schemes for kids
There are many simple patterns that make beautiful drawings; for children, animals are of more interest than household items or landscapes, so you should start with them.
A simple example of drawing a bird. Children love to feed the ducks on the ponds, any child would love to draw their own duck.
- The creative process begins with two ovals: the head and the torso, connected to each other by a short neck.
- Paws are drawn from the body down.
- On the duck's body, just below the middle, draw an arc representing a folded wing.
- Sharpen the edge of the oval from the tail side using an eraser. The tail is depicted by several almost parallel lines of short length
- A beak and an eye are drawn to the duck's head.
- The final touch is adding details in the form of drawing feathers throughout the body and wing of the bird.
- Now you can color it.
How to draw a duck