Drawing is, one might say, in the blood of children. Absolutely all children love to draw here and there (on the wallpaper, on the table, on the carpet)... But so that the interior does not suffer and your nerves remain intact, the child needs a full-fledged workplace to express his fantasies and emotions. And, of course, the right and safe material for creativity.
The ability to draw is determined by the development of one of the hemispheres of our brain: absolutely all children have developed the right, and only over the years, when the child goes to school and begins to solve logical problems, does the left hemisphere catch up with the right in its development. Well, until this moment, parents must provide the child with space for creative expression.
Today there are quite a lot of materials with which you can draw: different types of paints, felt-tip pens, pencils, crayons, markers... A young mother will be dizzy from such an assortment. But not every material is suitable for a two-year-old. Let's try to figure out what to draw for a 2-3 year old child? What materials exist and which ones are best to choose in terms of safety and practicality?
Oil crayons (pastel)
This material should not be confused with the wax crayons that we had in our childhood. Wax crayons were based on wax; they did not write brightly and required effort. Oil pastels are distinguished by their softness and bright colors and can become the first drawing material for a child aged 2-3 years. You can draw absolutely anything with these crayons: mom, dad, cars, clouds, landscape.
The disadvantage of oil crayons is their fragility: you cannot drop them, throw them, press them hard, stand on them or sit on them.
As for color palettes, it is, of course, better to take a set right away, but one intended specifically for children, and not for professional artists. For the first time, 6-12 primary colors will be enough. Most often, each chalk is packed in a paper or plastic wrapper to prevent your hands from getting dirty. And some crayons have the shape of a pencil, which is even more convenient for drawing.
For your first creative activities, there is no need to buy special paper; regular printer paper will do.
How to organize a drawing lesson for children 3-4 years old?
- Think about the activity. Play out in your mind the entire sequence of what you and your child will do. Stock up on wet wipes and cloths so that you have them at hand if necessary.
- Give an example of what should happen as a result of the lesson. This can make it very easy to explain the material.
- Take a doll, animal or cartoon character and conduct an activity with its help. Children will be happy to support and help the puppet teacher.
- Think about what photographs, pictures, videos and audio materials you can use in class. This will make your lesson fun and interesting.
Markers
One of the favorite materials for any child: they leave a bright mark and do not require special pressure. And in our childhood, these were some of our favorite materials for drawing due to their color palette.
The disadvantage of regular felt-tip pens is their durability on various surfaces (for example, on walls), so for children under 3 years old it is better to choose washable felt-tip pens. But the cost of these will be much higher than usual.
Choose the color palette as you wish: some parents prefer to go with more expensive ones, but with fewer colors, while others prefer a variety of colors. But to prevent both markers from drying out, you need to teach your child to always close the caps.
Felt pens for little ones usually have a triangular cross-section (for easier grip) and a rounded tip of the rod.
As for the paper, regular printer paper will also work, but fresh markers can leak onto the other side, so you need to put something under the paper to prevent the table surface from staining.
For older children, you can try buying art markers (a modern material based on alcohol and pigment), which are considered a more professional material.
How to draw with gouache correctly
Gouache is a light paint that even a child can work with. It does not require any special rules or skills.
To know how to draw with gouache from scratch, remember these rules when working with it:
- Take a few cups of water to wet your brushes and not dilute the “dirt” in your paints.
- Take synthetic brushes of small sizes - flat and oval are suitable
- You can mix shades on a separate sheet of paper or plastic plate/palette
- Add whitewash little by little
- Take thick paper - from 180 g/m2
- The paint dries quickly - start painting with the background, and then add other details to the drawing
Finger paint
It may be hard to believe, but not all kids enjoy finger painting. The strange jelly-like consistency, which stains both hands and everything around, is not suitable for every child. But oddly enough, psychologists recommend starting your acquaintance with drawing with fingertips.
Of course, for the sake of experimentation, you can buy safe finger paints for a one-year-old baby to introduce him to colors and textures, but very rarely do any children become interested in this material.
You can draw on any surface, especially if you bought washable paints, but it is better to immediately let your child know that a separate surface is intended for drawing. Specifically for finger paints, choose larger formats (for example, cut sheets of whatman paper into A3 and A2 formats). You can also try paper on a roll.
Artist Tips
- Always move from dark to light. For example, you have a dark background, purple, on which light objects are depicted - vases, fruits. Paint in the tone first, and then paint in the light objects, adding highlights at the very end.
- To paint with gouache you don't need a lot of water like you would with watercolor. Wet the brush a little in water - the paint should lie tightly on the surface.
- When mixing shades, use the Itten color wheel - it will help you avoid “dirt” and mixing the wrong color.
- Errors in the drawing can be corrected. To do this, wait for the paint to dry completely, then use a damp brush to remove unnecessary paint from the paper and paint it with a new color.
- Use bright colors. Since they will still become lighter after drying, do not use pastel shades so that the drawing does not seem faded.
Pencils
Another material that not everyone likes. Compared to oil-based crayons, pencils are harder and require effort to achieve rich, vibrant color. But, of course, in order to decide which material is most convenient for your child to draw with, it is still worth buying the first pencils.
Choose soft triangular ones with a small number of colors in the set (12 colors are enough to decide whether you like it or not). Some manufacturers produce special sets for the smallest: they are triangular, with an increased diameter and with a large rod.
Paints
Two types of paints are relevant for children: watercolor or gouache. Some people get used to one type, while others like others. In any case, you need to try to understand.
As for watercolors, few recommend it as the first paints, although modern manufacturers produce sets designed specifically for the little ones (the so-called honey watercolor). These are safe water-soluble paints that are suitable as the first ones. They are based on no toxic substances, given that a child may accidentally lick the brush. Good for coloring and economical.
Gouache should be chosen from the age when the child stops putting everything in his mouth (gouache is not one of those paints that can be tasted). Painting with gouache is pleasant if you choose the right brand (by the way, we always bought gouache from Gamma or Luch and did not regret it, but in both series, according to reviews, there are cheap sets with dirty shades). Low-quality paints will not fit well on paper and mix unsightly, sometimes forming sediments and clumps, which will definitely discourage you from painting with gouache. So make your choice responsibly.
Other types of paints (acrylic, tempera, oil) are considered more professional and are not recommended for children at first.
Best drawing techniques for 3-4 years old
Let's look at some drawing techniques for children 3-4 years old.
How and with what to draw?
Hatching
The point of this technique is to paint over any area without going beyond the boundaries of the drawing. It is better to do shading with a pencil or pen.
Invite your child to color the bunny gray.
coloring book "bunny"
fish coloring page
We color the fox red.
fox coloring page
Shading
Shading is similar to shading, but is done with paints. The meaning is the same - to paint over a certain area. For example, it is very interesting to draw colorful circles using plastic cups, and then paint them in a suitable color.
Lines
Straight, wavy, interrupted, spiral, etc. Here is an example of how you can draw the sky, grass and sun with different lines.
line drawing sky and grass
sun line drawing
Points
This is one of the first techniques that children learn and their favorite. Children can use this technique to paint sand, rain, snow, flies, etc. For example, you can decorate a pineapple with dots using a brush.
Pineapple dot pattern
Or draw a clover with cotton swabs.
Drawing with cotton swabs
Splashes and blots
If splashes and blots are usually considered something untidy, then in this technique everything is just the opposite. Here is an example of a beautiful butterfly made from a blot. We painted the blot on paper with different colors and then simply folded it in half. However, to get a butterfly pattern, you need to practice a little in applying paint.
Blot butterfly
But such a monster can be made if you apply paint with a lot of water to a sheet of paper, and then blow on the drops of paint into a tube. Under air pressure, the drop will flow, leaving a mark on the sheet of paper.
Blob Monster
An interesting messy picture is obtained if you apply finger paints or gouache to a sheet of paper.
Liquid paints
Then we press them with transparent film.
Press down with film
By pressing the film onto the paints, you can see how the colors spread and mix. And as a result, we get an interesting pattern!
Drawing from smeared paints
Watercolor over crayon drawing
The point of the technique is to draw a design with a white wax crayon or candle on white paper. He won't be visible. Then, when a layer of watercolor is applied on top, the drawing begins to magically “appear.”
Kids will probably be able to draw rain with horizontal lines.
Chalk drawing “Rain”
It’s a real miracle when the spirals drawn in chalk begin to appear.
Chalk drawing “Spirals”
You can draw fish in the same way and then cut them out.
Chalk drawing "Fish"
Seals and stamps as a drawing technique
The meaning of the technique is that the design is applied to a sheet of paper not with a brush, but with a seal. Let's see what you can use to make a print for a child: An amazing flower can be obtained if folded celery leaves are used to apply it.
Celery stalks
A celery print makes a very beautiful rose.
Celery imprint
You can cut a convenient stamp out of potatoes, for example, in the shape of a leaf.
Potato stamp
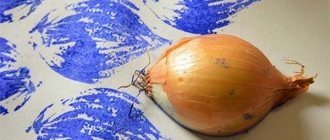
Nature itself gives us ideas. If you apply green and brown paints to a sprig of cauliflower, the imprint of the cauliflower is very similar to a spreading tree.
Cauliflower tree
Stamp using a dishwashing sponge. To do this, dip a sponge in paint and apply the design to the paper.
Autumn sponge drawing
Drawings made with bubble wrap prints will also find their lover. The mixture of pink and white flowers on the prints gives a touching tenderness to spring sakura.
Bubble wrap print pattern
Imprint of a rubber ball with spikes. Just like when working with a sponge, we dip the ball in the paint and run it across a sheet of paper, getting a funny dotted print.
Rubber hedgehog drawing
A paper mouth, eyes and ears will help bring our drawing to life.
Monster
Finger paintings
You can use your fingers to draw dots, lines, or cover a certain area. Here we decorated an autumn tree with dotted movements.
Autumn finger painting
You can simply smear the paint with your fingers, filling the selected contour.
Coloring the fruits
Drawing from a pen print
The point of the technique is to make an amazing picture from a pen print by adding a few additional strokes to the print. For example, we can make green prints and add orange rectangles to them - we get a carrot.
Drawing from prints “Carrot”
Or glue toy eyes to the print and add a mouth - you get a real goldfish.
Drawing from the print “Fish”
A very touching picture drawn with palms and fingers “nest”. Children will be able to draw birds, and also find out with what love the mother bird incubates her eggs and feeds her babies.
Drawing with palms and hands “nest”
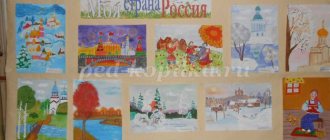
A very interesting way of drawing is to draw something three-dimensional on a large poster or the back of unwanted wallpaper. This way you can do group work.
Volumetric drawing
We looked at several drawing techniques for children aged 3 to 4 years. However, things can go wrong. Paint may spill, water may overturn, and clothes may get dirty. Try not to get upset or upset your child. Believe - next time everything will work out! A lot of things just come with experience.
See how you can draw a hedgehog with your child:
Workplace
Before starting drawing lessons, set up a comfortable workspace for your child. Drawing on a stack of books in the mother's arms will either discourage the child from drawing at all, or will encourage him to choose a more comfortable place, for example, on the wall or on the carpet.
For the little ones, choose children's tables with adjustable heights, as well as adjustable chairs. You shouldn’t immediately buy your child an easel—not everyone likes to draw on it. But many people strive to “decorate” their wallpaper with a pattern, so a place for painting can also be arranged on the wall. For example, hang a large sheet of Whatman paper or a special board for chalk.
In any case, it is your child who should choose the material for drawing, and not you, otherwise, if the child doesn’t like something, you can discourage all desire for further creativity.
Gouache brushes
The brush, like the magic wand in Harry Potter, should be perfect for its owner. Where to start choosing brushes for painting and how not to make a mistake with your choice?
To do this, hold different brushes in your hands in the store - choose the one that is most comfortable to hold in your hands. Imagine how you will sit for hours and draw and hold it in your hands - you should feel comfortable and comfortable.
In my articles, I often advise trying to paint with different brushes of different shapes. But a lot will depend on your goals - whether you are drawing a poster on whatman paper or making a small drawing in an album. For these purposes you will need different brushes, of course.
For beginners, I advise you to purchase 3-4 of the most versatile brushes, and then purchase additional ones as needed of some other shape or size.
So, the brushes you will need for painting with gouache:
- Flat brushes
Used when filling the background with paint, to create broad strokes and fill in large details (for example, when drawing a poster).
- Round and oval brushes
Depending on the pressure applied, you can change the thickness of the pile and experiment with the shape.
- Thin contour brushes
They will be useful for drawing small details.
Depending on the type of bristles, do not choose brushes made from natural bristles that are too soft. For gouache, synthetic brushes and brushes with bristly bristles are more suitable. You can use kolinsky or goat wool from natural pile, as they are more resistant to external irritants.
You can find out more about choosing brushes for gouache painting, as well as ratings by manufacturer, in this article