Scratch board for children: DIY engraving craft. We will tell you about the technique of performing grattage step by step, works and drawings in this technique: grattage fireworks, landscape, space.
Scratching is one of the types of graphics based on making a quick silhouette sketch by scratching. Non-standard drawing techniques are interesting to all children, regardless of age. The only difference is that we have to help the kids prepare the source material, and the older ones can do everything on their own, since the technique of performing grattage for children is quite simple.
The word grattage comes from the French Gratter - to scrape, scratch. This is a well-known method of making a drawing by scratching paper or cardboard filled with ink or black gouache with a sharp tool. Another name for the technique is waxography , sometimes also called scratching.
All the steps in preparing a worksheet for work are interesting and useful in that they instill in the child a sense of consistency, attention, and perseverance. Drawing on a prepared dark sheet is generally like magic : the child will be amazed to see how bright, contrasting lines and strokes appear on a black background.
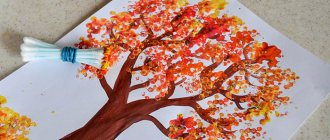
That is why the most popular motifs in the grattage technique for children are those that are always performed on a dark background: space, a rocket, a night landscape, festive fireworks.
Manufacturers call ready-made scratching kits scratch cards and engravings.
DIY engraving
Drawing is considered an engraving, because the image is obtained by applying strokes without the help of paints, although it would be more accurate to call this technique an imitation of engraving .
On colored cardboard
The simplest scratch paper can be made with your own hands on ordinary colored cardboard. An economical and colorful option is scratch paper on colored cardboard, for example, bright boxes, notebook or magazine covers, etc.
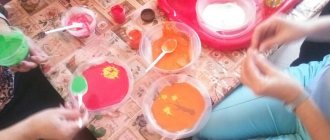
You will need: any colored cardboard, black gouache or acrylic paint, dishwashing liquid, a mixing glass, a candle, a stick for scratching the design.
- Mix cardboard paint: Add 6 teaspoons black paint and 1 teaspoon dishwashing liquid to a glass and stir gently until smooth.
- Take a regular candle and carefully wipe the colored paper pages with wax. The cardboard should be completely covered with a thin layer of wax.
- Take a brush and paint the resulting wax paper with the resulting black mixture. It's best to stock up on printmaking paper so you'll have plenty of material to experiment with!
Scratch stick
Take any stick with a sharp end, such as a wooden skewer. By decorating the stick with washi tape and a wooden bead, the tool becomes a truly chic etching stick.
You can find another scratching device. Even a dry marker works well.
Engraving with wax crayons
- Cover the construction paper with splashes of color using strokes of wax crayons.
- Paint the entire painting black using a soft brush. Not too thick, but not too thin either. If the colors are still showing through after 1 coat, you will need a second coat.
Scratching: history and features of technology
Scratching, or waxography, is a technique of scratching an image on a specially prepared base. It came to Russia from France a hundred years ago and immediately became popular among artists, because in the art of that time everything new, unusual, even fantastic was highly valued. Even earlier, in the 13th century, the sgraffito technique was known in Italy. The craftsmen applied several layers of plaster of different colors to the wall, and then, using special scrapers, scratched images into them so that the lower ones appeared from under the upper levels, forming beautiful paintings that covered the entire wall. It is sgraffito that is considered the predecessor of grattography.
The secret of grattage paintings is not in the paints and brushes, but in how the background was prepared and what patterns were scratched on it. Accordingly, the artist’s tools differ from the usual ones. For creativity you will need:
- a sheet of thick paper or cardboard;
- paraffin (candle), wax crayons or oil pastels;
- black ink or gouache (if desired, you can use dark blue, purple, brown);
- liquid soap;
- sponge or wide soft brush;
- a sharp tool for scratching - a special stick, a toothpick, a non-writing pen.
If your child was given a set with a ready-made scratch paper coloring book, do not throw away the plastic pen included in the set after using it. This pointed stick is also useful for home arts.
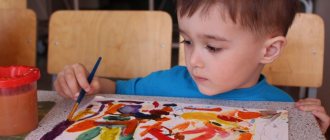
For preschoolers, different ways of making drawings are suitable, which can be used within the same step-by-step instructions:
- Preparing the work surface and tools. Cardboard or thick drawing paper must be secured to the table, for example, with tape.
- Primer, first stage. Classic grattage assumes the presence of only two colors - black and white. But scratching a design on a black background becomes like real magic if you make the base colored. To do this, you need to completely paint over the sheet with random spots of the selected color scheme. This can be done either with ordinary pencils, and then you will need to carefully rub the entire surface with a candle, or with wax or pastel crayons. Feel free to entrust this operation to your child.
- Primer, second stage. Now the sheet needs to be evenly covered with ink or gouache using the selected tool. Here you will need the help of an adult. Experts in grattography techniques at master classes recommend adding a drop of liquid soap or dishwashing detergent to the paint first so that it goes on smoother.
- Drawing a contour. When the primer is completely dry, you need to mark the boundaries of the future drawing and its largest details, for example, with a thin pencil line.
- Detailing. The most interesting part, for the sake of which everything was started! Using a sharp tool, you need to scratch out thin or wide lines and strokes to gradually achieve the desired design.
Handle the base very carefully: fingerprints and other minor damage will be clearly visible on it. To protect the primer, place a sheet of clean paper under your hand.
Scratch board for children
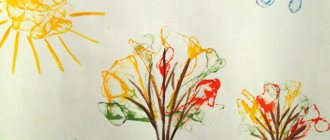
Festive fireworks - flashes of color on a coal-black sky - are an ideal theme for creative work using the grattage technique.
Night landscapes also look spectacular.
Animals, insects and fish, and almost any motif look beautiful in this technique.
Drawing using the "Scratch" technique
Galina Bogacheva
Drawing using the "Scratch" technique
The wonderful, unusual technique “Scratching” will be interesting for children of any age. The difference is that for younger children, the basis for drawing is done by an adult, while older children do it independently. The technique is simple to perform and consists of three stages. All stages of preparing a worksheet for work are interesting and arouse the child’s interest and develop attention, perseverance, a sense of consistency and the ability to complete the work started. The child learns about the diversity of the world around him, and also expands his horizons and carries out cognitive and research activities.
“Grattage” (from the French gratter - scrape, scratch) is a method of scratching a primed sheet with a pointed object. Many people know him as “Tsap-scratchy”. Children really like this funny name and easily remember this technique. I assure you: “Once you try the Grattage technique once, you will want to return to it again and again.”
The “Scratching” technique can be performed in several variations.
Option number 1. (the simplest).
1 step. You need to take a thick sheet of white cardboard and rub it thoroughly (without gaps) with a wax candle.
Step 2. Using a wide brush, apply a thick (like sour cream) layer of black gouache (or another dark color) onto the entire sheet of cardboard so that there are no gaps.
Advice:
add a few drops of liquid soap (shampoo, detergent or PVA glue) to the gouache, then the gouache will not stain your hands when scratched.
Step 3. Scratching. Take a pointed object (toothpick, feather, ballpoint pen refill, plastic fork, etc.) and start drawing the planned design. You can draw stripes, various lines or strokes. In general, what you want. I drew this version.
"Winter night".
Option number 2.
1 step. We make the background with gouache. In this version, I divided the white sheet of cardboard into two parts horizontally. I applied blue gouache to the bottom one, and yellow gouache to the top one.
Repeat steps 2 and 3 as in option No. 1.
Here's what I got.
“Starry sky” (waves made with a plastic fork).
Option number 3. I make the background with wax pencils.
1 step. Draw (without spaces) with colored wax pencils of the same color or draw colored spots.
Repeat steps 2 and 3 as in variation No. 1. In this drawing, I sketched a sheet of cardboard with colored spots.
"Firework".
Advice:
If you want to transfer a drawing from a book onto the Scratchboard, then transfer it to tracing paper and carefully apply the outline of the drawing, slightly pressing it, and then scratch it well.
Option No. 4. “Scratch” + applique.
1 step. Cardboard with a ready-made bright pattern. A cover made from colored cardboard or an album works great.
Repeat steps 2 and 3 as in option No. 1.
Step 4 Make the applique from pre-prepared forms.
“Northern Lights” (snow made with semolina).
Advice:
If you want to add shine to your work, apply hairspray evenly over the entire sheet.
I am sure that your students will like the “Scratching” technique. Experiment, create and scratch!
Ideas for prints
Forms
When you (or your children) get tired of scratching simple landscapes and fireworks on rectangles, try cutting out shapes and decorating them using the scratchboard technique.
Photo paper
Print the photo onto paper, wax it, and cover it with engraving paint. This way you can make amazing greeting cards and make your parents, grandparents or friends happy with such a gift.
Color
Experiment with color: in addition to black, gold and silver shades look good.
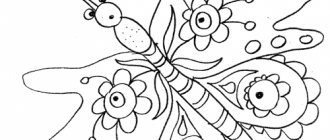
Preparing the Template
In order to introduce children to this technique, you need to prepare in advance. Children are happy to apply a layer of color, but they do not always like to apply gouache or ink. You can do this yourself, and the children will scratch the drawing. Moreover, the drawing can be invented by them, or you can offer a ready-made template, for example, a fish or a bird, help trace it, and the children can scratch the details in the drawing themselves. With older children, you can try scratching on wet gouache. Scratching can be incorporated into many different activities for children. Children are pleased not only with the end result, but also with the magical