Application from plasticine for children. fly agaric
Summary of organized educational activities
Manual labor lesson on the topic: “Plasticine applique “Amanita.”
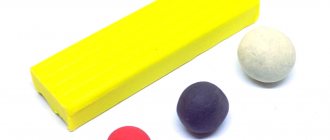
Author: Svetlana Aleksandrovna Ovchinnikova, teacher of OGKOU SKOSH No. 39 VIII type, Ulyanovsk. Description. The lesson notes are intended for students in grades 3-5 of type VIII correctional schools. This development may be useful for teachers and leaders of special (correctional) schools in their work on developing visual skills. Kindergarten teachers can partially benefit from this. The summary was developed taking into account the presence in the class of students with undeveloped own speech, but who understand the spoken speech. Goal: formation of visual skills. Tasks. Strengthen the ability to create an applique from plasticine, smearing it over the base without going beyond the contours. Continue to teach children to pinch off a piece of plasticine, roll a ball between their palms in a circular motion, and use additional material in the applique - peas. Practice the ability to recognize and correctly name colors: white, red. Correction and development of attention, visual-motor coordination of hands and fingers. Material. Sample - A-4 format, toy or picture - fly agaric. For each student: a game of soft parts “Collect a fly agaric”, half a sheet of cardboard with a graphic image of a fly agaric - a red cap, a white leg, a little grass, halves of peas painted white.
Preliminary work. A conversation about mushrooms with a demonstration of pictures, drawing a mushroom according to a template, a stencil and then painting it over, assembling a fly agaric from colored flat, soft parts with Velcro, memorizing the poem “Amanita.” Lesson content. Organizing time. The long-awaited bell is given, the lesson begins. Let's sit straight and not bend over. We'll get to work. — Let's start the manual labor lesson. What lesson starts? - Right. Finger gymnastics. There is a lock on the door. (Fingers in the lock) Who could open it? They pulled... They twisted... They knocked... And they opened it. (Hands to the sides) - Guess what mushroom grew in the clearing. Listen carefully to the riddle. But here is someone important On a little white leg, He is wearing a red cap, There are polka dots on his hat. - Well done. This is a fly agaric, L. show me where the fly agaric is. - Well done. Do you like fly agaric? - Let's look at it carefully. What is this? (Leg) - Show the fly agaric’s leg. What color is the leg? - What’s that on the fly agaric’s leg? (skirt) - What is this? (Hat). - Show me where the hat is. - Well done. What color is the hat? - What’s on the fly agaric’s hat? (white dots) - Well done. This is how beautiful the fly agaric has grown. We found out what parts the fly agaric consists of. I also have fly agarics. Oh (the teacher looks into one of the bags) they are broken. Help, collect mushrooms - fly agarics. We have already said that the mushroom has a stem, a cap, and white dots. Collect carefully. Game "Collect a fly agaric".
- Well done, what mushroom did you pick? (children's work is displayed on the admiration board) - That's right. Who will tell a poem about the fly agaric. Red hat with polka dots, collar on a thin leg.
The fly agaric is beautiful to look at, but dangerous and poisonous. - Well done. Fly agaric is a poisonous mushroom. We can't eat it. But many forest animals need it as a medicine. It's winter now, everything is covered with snow, and mushrooms don't grow in the forest. How can we help forest dwellers? Today in our handicraft lesson we will make an applique of a fly agaric from plasticine. Here is a fly agaric (sample introduction).
Do you like this fly agaric? What type of mushroom will we make in the lesson? — This fly agaric is made of plasticine. What is this? - That's right, leg. What color is the plasticine on the leg? — What geometric figure does the leg resemble? (Rectangle) - What color of plasticine did I take for the hat? - Well done. What geometric shape does the hat resemble? (triangle). - Look carefully, the leg is below, and the hat is on the leg, at the top. What are the white dots on the cap made of? (from peas) - Well done. What is the fly agaric applique made of? — And now I’ll show you how to make a fly agaric appliqué. Watch and listen carefully. A fly agaric is drawn on the card - a white leg and a red cap.
The teacher shows and explains how to do the work. We pinch off a piece of white plasticine, roll the ball between our palms in a circular motion, and press it onto the base at the top of the leg.
Then smear it from top to bottom with your finger, without going beyond the contours. Who wants to help me? (The student comes to the board). — To make a skirt, take some white plasticine and roll it into a “column.” Like this. Let's press the fly agaric to the leg. Gently smooth it on top, like this. Now let's make the hat. We pinch off a piece of red plasticine, roll the ball between our palms in a circular motion, and press it onto the base at the top of the cap.
Then smear it from top to bottom with your finger, without going beyond the contours. Who wants to help me? (2 students come to the board).
“That’s how beautiful my fly agaric turned out.” There's just something missing. Who guessed? - Right. I will make white dots from peas. Like this - I apply it and press it into the plasticine.
— I showed you how to make a mushroom from plasticine. Now let's rest a little. We stretch our hands to the ceiling, like a flower towards the sun. Let's spread our arms to the sides, as if we were spreading leaves. We flap our wings like geese. And then we’ll quickly lower it. - Let's sit straight, don't bend over, We'll get to work. -What kind of mushroom will you make from plasticine? - What will you do first? (leg) - And then what? —What will you make the white dots from? - Well done. Only the cunning peas hid among the yellow ones. I think you will find them when you decorate the hat. Show how you will roll a ball of plasticine and smear it on the base. (Actions are performed in the air). “Now it’s time to get to work.” Independent activity of children. The teacher provides individual assistance. — What mushroom applique did you make? —What did you make the fly agaric from? — What did you do with plasticine? (smeared) - Who will we give these fly agarics to? (Forest animals). - That's right, this is their medicine. Guys, if you liked the lesson, show me the cheerful sun. If you didn't like it, then it's sad.
“I’m very glad that everyone liked the lesson.” And I liked how you participated in the lesson. An individual assessment of work and participation in the lesson is given. - Well done. Thanks to all. This concludes our lesson. Children's work (severe mental retardation).
We recommend watching:
DIY autumn crafts Plasticineography in elementary school. Master class Plasticineography in elementary school. Master class Plasticineography for junior schoolchildren. Cat Scientist
Similar articles:
Application from plasticine “On the lawn” in elementary school
Plasticineography for children from 4 years old
A picture made of plasticine. Master class with step-by-step photos
Plasticineography as a means of developing the creative abilities of children with disabilities
Crafts for preschoolers for March 8th. Tulip for mom
We present to your attention a lesson from the series
"Plasticine World"
“Fly agaric” (class for children 4-5 years old)
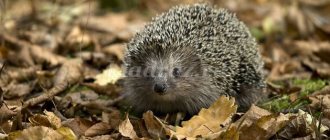
This incredibly beautiful forest inhabitant is known to everyone for its red hat with white specks. Fly agarics appeared approximately 20-30 million years ago in northeast Asia. Now they are found in all forests of the Northern Hemisphere. These mushrooms grow individually and in whole families from June to mid-autumn. Fly agaric is considered poisonous, but in fact it can be useful, it has been used in folk medicine since very ancient times, and currently some medicines are made from it and used for massage. And it is called that because when insects, including flies, drink water that has accumulated after rain in the middle of the cap of this mushroom, they fall asleep from the fly agaric substances dissolved in it, fall into the water and die. Many animals in nature eat fly agarics, for example, bears, squirrels, and moose. But they never eat more than they need, so they are not poisoned by them. Scientists have not fully studied this feature; they suggest that it helps animals get rid of harmful bacteria and parasites. Fly agarics are amazingly beautiful representatives of the mushroom kingdom. Admire this beautiful creation of nature, it is worth decorating the world.
Stages of making crafts from plasticine
1. For a base in the form of earth and grass, which will be placed on 10x10cm green cardboard, you need to cut two small pieces of green and brown (black) plasticine in stacks.
2. Connect these pieces and twist them a little, then roll them into a thick column and flatten it first with your palm on a modeling board, then make it thinner with your fingers.
3. Glue a piece of “ground with grass” to the cardboard square.
4. Cut half from a whole block of white plasticine, and divide the other half in half.
5. From half of the white plasticine, warmed in your palm, roll into a column, make it thinner on one side with your fingers - the leg of a fly agaric. Cut a small piece of white plasticine, roll it into a long thin column, flatten it with your fingers into a ribbon, which you glue in the middle of the mushroom stem with the upper side.
6. Move the lower side of the ribbon to the side - this is the “skirt” of the mushroom.
7. Warm half a block of red or orange plasticine in your palm and roll it into a ball, you can use it on a modeling board. Then flatten it on the board with your palm, lift it from the board, place the middle on your thumb, flatten it with the fingers of your other hand and pull the edges down. This will create a mushroom cap.
8. Roll a ball from the third piece of white plasticine, first warm it a little in your palm, flatten it on a modeling board and make it thinner with your fingers. Place the resulting circle inside the red cap, trim it and scratch lines in a stack from the middle to the edges. The fly agaric has white partitions under its cap.
9. Attach the leg with the skirt to the white side of the hat. The fly agaric is ready.
10. From small pieces of green plasticine, roll into thin columns - flagella of different lengths. Holding the mushroom with the stem up, attach flagella - blades of grass in a circle.
11. Attach the fly agaric with blades of grass to the base on the cardboard. Attach small balls of white plasticine to the hat. Roll a thick column from the remaining white plasticine, a ball from red plasticine, press it with your finger, make a hole, attach a white leg, make blades of grass and attach a small fly agaric to the base on the cardboard.
12. Roll a small piece of yellow plasticine into a ball and flatten it. On a modeling board, first draw in stacks and then cut out an elongated shape.
13. Glue a short thin flagellum from the same plasticine on one side and draw veins in a stack - this is an autumn leaf.
14. Bend the yellow leaf a little and carefully attach it to the cap of a large fly agaric.